Veg Puff in Airfryer
Tuesday, June 29, 2021
Ingredients:
- 4 - Kawan Flaky Parathas
- 2 cup - Aloo Bhaji (or any leftover dry curry for stuffing)
- 2 tbsp - melted butter
Method:
- Slightly warm the Aloo bhaji. Not too hot, maybe 30 secs in microwave oven.
- Remove Frozen Kawan parathas from freezer. Remove the parathas from the packet, separate them from the plastic sheets and spread bit of flour over them and let thaw for few minutes - just soft enough to handle them.
- Cut the parathas into half, place some stuffing as shown in the picture below
- Apply bit of water of water to the edges of the pastry, fold over and seal the pastry.
- Meanwhile preheat the Airfryer for 2 - 3 minutes.
- Apply melted butter over the stuffed pastry. You may make small indents on the top of the pastry with plastic knife.
- Place the prepared pastry in the airfryer basket or racks. Back for 7 minutes at 395 o F [200 o C].
- After 7 minutes, turn the pastry over. May apply one more coat of melted butter. Cook for 5 more minutes or until done.
- Remove and serve hot Veg puffs as is or with mint chutney. Enjoy!

Labels: Air Fryer, Appetizers, Baking, breakfast, Lunch-box, Potato, Snack, Vegetarian
Aloo Bhaji | Aloo Pyaaz Ki Sukhi Sabzi | Sabji
Aloo (Potato) Bhaji or Subji is one of the most common side dish prepared at most of the Indian home and Indian restaurants. Aloo bhaji goes well with Poori, Chapati, Roti, Rice, Dosa and also stuffing in rolls, puffs or over bread as a spread - very versatile. The main two ingredients are Potato and Onion, which can be stocked up at home without it going bad. I have never seen a child making a fuss to eat Aloo bhaji, so mom's always comes up with ideas to sneak in other veggies into it. Everyone has there own version of this recipe with slight variations here and there. In south Indian version, lentils are used in seasoning. Some people add tomatoes as well. In the end, quick and easy to make and it tastes good.
Ingredients:
- 2 cup - potatoes (boiled, skin removed and cut into cubes)
- 1 cup - sliced onion
- 2 - green chili, chopped
- 1 tsp - mustard seeds
- 1 tsp - cumin seeds
- ½ tsp - turmeric powder
- 1 pinch - asafoetida (hing)
- ½ cup - coriander|cilantro leaves, chopped
- 1" - ginger, grated
- 12-15 curry leaves
- 2 tbsp - oil
- salt as required
- Optional: other vegetables like green peas or grated carrot.
- Optional: Black gram|Urad dal and/or Split chickpeas|Chana dal
Preparation:
- Boiled Potatoes - I usually boil them in pressure cooker with bit of salt. Also, I cook potatoes in Microwave oven if need it quick and less quantity. [ Just apply bit of oil over couple of medium size potatoes, place them on a MWO safe plate, cover it with a MWO safe clear Tupperware or glass blow. Microwave for 5 minutes. Check if it is cooked, if not, turn the potatoes over and cook for 2- 3 minutes more. ] Peel the skin and cut the potatoes.
- If using the lentils in seasoning, soak it for 10 minutes, drain and use it in seasoning . This is a optional step, By soaking the lentils will be on the softer side. Especially helpful if you have child with baby-tooth or elderly people in the house.
Method:
- In a pan|kadai|wok, heat oil. Add cumin, mustard and soaked lentils.
- Once mustard starts to sputter, add asafoetida, curry leaves (if using), cut green chilies and grated ginger.
- Roast for a minute and then add the chopped onion. Fry till they become soft & transparent.
- Add the turmeric and stir.
- Now, add the chopped potatoes. salt, ½ of coriander leaves and ¾ cup water.
- Stir and cover the pan, simmer for 5-6 minutes on a low flame.
- Your Aloo is bhaji is ready
- Garnish with remaining coriander leaves and serve the Aloo bhaji hot with pooris, chapatis or dosa.
Labels: Potato, Side-Dish
~ Aloo Bhaji | Aloo Pyaaz Ki Sukhi Sabzi | Sabji
~
Posted by Swetha @ 6/29/2021 10:17:00 AM ::
 Swetha's Fusion
 ::
permalink
Masala Peanuts | Kara Kadalekai ( In Airfryer )
Saturday, June 26, 2021

When I was young, my mom used prepare this for evening snack. She used to deep fry in oil. She used to use chili powder prepared at home with Byadagi red chillies. Which gave dark red hue to the Masala Peanuts. You may use Kashmiri red chili powder for more bright red color. Here I used regular chili powder. Optionally, one may add Garam Masala or other Masala of choice to bring out different flavors. I use bit of semolina and rice flour to add extra crispiness, this is optional and one may skip it . Also check out Spicy Roasted Peanuts
Ingredients:
- 1 cup - raw peanuts | groundnuts
- ½ cup - chickpeas flour | besan
- 1 tbsp - semolina | suji rava
- ½ tbsp - rice flour
- ½ tsp - turmeric powder
- 1 tsp - red chili | cayenne powder (or as per taste)
- ¼ tsp - chat masala powder
- ½ tsp - gram masala powder (optional)
- ¼ tsp - asafoetida
- 1 tsp - oil
- salt or as per taste
- water as needed

Method:- in AirFryer
- Wash peanuts and drain. transfer it to a mixing bowl
- Add all the dry ingredients, and oil to the mixing.
- Now slowly add water little be little and mix it all together. It should be hard paste coated over the peanuts.
- Break big lumps and spread. Keep it aside for about 10 minutes.
- Meanwhile, preheat the Airfryer for 2 minutes on high. Brush the airfryer basket with oil and keep it ready. (optional: You may layer the basket with a parchment paper)
- Now, pour the flavored peanuts in to the airfryer basket. Spray oil over the peanuts and airfry 395 o F [200 o C] for 7 minutes.
- After 7 minutes, stir the peanuts around gently. Spray oil one more time and airfry for 7 minutes more or until roasted and crispy. Do not let it burn. [ Note: each airfry model is different, you may have to adjust the temperature and time accordingly]
- Immediately remove the peanuts and spread on a wide plate to cool down. As it is hot, the peanut mixture continues to cook. WARNING: It will be hot, be careful not burn your hand.
For deep frying in oil: follow the steps until Step 4. Deep fry in hot oil (medium flame). Once cooked remove on paper towel to drain excess oil.
Let it cool down completely (say about 2 hours) before transferring masala peanuts to container. Will last for about a week with out going bad. Good snack to take on week-long trips.
Enjoy this traditional masala peanuts!

Labels: Air Fryer, Snack, South-Indian Dish
~ Masala Peanuts | Kara Kadalekai ( In Airfryer )
~
Posted by Swetha @ 6/26/2021 09:03:00 PM ::
Swetha's Fusion ::
permalink
Spicy Roasted Peanuts (in Airfryer)

Spicy Roasted Peanuts are favorite snack during rainy days. We used to have enjoy them with evening tea. Also, we used to enjoy this spicy - roasted peanuts (or similar ones) during visits to parks and beaches. The vendor/baniya would serve them in a VERY long paper cone giving an illusion that there are a lots of peanuts, but the fact is it would contain just bit more than one tablespoon of peanuts. But did not matter, it was fun to pour out one peanut at a time and savor it. Also, check out Masala Peanuts
Ingredients:
- 1 cup - raw peanuts
- 1 tsp - red chilli/cayenne powder (or as per taste)
- ¼ tsp - cumin powder
- 1 tsp - oil
- ½ tsp - chat powder or curry powder (optional)
- ½ tsp - salt or as per taste
- pinch of sugar powder
- pinch of asafoetida
- water as needed
Method 1:- in AirFryer
- In a bowl, add raw peanuts and water. After 2 minutes of soaking, wash and drain. This helps other ingredients stick to the peanuts.
- Now, add all the dry ingredients and toss the peanuts to mix everything.
- Add 1/2 tsp of oil and sprinkle bit of water over the mixture and toss again. Keep it aside for about 10 minutes.
- Meanwhile, preheat the Airfryer for 2 minutes on high. Brush the airfryer basket with oil and keep it ready. (optional: You may layer the basket with a parchment paper)
- Now, pour the flavored peanuts and airfry 395 o F [200 o C] for 7 minutes.
- After 7 minutes, stir the peanuts around gently and airfry for 3 minutes more or until roasted and crispy. [ Note: each airfry model is different, you may have to adjust the temperature and time accordingly]
- Remove the peanuts and spread on a wide plate to cool down. If left in airfryer, it may burn and turn into dark color.
Method 2:- stove-top in kadai(wok)
- In a bowl, add raw peanuts and water. After 2 minutes of soaking, wash and drain. This helps other ingredients stick to the peanuts.
- Now, add all the dry ingredients and toss the peanuts.
- Add 1/2 tsp of oil and sprinkle bit of water over the mixture and toss again. Keep it aside for about 10 minutes.
- Place a wok on medium flame. Add rest of the 1/2 tsp oil.
- Once oil is hot, add the flavored peanuts and roast, stirring continuously until roasted and crispy.
- Remove the peanuts and spread on a wide plate to cool down.
Enjoy the snack with your friends and family.
Labels: Air Fryer, Snack
Chicken 65 in Airfryer
Wednesday, June 23, 2021

Chicken 65 a popular non-vegetarian appetizer from south-India and now it has gained popularity around the world. Many of the restaurant now offer this dish on their menu. Vegetarian version of same dish can be prepared using Paneer (Indian cottage cheese) and Cauliflower - known as Paneer 65 and Gobi 65 respectively. The dish may be prepared on a grill, oven or tandoori oven, deep-fried, Pan cooked or Airfried. I used to follow my mom's recipe for stove-top/pan-cooked version until I purchased a Airfryer. I searched online and found Ranveer Brar's Chicken 65 in Philips Airfryer YouTube video, I tried the recipe and it turned out pretty good. He also has a deep fried [Chicken 65] version, which is different from my mom's recipes which does not require deep frying - Click [here] to check out my mom's recipe cooked with pressure-cooker and then roasted.
INGREDIENTS:
- 2 lb - Chicken
- 1 cup - onion - cut into big square pieces
- Oil - to spray while cooking.
Marinade:
- 1 cup - Thick curds or Greek yogurt
- 2 tsp - Red chili powder (or as per taste)
- 1 tsp - Black pepper powder
- 1 tbsp - Ginger Garlic (G Chili) Paste
- 1/2 tsp - Freshly roasted fennel seeds course powder
- 2 tsp - Coriander powder
- 1 - Egg
- 1 tbsp - Corn flour
- 1/2 tsp - Turmeric powder
- 1 tbsp - Lemon juice
- 2 Cloves + 2 Green cardamom + 1 Black cardamom powder (optional)
- 1/2 tsp - Kasturi Methi (optional)
- 1 tsp - Oil
- Salt
For Seasoning:
- 2 tsp - Ghee or oil
- 4 - Green chili - slit lengthwise
- 10 - curry leaves
- 10 - Cashew (optional)
For Garnishing:
- Fresh Coriander leaves
- Lemon wedges
- Onion - 1 small - cut into thin long pieces
METHOD:
- Clean and cut chicken into 1 to 2 inch pieces. Squeeze out the extra water.
- Sprinkle salt, turmeric powder & lemon juice over the chicken. Mix all together.
- Now add all other listed powders + ginger/garlic paste + egg + corn flour + curds + oil ( basically, rest of marinade ingredients)
- Mix it all, cover and keep it aside to marinate for at-least 10 - 30 minutes (or overnight in refrigerator)
- If you have skewers, thread the big onion pieces in between marinated chicken pieces. This will not only help infuse the flavor, it will also help prevent chicken pieces from sticking to each other. I have a air-fryer skewer-stand which is vertical. I add double layer of wide slices of onion at the end, which will end up as a bottom layer - to prevent the masala from flowing down and also to prevent chicken from sliding down and getting stuck to the stand.
- After preheating the air-fryer for about 4 minutes at 395 F [200 C], place the skewer stand in the air-fryer, cook for 15 minutes in air-fryer/crisp mode.
- After 13 minutes, rotate the skewers around (or flip over if it is horizontal skewer stand, or you have just laid the pieces on the air-fryer basket. Optional: at this point, you may coat the chicken pieces with additional left over ground masala and/or spread bit of oil or melted butter over the chicken pieces.
- Cook for additional 7 to 8 minutes or until done.
- Plate Chicken 65 as is with the skewers or remove it and spread it on a plate.
- In another seasoning pan, heat ghee, roast curry leaves, cashew-nuts and lengthwise slit green chilies. Pour the whole seasoning over prepared Chicken 65.
- Garnish with coriander leaves, cut onion and lemon wedges.
- Serve and enjoy!

Labels: Air Fryer, Appetizers, Baking, Chicken, Side-Dish, South-Indian Dish
Chicken 65 - Stove-top/Pan Roasted
I got this Chicken 65 recipe from my mom. This is recipe calls for using Pressure-cooker first, then Pan roast the chicken. Since the chicken is already partially cooked in pressure-cooker, this method not only saves time also require less oil. One thing to watch out is not to over cook in pressure-cook, one pressure realize is sufficient for farm grown chicken as they tend to very tender. There are other methods of preparing Chicken 65 as well -Airfried,
deep fried, oven c etc. This recipe is more on moist side and works best as a side-dish.
Ingredients:
- 2 lb - Chicken (breast pieces is better)
- 1 tsp - Turmeric/haldi powder
- 1 cup - curds
- 2 big - Onion cut
- Salt - as per taste
- Oil
Masala:
- 6 to 7 - Red Chilies (according to the taste)
- 1 tsp - Funnel seeds
- 1 tsp - Cumin seeds
- ½ tsp - Fenugreek | Methi seeds
- 2 tbsp - Coriander seeds
- 1 tsp - Black Pepper
- 2 inch - Cinnamon piece
- 3 - Cloves
- 1 tbsp - Garlic paste
- 1 tbsp - Ginger paste
- 1 tbsp - Tamarind pulp
- Red food color - Optional
For Seasoning:
- 1 tbsp - Ghee or oil
- 3 stems - Curry leaves
- 5 - Green chilies
- 4 - garlic cloves
- 10 - cashew-nuts (optional)
For Garnishing:
- Fresh Coriander leaves
- Lemon wedges
- Onion - 1 small - cut into thin long pieces
- Clean and cut chicken into 1 to 2 inch pieces. Squeeze out the extra water.
- Sprinkle salt and turmeric powder over the chicken.(optional: rub in some lemon juice or vinegar - help tenderize the chicken ). Mix it all and keep it aside to marinate for at-least 10 - 30 minutes
- Make masala ready:Roast all the masala dry ingredients with bit of ghee/oil on a tawa/griddle.
- Grind all the masala ingredients in a blender(mixie) to a fine paste along with ginger/garlic paste and tamarind pulp.
- Place pressure cooker on medium heat, add oil or ghee. Once it is hot, add onion and cook until translucent.
- Add ground masala, roast for 2 minutes.
- Add marinated chicken and stir with masala.
- Add curd and pressure-cook Chicken pieces with masala and curds - for one whistle. If possible, try to release pressure after a minute or two. If left, the chicken will get too tender and fall apart when trying to roast it.
- Once pressure is released, transfer the chicken and masala on to a thick bottom tawa/griddle (preferably non-stick). Since I use pressure-pan, I continue cooking in the same pan and roast the chicken.
- Let it cook on medium high (covered if needed) until liquid is observed.
- Add a spoon of ghee or oil and shallow fry/roast the chicken in the same tawa by gently turning the chicken pieces around. Note: Do not disturb the chicken too much, the pieces will break apart.
- Once done, turn off the heat and let it sit for 5 to 10 minutes before transferring to serving tray.
- In another seasoning pan, heat oil or ghee. Roast curry leaves, sliced garlic and lengthwise slit green chilies. pour over prepared Chicken 65.
- Garnish with coriander leaves, cut onion and lemon wedges.
Enjoy!!
Labels: Chicken, Side-Dish, South-Indian Dish
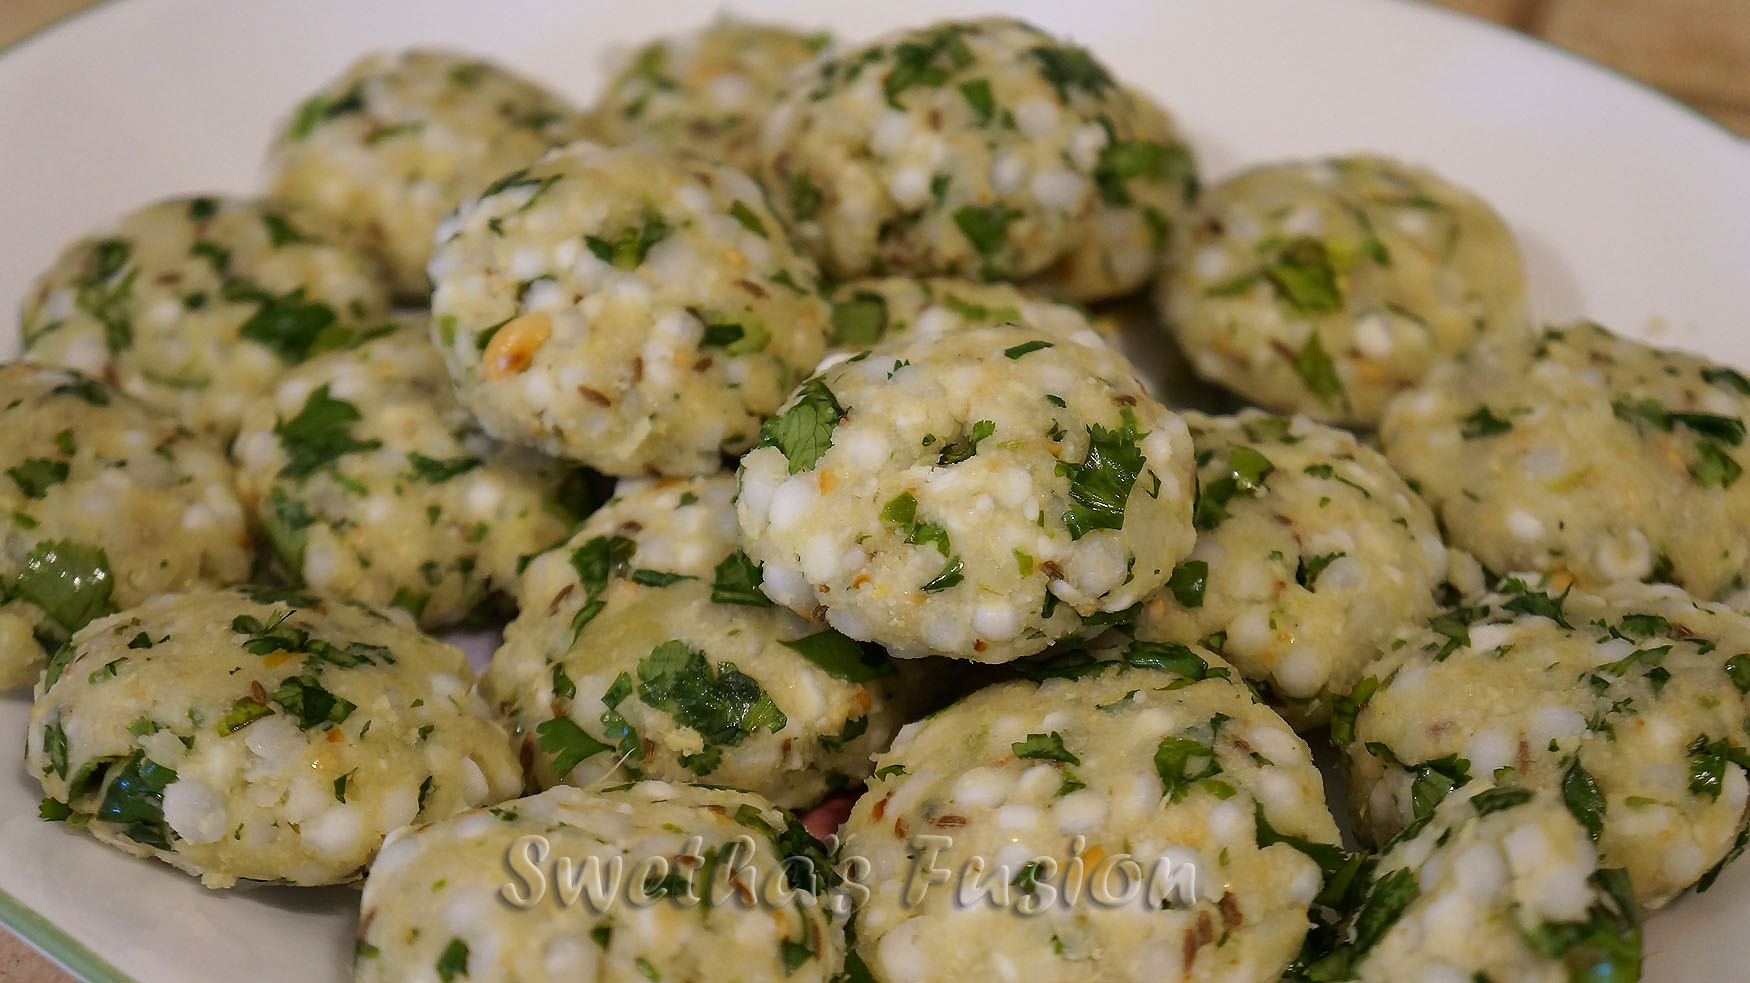
Sabudana Vada in Airfryer [Tapioca pearls fritters]
Tuesday, June 22, 2021
Here is the Air-fried version of the
Sabudana Vada, which is traditionally deep-fried fritters. I found no difference in taste between Air-fried and deep-fried. In fact, I felt air-fried vada taste better or may be because it has very little oil. All of sudden fritters became healthy snack ;)
Check out other
Sabudana/Sago/Tapioca Pearls recipes.
Ingredients:
- 1 cup - Sabakki/Sago/Tapioca Pearls
- 1 big - Boiled Potato
- 1 tsp - Jeera/Cumin seeds
- 1/3 cup - Dry roasted Peanuts powder (coarsely powdered)
- 1 tsp - Ginger paste
- 2 tsp - Green Chilli minced paste
- 1 tsp - Lemon juice
- 1/4 tsp - Sugar
- 1/2 cup - Coriander leaves - finely chopped
- 1/4 cup - dill leaves (optional) - finely chopped
- 1 tsp - oil
- Salt - as per taste
Method:
- Rinse sago well with water and soak sago overnight or for at least 5 hrs with enough water just to immerse it well. Drain the Sago in a strainer and set aside sago in the strainer on a stand or a bowl to let rest of the water drain.
- Dry roast peanuts till the skin splutters.
- Discard the skin and grind the peanuts to a coarse powder. (I make extra and save the powder in a air-tight jar for next time or for Sabbakki uppittu/Sago Khichdi)
- In a blender I combine ginger and chili to make paste, rather preparing it separately.
- In a mixing bowl - add sago, peanut powder, mashed potato, jeera, ginger/green chili paste, lime juice, sugar, coriander leaves (or dill leaves,) oil and salt as per taste.
- Mix all together, it should form into a ball easily when pressed into one, If needed sprinkle little water if it is dry or add little rice flour if the mixture is watery.
- Apply oil on your palm so that the mixture wont stick to your hands. Press the mixture into lemon sized ball and press slightly flat in between center of your palms to shape into vada. Keep aside on a plate. Work with rest of the mixture to make all the vada ready.
- Place the shaped vada in the air-fryer basket. you may line it with parchment paper if you wish. I use a 2-tier wire rack. I brush the rack with oil and place the vada on them. Using 2-tier rack allows me to make about 18 vada at a time. Which helps save time and electricity.
- Brush or spray the vada(s) with oil. place the rake (or basket) in the air-fryer.
- Air-fry for 13 minutes on 395F (200C).
- After about 13 minutes, brush/spray oil on the top, now flip the vada over and brush/spray oil on the other side of the vada. Since I use 2-tier rack, I even switch the vada between top and bottom rack for even cooking and roasting. Airfry for 8 - 10 minutes more, or until done.
- Serve hot with green chutney or tomato sauce.
Enjoy these healthy, guilt-free Sabudana vada with your family and friends.

Labels: Air Fryer, Appetizers, Fritters, Healthy dish, Sago, Side-Dish, Snack, Vegetarian
~ Sabudana Vada in Airfryer [Tapioca pearls fritters]
~
Posted by Swetha @ 6/22/2021 06:40:00 PM ::
Swetha's Fusion ::
permalink
Hariyali Chicken Tikka in Airfryer
Friday, June 11, 2021
First, I tried
Hariyali (Green masala) Paneer Tikka, which turned out so yummy. While I plated one serving and was taking
pictures for the blog, my family had finished more than half of the paneer
tikka behind me right out of the air-fryer. Did not even wait for me to serve.
Claimed they were testing it to see if it was ok, LoL! It was such a big
hit in our house, I wanted to try with chicken. Again, no surprise here. for
some reason everybody in the house seem to be hanging around the kitchen while I prepared it. I
wonder why? Used the same masala as I had prepared a big batch of it and froze
it for couple days before using it for Hariyali Chicken Tikka.
The steps are same for both the paneer and chicken tikka, just posting the steps anyway. Scroll down to the end of this post
for more cooking options other than air-fryer.
Ingredients:
-
2 cups - Chicken - cut into cubes [ big slices or pieces with bones may be
used if cooked over pan or in oven]
- 1 cup - Onion pieces - cut into big pieces
-
1 cup - Bell pepper - cut into big sq pieces - may use different color
bell pepper to make it look vibrant
- 1/2 tsp - turmeric pdr
- 2 tsp - lime juice
For Masala:
- 10 Mint leaves
- 5 stem Coriander leaves
- 10 Green chilies
- 3 - garlic cloves
- 1"- ginger piece
- 1/2 tsp - fennel seeds
- 1/2 tsp cumin seeds
- 1/2 tsp - amchur pdr
- 1/2 tsp - dhania pdr
- 1/4 tsp - Turmeric pdr / Haldi
- 1/4 tsp - Garam Masala powder
- 1/4 tsp - chat masala powder (optional)
- 1 tsp - curds
- salt as per taste.
Method:
- Clean and cut (skinless boneless) chicken into cubes.
- Place the chicken pieces in a mixing bowl, mix-in lemon juice and turmeric powder. Keep aside for about 5 minutes.
- Meanwhile, take all the masala ingredient in a blender and grind them together into thick paste.
- Now add the ground masala to the chicken pieces and mix it all. Cover and keep it aside to
let it marinate for at least an hour. You may even marinate it over night by keeping it refrigerator.
-
Optional: I marinate the onion and bell pepper pieces with bit of ground
masala as well ...just 10-15 minutes before cooking..
- If you have skewers, put the onion, bell pepper and the marinated
chicken pieces. Thread bell-pepper and onion in between the chicken cubes. This
will not only help infuse the flavor, it will also help prevent chicken pieces from sticking to each other. I have a air-fryer skewer-stand which
is vertical. I add double layer of wide slices of onion at the end, which
will end up as a bottom layer - to prevent the masala from flowing down
and also to prevent chicken from sliding down and getting stuck to the stand. .
-
After preheating the air-fryer for about 4 minutes at 375F [190 C], place the skewer
stand in the air-fryer, cook for 15 minutes in air-fryer/crisp mode.
-
After 13 minutes, rotate the skewers around (or flip over if it is
horizontal skewer stand, or you have just laid the pieces on the
air-fryer basket. Optional: at this point, you may coat the chicken pieces with additional left over ground masala
and/or spread bit of oil or melted butter over the chicken pieces.
- Cook for additional 7 to 8 minutes or until done.
-
Garnish with chopped fresh coriander leaves and lemon wedge on the
side.
- Serve hot with rice, or as an appetizer or inside a wrap.
-
Optional, sprinkle bit of chat masala powder before serving and/or serve
with mint chutney on the side.
Other Cooking Options:
-
GRILL: Tikka taste the best when cooked on a grill, barbecue pit. Recipe
is same but rather than cooking/roasting in air-fryer, it is done on a
barbecue/tandoori grill
-
PAN COOKED: Tikka can be simply cooked on regular pan. Cast-iron or
non-stick pan would work better. First cover and cook on medium flame
until the masala is absorbed and cooked. Then increase the flame to high
and roast it. This method of cooking will require more oil or butter to cook.
Flip and turn the pieces over often while cooking to prevent it from sticking to
the pan or getting burnt on one side.
-
BAKE: Other option is to bake. just spread the marinated chicken on a baking tray (in the tray, need space on the side for later), and cook for 10-15 minutes in a preheated
oven at 350 F. Now turn the chicken pieces over for cooking evenly on the other side too. Now spread the cut onion and bell-pepper on the sides of the baking tray. Spray oil or spread melted butter on the chicken pieces and bake for 10 more minutes ... or until cooked. NOTE: Each oven is different, time needed to cook may differ.
-
WOODEN SKEWERS: Note, while grilling/baking if you plan to use wooden
skewers, To prevent it from catching fire, soak the wooden skewers in
water -for at least an hour or overnight. Wipe clean the wooden
skewers before threading the chicken, onion and bell-pepper pieces.

Labels: Air Fryer, Appetizers, Chicken, Side-Dish
Hariyali Paneer Tikka in Airfryer
Thursday, June 10, 2021
Few months ago, we purchased a Airfryer and I have been having so much fun
trying out all the recipes in it. I purchased a Ninja Foodi 8qt - 9 in 1 unit.
I should admit, I Love It!! So far I have used options - air fry/crisp,
bake, steam-cook and pressure-cook. My favorite part is to use the Airfry
option. ... and I defiantly recommend purchasing an Airfryer for
everyone. With so little oil needed, but results are better than the regular (deep fry in oil) cooking method. No surprise here, I will be updating the blog with more of my Air-fried
version of recipes.
This is a vegetarian recipe with Hariayli (Green) masala, you may also try out the Hariyali Chicken Tikka
Ingredients:
- 2 cups - Paneer - cut into cubes.
- 1 cup - Onion pieces - cut into big pieces
-
1 cup - Bell pepper - cut into big sq pieces - may use different color
bell pepper to make it look vibrant
- 2 tbsp - curds
- 1 cup - water
- 1/2 tsp - salt
For Masala:
- 10 Mint leaves
- 5 stem Coriander leaves
- 10 Green chilies
- 3 - garlic cloves
- 1"- ginger piece
- 1/2 tsp - fennel seeds
- 1/2 tsp cumin seeds
- 1/2 tsp - amchur pdr
- 1/2 tsp - dhania pdr
- 1/4 tsp - Turmeric pdr / Haldi
- 1/4 tsp - Garam Masala powder
- 1/4 tsp - chat masala powder (optional)
- 1 tsp - curds
- salt as per taste.
Method:
-
Mix in 2 tbsp of curds, 1/2 tsp salt with one cup of water. If
available, may use butter milk instead. May also add bit of green
chili-paste if you prefer it spicy.
-
Soak the paneer cubes in the diluted curds solution for about 30
minutes. This process helps softens the paneer and won't end up too dry
or rubbery.
-
Take all the masala ingredient in a blender and grind them together into thick paste.
- Remove the soaked paneer and drain all the liquid out.
-
Now add the ground masala paste to the paneer. Cover and keep it aside
to let it marinate for at least 20 - 30 minutes.
-
Optional: I marinate the onion and bell pepper pieces with bit of ground
masala as well.
-
If you have skewers, put the onion, bell pepper and the
marinated paneer. Thread bell-pepper and onion in between the paneer cubes.
This will not only help infuse the flavor, it will also help prevent
paneer pieces from sticking to each other. I have a air-fryer skewer-stand which is vertical. I add double layer of wide slices of onion at
the end, which will end up as a bottom layer - to prevent the masala
from flowing down and also to prevent paneer from sliding down. Notice the picture below, the bell-pepper and onion are placed to form a cup to hold the masala in.
..... see end of this post for more cooking options .
-
After preheating the air-fryer for about 4 minutes on 375 degree F (190 C), place the skewer stand in
the air-fryer, cook for 13 minutes in air-fryer/crisp mode.
-
After 13 minutes, rotate the skewers around (or flip over if it is
horizontal skewer stand, or you have just placed the paneer pieces on the
airfryer basket. Optional: May coat the paneer with additional left over ground masala and/or spread bit of oil or melted butter over the paneer pieces
- Cook for additional 7 to 8 minutes or until done.
-
Garnish with chopped fresh coriander leaves and lemon wedge on the side.
- Serve hot with rice, or as an appetizer or inside a wrap.
-
Optional, sprinkle bit of chat masala powder before serving and/or serve
with mint chutney on the side.
Other Cooking Options:
- GRILL: Tikka taste the best when cooked on a grill, barbecue pit. Recipe is same but rather than cooking/roasting in air-fryer, it is done on a barbecue/tandoori grill
- PAN COOKED: Tikka can be simply cooked on regular pan. Cast-iron or non-stick pan would work better. First cover paneer and cook on medium flame until the masala is absorbed and cooked. Then increase the flame to high and roast it. This method of cooking will require more oil or butter to cook. Flip and turn the pieces over while cooking to prevent it from sticking to the pan or getting burnt on one side.
- BAKE: Other option is to bake. just spread the marinated paneer, onion and bell-pepper on a baking tray, and cook for 10-15 minutes in a preheated oven at 350 F. Flip the paneer pieces over and cook of 10 minutes more. NOTE: Each oven is different, time needed to cook may differ.
- WOODEN SKEWERS: Note, while grilling/baking if you plan to use wooden skewers, To prevent it from catching fire, soak the wooden skewers in water -for at least an hour or overnight. Wipe clean the wooden skewers before adding the paneer, onion and bell-pepper.
Labels: Air Fryer, Appetizers, Paneer, Side-Dish, Vegetarian
Aloo | Potato Finger Chips in Airfryer
Monday, June 07, 2021
During Christmas we purchased a Airfryer. Had been keeping eye out and doing my research on which Airfryer to purchase. Finally, decided on Ninja Foodi 8qt, which is also 9 in 1 unit.Ordered online on Amazon during the sale. The first thing we tried out when it arrived is Potato Finger chips. basically French fries. It was ready in 30 minutes from Prep -> cooking -> cleanup (& eating ). This is a very simple dish, I would quickly prepare as a side-dish {click here) or snack. I used partially cook the cut potatoes in MWO, then pan roast rest of the way. This is the steps I follow to make potato finger chips in Airfryer.
Ingredients:
- 2 - big potatoes
- 1 tsp - turmeric powder
- ½ tsp - red chili powder |or| as per taste
- 1 tbs - bagel seasoning or any other flavoring mix (optional)
- 1 tbs - oil
- salt - as per taste
Method:
- Wash potatoes. Peel the skin and place the potatoes in a bowl with regular cold water.
- Cut potatoes into long strips or french fries shaped pieces. Drop the cut pieces into the same bowl of water.
- Once all the potatoes are cut, rinse the cut potatoes.
- Drain all the water out.
- Add salt, turmeric powder, chili powder, flavoring mix over the cut potatoes, mix or toss around to coat the pieces.
- Layer the Airfryer basket with parchment paper. This step is optional.
- Pour the potato mixture into the Airfryer basket.
- Set Airfryer to 390F, and Airfry for 20 minutes. - which is default on my Airfryer
- Say about after 10 minutes of cooking open and stir the potatoes around so it may cook and roast evenly.
- Once done, transfer the finger chips on a serving plate and serve along with ketchup or hot sauce
Labels: Air Fryer, Appetizers, Fritters, Potato, Side-Dish, Snack, Vegetarian