Heerekai Bajji | Ridge Gourd Fritters | Heerekai Pakoda
Sunday, July 26, 2020
Few days ago I posted Palak Pathrode recipe. Well, as I had mentioned on the post "save some of the masala for bajji", time has come to use that pathrode masala now. I froze the masala in a tapper-ware. Note: do not use microwave oven to thaw the masala. Simply, take it out of the freezer at least 2 hours ahead and also place the dish in warm water to help thaw faster. To recap, I am listing the ingredients and steps to make masala in this post too.
If you enjoyed the Palak pathrode, you will enjoy the unique taste this ridge gourd fritters has to offer. Try it and see.
Ingredients:
- 1 cup - cut ridge gourd
- 1 cup - Rice
- 2 tbsp - Dhania | Coriander seeds
- 1 tbsp - Jeera | Cumin seeds
- 1 tsp - Methi | Fenugreek seeds
- ½ tsp - Mustard seeds
- 2 tsp - Urad dal | Black gram
- 2 tsp - Channa dal | Split chickpeas
- ½ cup - fresh grated coconut. (optional)
- 10 - Red chilies
- 1 tbsp - Tamarind paste
- 1 tsp - Jaggery
- 1 tsp - turmeric pdr
- Salt - as per taste.
- Oil - for shallow frying.
Preparing the Masala:
- Soak rice overnight or for at least three hours.
- In a pan, dry roast coriander seeds, cumin seeds, fenugreek seeds, mustard seeds. urad dal, channa dal and red chilies. Transfer it to a blender/food processes
- Optional step: In the same pan, dry roast grated coconut. Add it to the blender along with other roasted ingredients.
- To the blender, add tamarind paste, jaggery, turmeric pdr and salt. Add 2 tbsp of water and grind. If needed, add more water. Grind it into a smooth paste.
- Drain soaked rice, Add it to the blender and grind it into slightly course paste.
- Keep the ground masala aside.
Preparing the ridge gourd bajji/fritters:
- Wash ridge gourd. Using a peeler, peel the hard ridges off. Cut and discard the ends of the gourd. Cut the gourd into one cm thick round chips. Keep aside.
- In a mixing bowl add 2 tablespoon of masala. And add little water to make dough into smooth paste. If needed, add a bit of rice floor and mix to get right consistence.
- Meanwhile, put the oil on medium flame for deep frying.
- Once the oil is hot enough (a small portion of the dough dropped into the hot oil should gradually bubble and float to the top), dip the cut ridge gourd chips into the dough and gently slide it into the oil. You may fry few of them together depending on the size of the fry pan.
- After 2 minutes, with the help of a skimmer ladle, turn the fritters over to cook on both side. Fry until fritters are golden brown in color. Remove from the oil and place them on paper towel to absorb excess oil.
- Serve hot with rice and dal or rasam.
Labels: Bonda/Pakoda, Fritters, Side-Dish, South-Indian Dish, Vegetarian
~ Heerekai Bajji | Ridge Gourd Fritters | Heerekai Pakoda
~
Posted by Swetha @ 7/26/2020 11:07:00 PM ::
 Swetha's Fusion
 ::
permalink
Aloo Tarkari | Potato Stir fry | Simple Potato dry curry to go with Roti/Chapati | Bengali Style
Aloo Tarkari is a simple Bengali style potato stir fry curry my mom-in-law used to whip-up fast as one of the side-dish or to go with roti/chapati. Potatoes are cut into cubes, or cut into long pieces (like french fries). Everyone in our house loves it and I usually make a bit more than what is needed as everyone will eat it as a snack around dinner table. For lunch-box, place the prepared aloo tarkari in the middle of the roti/chapati or puree and role it into a tube/role. Wrap a aluminium foil to keep it warm. Also it makes it easy for your child to unwrap the foil and eat it without touching the food.
NOTE: To avoid using too much oil, I partially pre-cook cut potatoes in microwave oven for 5 to 6 minutes on high. Traditionally, it is cooked with lots of oil until potatoes pieces are tender inside and crispy outside.
Ingredients:
- 3 - big potatoes
- 1 tsp - panch phoron (A bengali seasoning mix consisting of 5 types of seeds - fenugreek seed, nigella seed, cumin seed, black mustard seed and fennel seed in equal parts. Readily available in store or you may prepare the mix at home)
- 1 tsp - turmeric powder
- ½ tsp - red chili powder |or| 2 - red chilies
- 2 tbsp - oil
- pinch of asafoetida
- 5 - curry leaves (optional)
- salt - as per taste
- 1 tbsp - finely chopped coriander leaves for garnish (optional)
Method:
- Wash potatoes. Peel the skin and place the potatoes in a bowl with regular cold water.
- Cut potatoes into cubes or french fries shaped pieces. Drop the cut pieces into the same bowl of water.
- Once all the potatoes are cut, rinse the cut potatoes.
- Drain all the water and transfer them into a MWO-safe dish/bowl.
- Add ½ tsp of salt to the potatoes and mix or toss around to coat the pieces with salt.
- Microwave for 5 to 6 minutes, until slightly cooked, but the pieces are still hard enough when you press on them it won't crumble. NOTE: each MWO is different, it take more time or less. You will have to test and see.
- In a kadai/wide fry pan, add oil and place it on stove on medium flame.
- Once oil is hot add panch phoron, some of the seeds will start to sputter, so be careful. Step back or partially cover the pan.
- Add asafoetida, curry leaves and red chilies [or chili powder]. Saute for 30 seconds.
- Now add the partially cooked potatoes. Stir a bit.
- Add salt as needed (remember - bit of salt was already added before microwaving the potatoes. so taste and see if you need more).
- Add turmeric powder and mix.
- Spread the potatoes on the pan and continue cooking on medium-low flame. Stir in-between to prevent potatoes sticking to the pan and burn. Do not cover, or else you won't get the crispness you are looking for.
- The potatoes are ready when you press the spatula, it should easily be able to cut through the potato piece.
- Turn off the flame. Mix-in ¾ of the coriander leaves.
- Transfer aloo tarkari to a serving bowl and garnish with rest of the coriander leaves. Serve hot with poori, roti/chapati or as a side dish with meal.
Labels: Bengali dish, Potato, Side-Dish, Vegetarian
~ Aloo Tarkari | Potato Stir fry | Simple Potato dry curry to go with Roti/Chapati | Bengali Style
~
Posted by Swetha @ 7/26/2020 06:08:00 PM ::
Swetha's Fusion ::
permalink
Heerekai Thove | Ridge Gourd and Moong Dal curry
Heerekai Thove - Ridge Gourd and Mung gram (lentil) curry is one of the favorite curry in my house. It is like comfort food. Besides mixing with rice, my husband will just drink the flavorful lentil liquid. Very quick and simple to make.
Ingredients:
- 1 cup - Moong dal
- 1 whole - tender Ridge Gourd (about 2 cups cut pieces)
- 2 - green chillies
- 1 tsp - cumin seeds
- 1 tsp - turmeric powder
- ½ tsp - mustard seeds
- 2 tsp - freshly grated ginger
- 1 tbsp - oil or ghee for seasoning
- 2 tbsp - lime juice
- 2 tbsp - chopped coriander leaves
- 5 to 8 - curry leaves
- 4 to 5 - dry coconut slices (optional)
- 1 pinch - hing | asafetida
- salt - as per taste
Method:
- Rinse moong dal couple times until water runs clear.
- Optional step: soak dal for half hour
- Cook dal with 3 cups of water in pressure cooker for about two whistle or 12 to 15 minutes in microwave oven on high
- Meanwhile, wash ridge gourd. Using a peeler, peel the hard ridges off. Cut and discard the ends of the gourd. Cut the gourd into 2 cm thick circles. if it is wide, cut them into halves. Keep aside.
- Other preparation: Slit green chilies length wise; extract lime juice; grate ginger and chop coriander leaves and keep all aside.
- Heat seasoning oil/ghee in a sauce pan on medium flame. Add mustard to the oil.
- Once mustard starts to sputtering, add curry leaves, asafetida and cumin seeds (optional coconut slices).
- Reduce the flame, and carefully, pour the cooked dal into the sauce pan. Note, the oil is hot and when pour the dal it will start flying all over the place - cover the pan to avoid it or stir the dal to stop it.
- Using a masher or buttermilk churner, mash and churn the dal.
- Set the flame medium-high, add more water if needed and bring it to boil.
- Now, add the cut ridge-gourd, green-chilies, turmeric powder and salt to sauce pan with dal.
- Cover the pan and simmer it until ridge gourd is cooked. Stir in-between to prevent dal burning at the bottom.
- Once the ridge gourd is cooked and tender, turn of the flame.
- Mix-in lime juice to taste.
- Garnish with chopped coriander leaves and serve hot with rice and pokoda on the side.
Labels: Curry, Lentil, Side-Dish, South-Indian Dish, Vegetarian
~ Heerekai Thove | Ridge Gourd and Moong Dal curry
~
Posted by Swetha @ 7/26/2020 01:57:00 PM ::
Swetha's Fusion ::
permalink
Dal Makhani with Mung beans [Hesaru Kalu | Moong | Green Gram]
The Dal Makhani is usually prepared with Urad dal [Black gram] and Rajma [Red kidney beans]. It is a Punjabi dish. Goes well with naan especially garlic-naan and/or Ghee rice. To be honest, though I enjoy eating Dal makhani in restaurants, I am not a big fan of using Rajma beans in my cooking. I make my dal makhani with sprouted moong dal [mung beans or green gram]. Taste's equally good.
Here is my version of Dal makhani. For this recipe, you need to start two to three days ahead, unless you can find ready sprouted mung beans in store.
Ingredients:
- 1 cup whole green lentil (Mung beans or Moong)
- 3 tbsp - unsalted butter
- 1 tbsp - Ghee
- 2 - onion finely chopped
- 3 - bay leaf
- 2"- cinnamon piece
- 3 - green cardamoms
- 1 - black cardamom (optional)
- 3 - tomatoes
- 1 tbsp - ginger garlic paste
- 2 tsp - red chill powder /or as per taste
- 1 tsp - garam masala powder
- ½ tsp - sugar
- 1 tsp - amchur
- ½ tsp - kasuri methi
- 1 cup - cream or 1 can - coconut milk ( I usually use coconut milk)
- ¼ cup - cream (more for garnish)
- salt - as per taste
Sprouting and preparing Mung beans:
- Add water to mung beans and rinse well a few times. Drain the water and soak it in 3 to 4 cups of water for 7 to 8 hours or over night.
- Next, drain the water and rinse it well. Pour socked mung beans over a wet kitchen towel, tie the wet towel with beans in it and place it aside for the beans to sprout.
- Next day, morning you should be able to see good amount of sprouts.
- Pour 4 cups water and sprouted beans in a pressure cooker. And 1 tsp of salt and a ½ inch piece of ginger. Pressure cook for 2 to 3 whistles or until done on a medium heat. (each pressure cooker is different)
NOTE: Like beans, lentils also contain FODMAPs. These sugars may contribute to excessive gas production and bloating. However, soaking or spouting the lentils before you eat them can make them much easier on the digestive system[healthline.com]. ... and cooking with ginger helps even more with reducing the gas.
Method:
- Heat a heavy bottom pan with 2 tbsp butter and ghee. Add the bay leaves, cinnamon and both cardamom to the butter, saute for half a minute. Then add onions and fry until they are translucent.
- Stir in ginger-garlic paste and saute for one minute or until the raw smell goes away.
- To the mixture, add the cut tomatoes and let it cook until soft.
- Add salt, red chill powder, turmeric powder, garam masala, sugar and amchur. Saute well until it smells good and turns thick.
- Now add the cooked moong beans to the mixture and add a cup of water.
- Cover and cook on a low flame until the dal thickens stirring often in between to prevent burning the bottom.
- Add cream or coconut milk and ½ cup water. Mix, cover and continue cooking on medium flame. Stir in-between.
- Once you see the oil starts to float on the top, crush kasuri methi between your palm and sprinkle over dal.
- Taste to check for salt and add more salt if needed. Add rest of the butter and mix well.
- Garnish dal makhani with butter or cream or coriander leaves and serve with naan, roti/chapati or rice

Labels: Curry, Lentil, North Indian dish, Side-Dish, Vegetarian
~ Dal Makhani with Mung beans [Hesaru Kalu | Moong | Green Gram]
~
Posted by Swetha @ 7/26/2020 01:07:00 AM ::
Swetha's Fusion ::
permalink
Sugar Coated Fennel Seeds | After meal Indian Mouth Freshener | Mukhwas
Wednesday, July 15, 2020
Sugar coated Fennel seeds - Mouth freshener and helps with digestion as well. Usually served after a meal. Especially after a heavy spicy meal and also offered to the guests. Most of the Indian restaurant will have a bowl at the door or served along with the bill in a bowl or small sachets.
These are also called Mukhwas. mukh meaning mouth and vas meaning smell. There are different variations of mukhwas - sweet, savory, with shredded Areca-nuts, with candied rose petals etc. In many Indian homes, one may find one more type of Mukhwas kept in beautiful container on or around dinning table.
I just like to have something sweet after every meal. I usually have some store brought colorful candied fennel seeds with regular fennel and cumin seeds. This is my first try in making sugar coated fennel seeds at home. Took about 10 to 15 minutes. Turned out pretty good. I am impressed. I guess I will not be opting for store brought mukhwas anymore. I will also try to make other versions of mukhwas, if they turn out good, I will definitely share it.
Ingredients:
- 1 cup - fennel seeds
- 1 cup - sugar
- ¼ cup - dry coconut powder
- ½ tsp - cardamom powder
- ½ tsp - rose water or few drops of rose essence (optional)
Method:
- In a small pan or kadai, dry roast fennel seed on medium-low flame. Not too long, just for a minute or two. Transfer the seeds on a wide plate and spread for it to cool down.
- Mix in coconut and cardamom powder to the warm fennel seeds.
- Heat the same pan on medium flame, add sugar and about ½ cup of water.
- Sugar will melt slowly bubbles will starts to form. Keep stirring.
- As the sugar gets lots of bubbles, add the rose water (or essence) and mix.
- The syrup should be bit sticky by now (no need to wait for one-thread consistency)
- Reduce the flame to medium-low. Add the fennel-coconut powder mixture to the syrup.
- Keep stirring the mixture. Once you notice the it crystallize and the fennel looks dry. Turn off the flame.
- For convenience place the hot-pan on a kitchen towel and keep stirring bit more so that the seeds are coated well and separated, or else it will harden to candied chunks.
- Transfer and spread the sugar coated fennel seeds back on to the wide plate to completely cool down for an hour or so.
- May store in air-tight container for longer shelf-life. Pour a small amount to a serving bowl as and when needed.
Try this yourself, share with friends and family.
For making Sugar coated Fennel seeds, I refereed to these post
FOOD52 and
mind over munch. It was very helpful. Thanks for sharing.
Take Two: Added 1 tablespoon of grated dry coconut
Take Three: Soaked the fennel seeds in rose-water for about 10 minutes before roasting. The result was the seeds got a darker shade of color. Also I added red food color to the grated dry coconut before adding to the mixture. It tasted good.
Labels: Mukhwas
~ Sugar Coated Fennel Seeds | After meal Indian Mouth Freshener | Mukhwas
~
Posted by Swetha @ 7/15/2020 12:07:00 AM ::
Swetha's Fusion ::
permalink
Kashi Halwa | Ash Gourd(Winter Melon) Halwa | Dumroot Halwa
Sunday, July 12, 2020
Kashi Halwa or Dumroot Halwa originates from south-canara (Udupi- Mangalore ) region. Made during festivals, served as dessert after meals. And at functions, sometimes it is served with a dollop of vanilla ice-cream. Yummy! Not only this combo is tasty, it adds volume to the dessert ...as Ash-gourd is mainly water, you will notice the reduced small volume of halwa after preparing it. Usually the serving size for (most of ) halwa is just one tablespoon per person.
Kashi halwa is made from Ash gourd/ Winter Melon. During one of the ISHA foundation workshop I attended, I learned that Ash Gourd as Positive-Pranic (energy) and is very healthy for ones physical and mental growth.
Kashi halwa has a sticky-candy texture. It is almost translucent and off-white in color. When saffron is added, it gets a yellowish hue to it. Also I cook grated Ash-gourd with milk or condensed milk (optional), which adds a bit of creamy texture to it.
Note: sugar should be added after Ash-gourd is completely cooked and has no raw taste to it. It needs very few ingredients, and is time consuming. But is worth every bit of effort and time. It helps to cook in a non-stick pan as you need not have to stand and stir the ash-gourd while it cooks (about 15-20 minutes), you can just cover the lid and stir occasionally. Enjoy this delicious Kashi halwa with your friends and family.
Halwa recipes: Carrot halwa, Falooda and China grass halwa, Duddi Halwa, Suji Pineapple halwa and Kashi Halwa.
Ingredients:
- 3 cups - Ash gourd/White Pumpkin/ Winter Melon/ BoodhKumbalakayi
- 1 cup - Sugar
- ½ tsp - Cardamom/Elaichi Powder
- ¼ tsp - Saffron strands
- 2 tsp - warm milk
- 10 - Cashew nuts halved/broken
- 3 tbsp Ghee
- ½ cup - milk |or| 2 tbsp - condensed-milk (optional)
Method:
- Peel the skin and de-seed the Ash-gourd. Wash and grate the Ash-gourd. Many version of the recipe call for draining the liquid of the grated Ash-gourd by squeezing or putting in a colander. But I save the liquid and let the Ash-gourd cook in its own water. Way throw away all the nutrients.
- Heat a non-stick pan (or kadai or wok) on medium heat add 1 tsp of ghee.
- Add the cashew-nuts to the hot ghee and roast to golden color. Remove the cashews and keep aside.
- In the same pan, now add the grated Ash-gourd, cover and let it cook. Stir the mixture in between, this whole process may take from 10 to 20 minutes depending on the quantity and tenderness of the Ash-gourd.
- Optional-step: after about 5 minutes, add milk or condensed-milk, mix, cover the lid and let it cook further until most of the liquid is absorbed or Ash-gourd is completely cooked and is soft.
- Meanwhile, to 2 tsp of warm-milk add saffron strands. Let it soak for about 2 minutes. Using a pestle or back of a spoon crush the saffron to extract more color. No need to make a paste or break the strand. Keep aside.
- Once the ash gourd is cooked stir in the sugar. Mix and cook. Keep stirring. From this point on, you can not leave the pan.
- Once sugar melts, mix-in the saffron and milk mixture. The color of the halwa will now turn to yellowish hue.
- Once the mixture thickens, add rest of the ghee, roasted cashew-nuts and cardamom powder.
- Continue stirring until the halwa starts to leave the sides of the pan and most of the liquid is absorbed. Turn off the heat.
- Transfer the halwa to a serving bowl. Let it cool and serve as is or with vanilla ice-cream

Halwa recipes: Carrot halwa, Falooda and China grass halwa, Duddi Halwa, Suji Pineapple halwa, Kashi Halwa and Badam Halwa
Labels: condensed milk, Desserts, Festive Food, Halwa, Mangalore dish, South-Indian Dish, Sweet, Traditional Sweet, Vegetarian
~ Kashi Halwa | Ash Gourd(Winter Melon) Halwa | Dumroot Halwa
~
Posted by Swetha @ 7/12/2020 04:19:00 PM ::
Swetha's Fusion ::
permalink
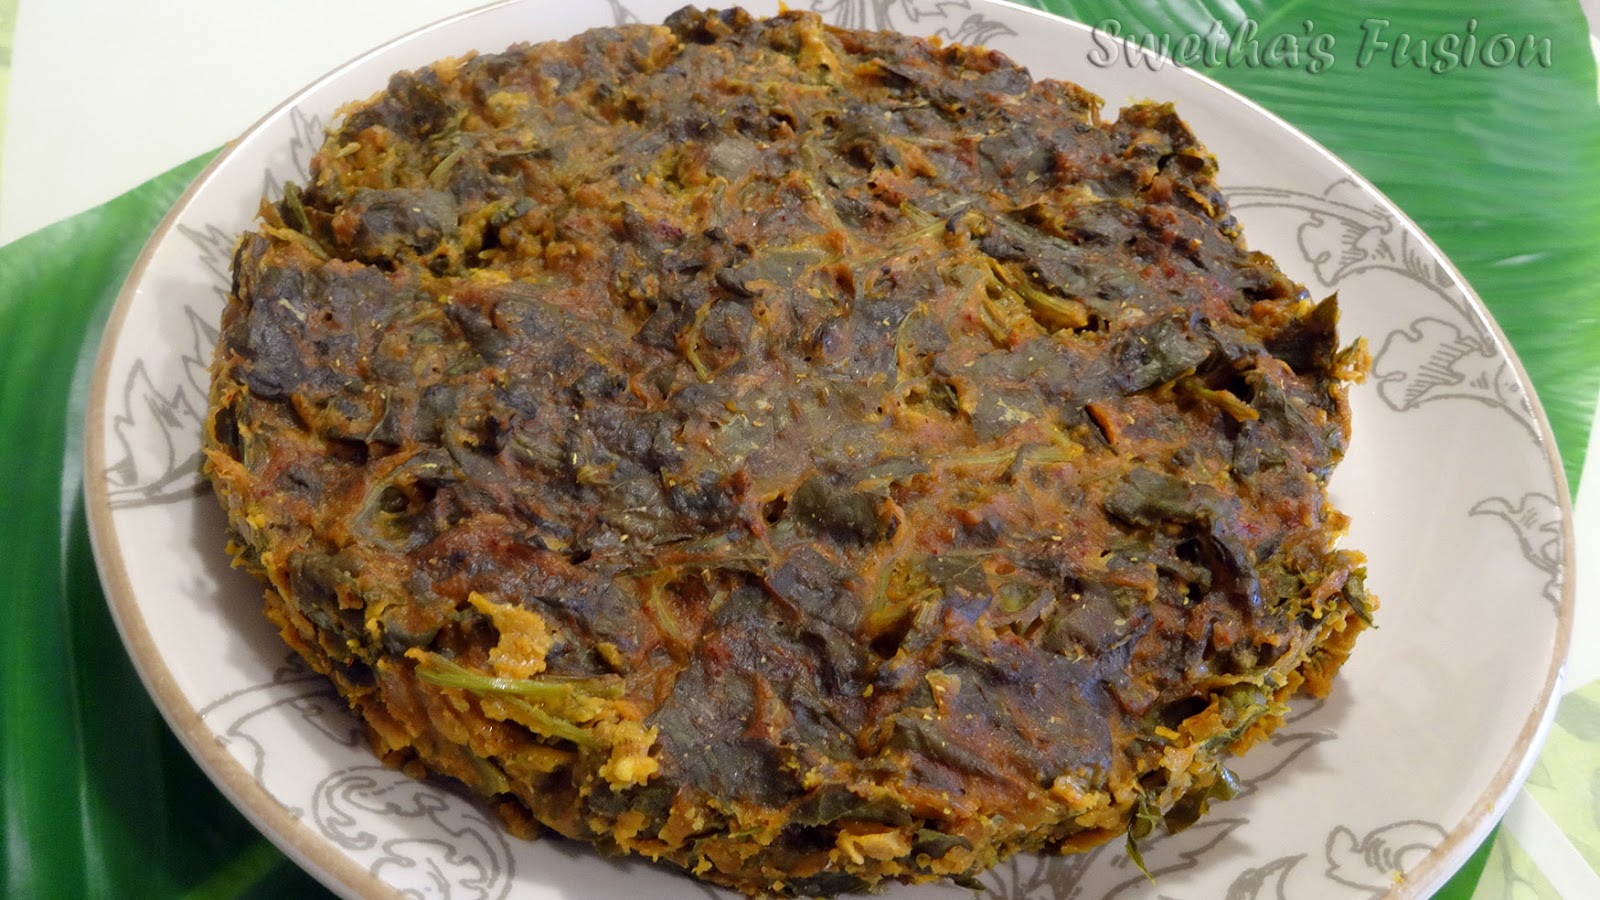
Palak Pathrode | Spinach Patra
This is a slight twist for the classic Pathrode recipe. Do love Pathrode made out of Colocasia leaves, but since Colocasia leaves are not available here, it is not going to stop me from enjoying Pathrode. This version is made with fresh palak/spinach leaves, besides it is slightly easier to make, ...and don't have to deal with Colocasia leave's irritating itchiness. Taste is almost the same. Hope you will enjoy this version of Pathrode Recipe with your friends and family.
Ingredients:
- 4 cups - Spinach leaves
- 1 cup - Rice
- 2 tbsp - Dhania | Coriander seeds
- 1 tbsp - Jeera | Cumin seeds
- 1 tsp - Methi | Fenugreek seeds
- ½ tsp - Mustard seeds
- 2 tsp - Urad dal | Black gram
- 2 tsp - Channa dal | Split chickpeas
- ½ cup - fresh grated coconut. (optional)
- 10 - Red chilies or depending on how spicy you want use the amount chillies . I use Byadgi red chili which is on the milder side. May choose to combine Kashmiri and Byadgi chili to achieve desired spice.
- 1 tbsp - Tamarind paste
- 1 tsp - Jaggery
- 1 tsp - turmeric pdr
- Salt - as per taste.
- ½ cup - Oil for shallow frying. I use coconut oil, which gives authentic flavor.
Preparing the Masala:
- Soak rice overnight or for at least three hours.
- In a pan, dry roast coriander seeds, cumin seeds, fenugreek seeds, mustard seeds. urad dal, channa dal and red chilies. Transfer it to a blender/food processes
- Optional step: In the same pan, dry roast grated coconut. Add it to the blender along with other roasted ingredients.
- To the blender, add tamarind paste, jaggery, turmeric pdr and salt. Add 2 tbsp of water and grind. If needed, add more water. Grind it into a smooth paste.
- Drain soaked rice, Add it to the blender and grind it into slightly course paste.
- Keep the ground paste aside.
Preparing the Leaves:
- Wash spinach leaves. Cut thick stems.
- Put the leaves in a colander or spread them on a kitchen towel to remove the water. Keep aside
Prepping and cooking the Pathrode:
- Take 1/4 portion or more of the masala and keep aside
- Pour rest of the masala into a large mixing bowl.
- Check for consistence of the masala, if it is too thick add some water. If it is watery add some rice flour.
- Roughly chop the spinach leaves and add the leaves to the masala.
- Mix all together. Cover and keep aside for about 10 minutes.
- Meanwhile add water to bottom of the steam-cooker/idli-cooker/pressure-cooker and put it on stove on medium flame. Bring the water to boil
- Apply oil to the bottom of a metal-pan or cooker-pan. keep aside
- After 10 minutes, you will notice that the spinach has settled well with the masala. If needed, mix-in some more masala which was kept aside.
- Now pour the spinach-masala mixture to the prepared cooker-pan. Thickness should be about 1 to 1½ inches. If needed separate the mixture into two pans.
- Spread and press the mixture evenly.
- Place the pan in the cooker (by now the water should have come to a boil)
- Cover and steam cook on medium flame for about 25 to 30 minutes until done
- If using pressure cooker, don't place the weight (just like cooking idli)
- Once cooked and flame is turned off, let it sit for about 5 to 10 minutes.
- Loosen the Pathrode from the pan using a knife or flat spatula. Transfer the cooked Pathrode onto a plate or a cutting board.
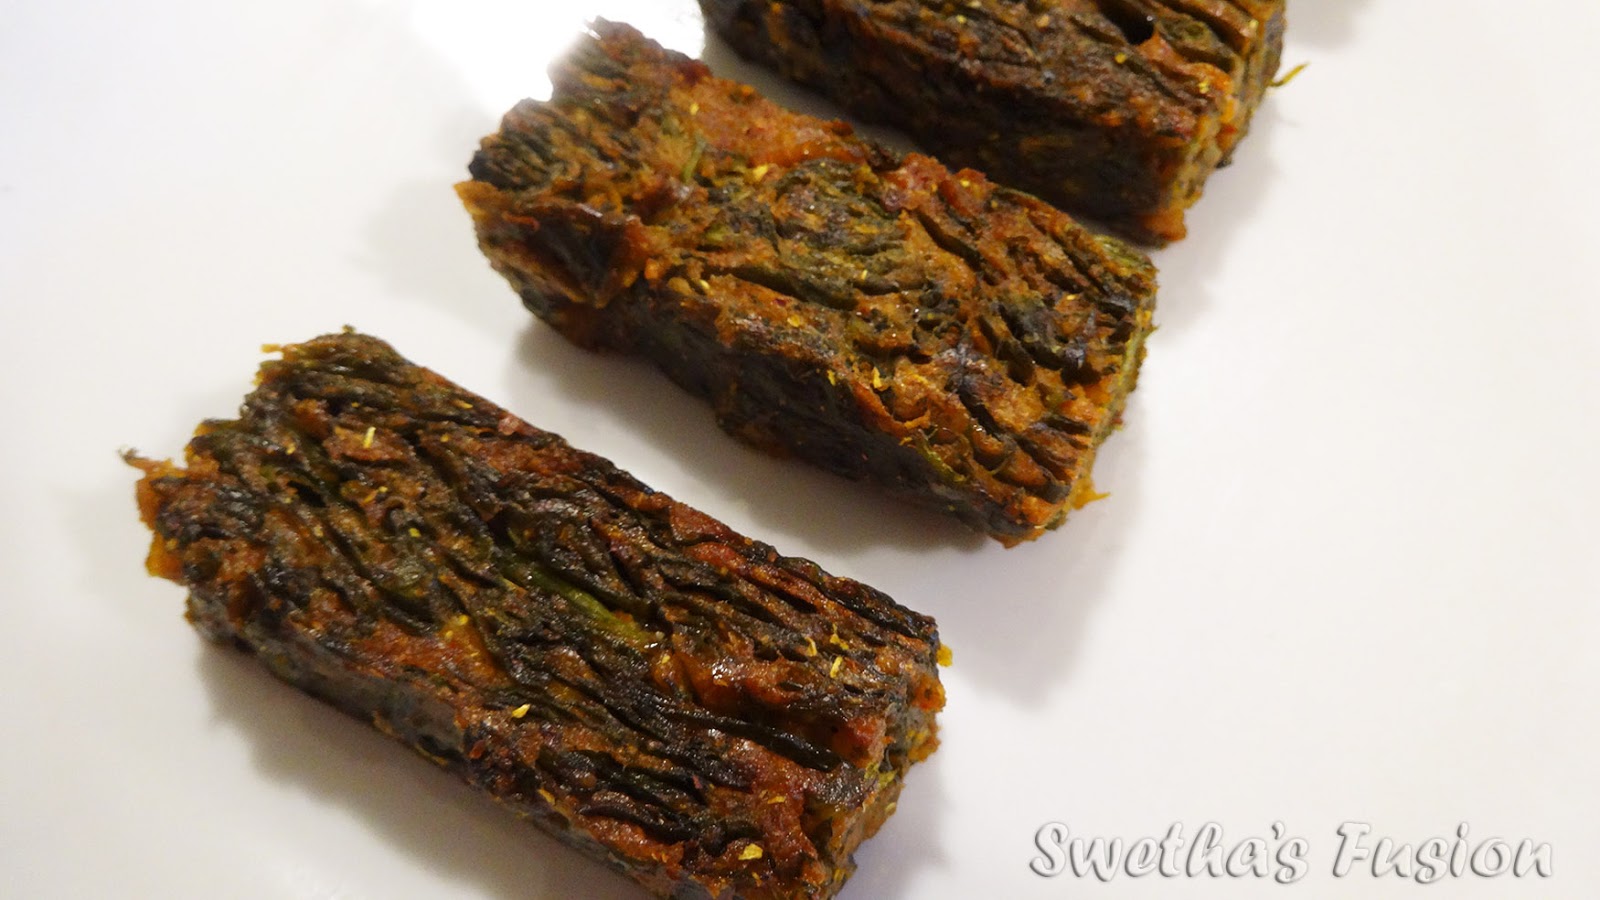
- Cut Pathrode into desired shape (square, rectangle or triangle)
- On a flat tawa, shallow roast on both sides applying little coconut oil. This step is optional but it gives that extra bit of crunchiness on the outer layer.
- Serve hot as a snack or as a side dish.
Enjoy one of the unique and exotic vegetarian dish from South Canara region of India.
Labels: Appetizers, Fritters, Kundapura, Mangalore dish, Side-Dish, South-Indian Dish, Tawa Fry, Vegetarian
Kadlekai Usli | Nela Kadle Usli | Shenga Usli | Groundnut Usli | Peanut Sundal
Usli is made as one of side dish year around. It is especially made around Navaratri festival. Usli is made with different lentils, beans and nuts. As many Hindu's fast during this nine day festival, breaking the fast by having Usli after offering it to Goddess during prayer is considered beneficial. The belief is for good reasons, as most of the legume are high in protein and are very nutritious, especially when sprouted bean is used in the recipe. For each day of the festive, a Usli is made with different legume. Peanut Usli is one of them. This turns out to be very tasty, can't stop eating. Who does not like peanuts, that too flavorful savory nuts. Enjoy!
Ingredients:
- 1 cup - Peanuts/Groundnut/Kadlekai/Nela Kadle/Shenga
- 1 tsp - Chili powder
- ¼ tsp - turmeric powder
- 1 tbsp - Lemon Juice
- 1 tbsp - Coconut
- 8-10 - Kadi Patha (curry leaves)
- 1 tsp - Mustard
- ¼ tsp - Asafetida/Hing
- Salt as per taste
- 1 tbsp - Coriander (cilantro)
Method:
- Soak peanuts over night.
- To sprout the peanut (optional step) - Drain the soaked beans and leave it in the strainer covered with a wet cloth for three to five more day(so plan ahead). ... or tie the soaked peanuts in a wet cotton towel and let it sit in colander. Peanuts takes longer to sprout. Need to wash and most the towel often in a day. Again, this is optional step.
- Rinse the peanuts and pressure cook with salt and water. (You may add a piece of ginger while cooking as it will help reducing the Gas problem. ) Let it cool. Drain and keep aside.
- Take 2 tsp of oil in a pan and heat it on medium heat. Add mustard seeds, Curry leaves and asafetida.
- Once mustard starts to sputter, add cooked peanuts to it. Mix in salt, turmeric powder and chili powder as per taste. After 2 minutes of stirring, add grated coconut and lemon juice.
- Add ¼ cup of water, cover and cook until all the water is absorbed.
- Remove from the fire and garnish with chopped coriander leaves,
- Serve hot
Labels: Festive Food, Side-Dish, Snack, South-Indian Dish, Usli, Vegetarian
~ Kadlekai Usli | Nela Kadle Usli | Shenga Usli | Groundnut Usli | Peanut Sundal
~
Posted by Swetha @ 7/12/2020 08:35:00 AM ::
Swetha's Fusion ::
permalink
Raw-Mango Chitranna | Mavinkai Chitranna
Saturday, July 11, 2020
Mavinkai means raw-mango in Kannada language. Chitranna (a.k.a Lemon-rice) is a south-Indian dish usually made with lime-juice Lemon-Rice is made year around. But when it comes to summer - Mango season, raw-mango may be used instead of lemon juice. During summer, mango-ginger is also available in the market. I add a bit of it, (not too much as it turns bitter).
Picking the right mango: don't go for the green mango. Pick a raw mango, which is just about to ripe. Basically, very hard when pressed on, slight yellow shade on the mango skin and mostly tangy with bit of sweetness in taste(and small). If I have a green mango, I place it in my onions-basket or in rice box for a day or so for it start to ripe. Anyway, if you do use raw-mango or very tangy mango, add bit of jaggery or sugar to balance the taste.
This dish is perfect for the humid and hot climate conditions, and also can be eaten at room temperature, hence perfect for lunch-box. Very simple to make, flavorful, easy on digestion, and won't go bad easily. A bit of (spicy mango or lemon) pickle and curds is sufficient on the side and goes well as a combo.
Also checkout Chitranna / Lemon-rice
Ingredients:
- 1 cup - rice (I used sona masoori)
- 1 cup - grated raw Mango
- 1 tsp - methi powder | fenugreek powder
- 1 tsp - grated ginger (I use mango ginger)
- ¼ cup - peanuts or groundnuts
- ½ tsp - mustard seeds
- 3 tp 5 - green chilies (or as per taste) - split in center lengthwise.
- 7 to 8 - curry leaves
- ¼ cup - coriander leaves - chopped
- 2 tbsp - cooking oil
- ½ tsp - turmeric powder
- ¼ tsp - asafoetida
- Salt - as per your taste
Method:
- Cook rice and keep it aside to cool down. You may carefully spread the rice on a wide tray to fasten the process.
- In a pan, heat oil on medium flame and add mustard seeds.
- As mustard sputters, add green chilies, curry leaves, asafoetida and peanuts. Stir and let peanuts roast a bit on medium-low flame
- Meanwhile, add methi powder and salt to the cooked rice, mix it all together. Keep aside.
- As the peanut is roasted, add grated mango, ginger, turmeric powder and cut coriander leaves. Stir until the raw small is gone (for about 2 minute). [Note: Rather than just garnishing coriander leaves, roasting it gives an unique flavor, aroma and will not let it go bad in lunch-box.]
- Now add the rice mix to the pan and mix it all together. Turn the heat to low, cover and let it warm for about 2 minutes. Turn off the flame.
- Serve with pickle and curds or Raita. Of course any pakoda's will go well with Mango rice.
Tips:
- If packing for lunch, let the Mango-rice cool down before covering the lunch box lid.
- 1 tsp of (soaked for about 10 minutes) urad dal and chana dal may be add to the seasoning along with peanuts.
- It is important that the cooked rice is cool down, or else the rice will break and get mushy.
Labels: Meal, Rice, South-Indian Dish, Tiffin Variety, Vegetarian
Chitranna | Lemon Rice
Chitranna a.k.a lemon-rice is a south-Indian dish. It is perfect for the humid climate and also can be eaten at room temperature, hence perfect for lunch-box. Very simple to make, flavorful, easy on digestion, and won't go bad easily. A bit of (spicy mango or lemon) pickle and curds is sufficient on the side and goes well as a combo.
Ingredients:
- 1 cup - rice (I used sona masoori)
- ¼ cup - peanuts / groundnuts
- Lemon juice from one large lime ( as per taste)
- ½ tsp - mustard seeds
- 3 to 5 - green chilies (or as per taste) - split in center lengthwise.
- 7 to 8 - curry leaves
- ¼ cup - coriander leaves - chopped
- 1 tsp - grated ginger
- 2 tbsp - cooking oil
- ½ tsp - turmeric powder
- ¼ tsp - asafoetida/hing
- Salt - as per your taste
Method:
- Cook rice and keep it aside to cool down. You may also carefully spread the rice on a wide-tray to fasten the process.
- In a big pan, heat oil on medium flame and add mustard seeds.
- As mustard sputters, add green chilies, curry leaves, asafoetida and peanuts. Stir and let peanuts roast a bit on medium-low flame
- Meanwhile, add lemon juice and salt to the cooked rice, mix it all together. Keep aside.
- Once the peanut is roasted, add turmeric powder, ginger and coriander leaves. Stir until the raw small is gone (for about a minute or so). [Note:Rather than just garnishing coriander leaves, roasting it gives an unique flavor, aroma and will not let it go bad in lunch-box.]
- Now add the rice mix to the pan and mix it all together. Turn the heat to low, cover and let it warm for about 2 minutes. Turn off the flame.
- Serve with pickle and curds. Of course, any fritters like pakoda's will go well with Lemon rice.
Tips:
- If packing for lunch, let the Lemon-rice cool down before covering the lunch box lid.
- 1 tsp of (soaked for about 10 minutes) urad dal and chana dal may be add to the seasoning along with peanuts.
- It is important that the cooked rice is cool down, or else the rice will break and get mushy while mixing it.
Labels: Meal, Rice, South-Indian Dish, Tiffin Variety, Vegetarian
Cabbage Rice | Quick and Easy Cabbage Rice | Cabbage Rice bhath
Tuesday, July 07, 2020
My sister and I love this Cabbage rice bhath which my mom used to make occasionally. My mom was not a big fan of using cabbage a lot in her cooking as it make one feel bloated with gas after :D
Anyway, it looks and tastes exquisite, but in fact it is very simple and quick to make.
Don't know from where or from whom my mom got this recipe, but she used to call it Mexico-Bhath. Well, we din't know much about it nor about Mexico then and there was no internet either. Well now, if I look-up, only result I get is Spanish rice ( Tomato rice or Salsa rice) ...not even close. Well, at our house we still refer to it as Mexico rice-bhath, though it is not from Mexico :P
Here is my mom's simple recipe. Unlike pulao or biryani where rice grains are preferred separated, cabbage rice is moist and texture on the mushy side. Regular white rice is used not basmati rice. I used 'sona masoori' rice in this recipe.
Ingredients:
- 1 cup - Sona Masoori Rice
- 2 cup - Cabbage (chopped)
- 1 cup - Onion (chopped)
- ½ cup - Green peas
- ¼ cup - Carrot (grated)
- 1 tsp - Garam Masala powder
- 2 tbsp - Sambar Powder
- 1 tsp - Turmeric powder
- 1 tsp - Red chili powder (or as per taste)
- 1 tbsp - Tamarind paste
- ½ tsp - Jaggery powder
- ½ cup - grated fresh coconut
- Oil - as needed
- Salt as per taste
Method:
- Rinse rice and cook with 3 cups of water.
- Once done, spread it on a big plate or a wide tray and keep aside to cool it down.
- In a food processor, add coconut, garam masala powder, samber powder, turmeric powder, chili powder and tamarind paste to the jar. Add ¼ cup of water and grind it to smooth paste. [Note: you could just grind the coconut and then add rest of the ingredients later]
- Heat a wide pan on medium flame. Add 2 tsp of oil and cut onion. Roast it until translucent.
- Now add, cabbage, carrot and peas and bit of salt.
- Mix it all together, cover and let it cook for about 4 to 5 minutes or half done.
- You will notice that cabbage with leave water and reduce in size. Now, add the ground masala. Mix it all together, cover and continue to cook for about 5 minutes or until the raw smell is gone.
- Turn down the flame to low, add the cooked rice to the cabbage mixture.
- Mix it all together, cover and let it cook on low for few more minutes.
- Cabbage rice bhath is ready.
- Serve hot with Onion-Tomato Raita and potato-chips or mixture (spicy and savory bhujia and boondi mix) on the side.

Labels: Main Course, Rice, South-Indian Dish, Vegetarian
~ Cabbage Rice | Quick and Easy Cabbage Rice | Cabbage Rice bhath
~
Posted by Swetha @ 7/07/2020 06:47:00 PM ::
Swetha's Fusion ::
permalink