Vermicelli Pakoda, Semiya Bonda, Shevige Bajji in Air Fryer (from leftover Vermicelli Upma)
Wednesday, July 03, 2024
Yesterday I posted recipe for
Vermicelli Upma, so what to do with the leftover
upma. Here is a secret, I prepare extra upma so that I can make Vermicelli
Pakoda or
Vermicelli cutlet for snacks. It goes so well with evening tea or
filter-coffee. Now that we have air-fryer it makes my life more easy, I don't
have to stand in front of the hot oil and constantly monitor it. Of course, it
is more healthy as there is very little oil needed to prepare it in
Air-fryer.
Ingredients:
- 2 cups - Vermicelli Upma
- 2 tsp - red chili powder (or as per taste. Pakodas are usually more spicier then the upma)
- 1 tsp - green chutney (optional)
- 1 tbsp. - curds [1 tsp lime juice can be used instead]
-
½ cup - boiled and mashed potato (optional) helps in binding
-
½ cup - oil -for brushing
For dipping batter:
- 2 tbsp. - Besan | Chickpeas flour
-
1 tbsp. - corn flour [for Air fryer recipe, if you want to fry in oil, just
add 1 more cup of Besan]
- 1 tsp - chili powder
- 1 pinch - hing | asafetida
- 2 tsp - oil
- salt as per taste
Method:
- Take the leftover Vermicelli upma in a mixing bowl.
-
Add red chili powder, green chutney, curds (or lime juice) and mashed
potato if using. Mix it all together.
-
In another smaller mixing bowl, Take all the ingredients for making
dipping batter and mix.
-
Now slowly add little water at a time and mix to form thin
batter.
-
Put a liner in the Air Fryer basket. This is a optional step, but helps
from batter dripping.
-
Take about 1½ tablespoon vermicelli mixture and form into a ball. Press it in
between you palm to form vada shape. Place it on a plate. Shape the rest
of mixture into vada and keep it ready.
-
Now, dip each vada in the batter and place them on the liner in the air
fryer basket.
-
Lightly spray cooking oil on the vada and place the basket in the air
fryer.
-
Air fry on 375°C (700°F) for 12 minutes.
-
After 12 minutes, remove the vada, turn them over and place them
directly in basket with out the liner. Spray or brush cooking oil over
the vada and cook for another 8 to 10 minutes or until done.
- Serve hot Vermicelli pakoda with green chutney or ketchup.
NOTE:
- Using corn flour helps the pakoda get crispy outer coating.
- Adding bit of mashed potato helps for binding and keep the vada shape. Also, adds to the flavor.
- If you don't have leftover Vermicelli upma, just follow the direction on the packet to cook the vermicelli and use it to make the pakoda. You will need add salt and more chili powder.

Labels: Air Fryer, Appetizers, Bonda/Pakoda, Fritters, Snack, Vermicelli
~ Vermicelli Pakoda, Semiya Bonda, Shevige Bajji in Air Fryer (from leftover Vermicelli Upma)
~
Posted by Swetha @ 7/03/2024 07:50:00 PM ::
 Swetha's Fusion
 ::
permalink
Dal Vada | Chattambade | Aambode | Lentil Fritters - AIR FRYER version
Saturday, June 29, 2024
You may have already seen my past blog posts on preparing
Dal Vada,
Masala Vada and
Sabudana Vada
traditional way of making by deep-frying them. But, now I have my NEW favorite... Since I got my
Air Fryer, I have been experimenting with recipes which usually requires deep
frying in oil to make them in Air Fryer with very little oil. To my surprise Air Fried
Dal Vada and
Sabudana Vada
tastes much better and cooks well evenly without the dripping oil.
Did I mention, I have not deep fried anything since I brought the Air Fryer in
Nov of 2020. I am so proud of myself.
I am still trying to figure out how to make my all-time-favorite Onion Pakodas
in Air Fryer. Few times I experimented, the pakodas has turned out dry, not the same.
Meanwhile, check out other
Air Fryer
recipes.
Ingredients:
- 1 cup - Bengal gram dhal (Chana dhal)
-
¼ cup - Finely chopped
onions
- 3 - Green chilies ( or as per taste)
- 1 tsp - Crushed ginger
- 2 tbsp. - Chopped coriander
- 1 tsp - Chopped curry leaves
-
1 tsp - Fresh dill leaves -finely chopped (use only the
leaves and discard the stem)
- 2 tbsp. - oil
- Pinch of asafoetida (Hing)
- Salt - to taste
Method:
- Wash and soak chana dal in water for 2 hours ( Tip: if you are short on time,
wash Chana dhal and with little water microwave for 5 to 6 minutes.
Remove add some more water and let it soak for half an hour)
-
In a blender, add green chilies and ginger. Grind it into fine paste
without adding water. Transfer it to a mixing bowl.
- With help of a strainer, completely drain water from the soaked
chana dal. Transfer it the blender. Without adding any water, grind it in to coarse paste . Basically pulse the soaked lentils for 5 to 6 times in
the blender. As you will notice in the picture some of the lentils are
intact. Transfer it to the same mixing bowl with ginger/green-chili
paste.
-
Add salt, 1 tbsp. of oil and coriander/dill/curry leaves to the mixing
bowl.
-
Mix all together, it should form into a ball easily when pressed into
one, If needed sprinkle little water if it dry or add little rice flour
if the mixture is watery.
-
Apply little oil on your palm so that the mixture won't stick to your hands.
Roll the mixture into lemon sized ball and press slightly flat in
between center of your palms to shape into vada. Keep aside on a plate.
Work with rest of the mixture to make all the vada ready.
-
Place the shaped vada in the air-fryer basket. you may line it with
parchment paper if you wish. I use a 2-tier wire rack. I brush the
rack with oil and place the vada on them. Using 2-tier rack allows me to
make about 18 vada at a time. Which helps save time and electricity.
-
Brush or spray the vada(s) with oil. place the rake (or basket) in the
air-fryer.
- Air-fry for 13 minutes on 395F (200C).
-
After about 13 minutes, brush/spray oil on the top, now flip the vada
over and brush/spray oil on the other side of the vada. Since I
use 2-tier rack, I even switch the vada between top and bottom rack for
even cooking and roasting. Airfry for 8 - 10 minutes more, or until
done.
- Serve hot with chutney or tomato sauce.
Notes, Tips and Variations:
-
*Dill =
sabsige soppu in Kannada
-
May use red chilies powder instead of green chilies. Vada will turn out
dark shade.
-
Finely chopped mint leaves (puddina) or or any other greens may be
added.
-
1/4 cup of split white peas can be added while soaking for more crisper
vade.
-
No onion: If you plan to make dal vada on a festival or a fasting
occasion, then simply skip onions. Add a generous pinch of asafetida to
mimic the onion flavors.
-
Soaking: Do not soak chana dal for more than 2 hours. Soaking it for
longer time does not result in crispy texture.
-
Consistency: The ground mixture has a thick and coarse consistency. If
the batter becomes flowing or runny, then add some rice flour to thicken
it.
-
Shaping: A thick coarse mixture helps to shape the vada easily.
Labels: Air Fryer, Appetizers, Fritters, Healthy dish, Lentil, Snack, Vegetarian
~ Dal Vada | Chattambade | Aambode | Lentil Fritters - AIR FRYER version
~
Posted by Swetha @ 6/29/2024 10:11:00 AM ::
Swetha's Fusion ::
permalink
Spicy Roasted Chickpeas | Garbanzo | Chana- in Air Fryer
Wednesday, June 26, 2024

Roasted Chickpeas | Garbanzo | Channa - a healthy snack or use it as toping on your salad.
Adding spices makes a wonderful snack to have with evening drinks as well.
Coming to spices, one may choice to add any combination, let your imagination and tastebuds rule. Or just add salt. In this recipe, I just used salt, chilli powder and Zatar.
Ingredients:
- 19 oz can - of chickpeas | Garbanzo (drained and rinsed)
- 1 tsp. - olive oil
- ⅛ tsp - salt
- ¼ tsp - zatar
- ¼ tsp - red chili powder or ground cayenne pepper
Method:
- Preheat air fryer to 390°F / 200°C.
- Mix dry ingredients (spices) and keep aside.
- Drain chickpeas in a colander and transfer over to a kitchen towel. Let it dry completely.
- In a mixing bowl, add oil and toss to coat the garbanzo.
- Transfer it to Air fryer basket and spread it evenly.
- Cook for 12-15 minutes, shaking the basket every 5 minutes until crunchy on the inside, not moist and golden brown [Time required my be different depending on the model of the the Air fryer - just keep an eye not to burn]
- Transfer the roasted chickpeas to a mixing bowl while still hot, sprinkle the spices over the hot garbanzo and immediately toss with the spices.
- Let it sit to cool down completely before transferring to a container.
- Enjoy this yummy healthy snack.
NOTE:
- Instead of canned Chickpeas, you may use dry chickpeas. Soak it overnight, dry it on a kitchen towel and follow the above recipe.
- You may use any spices you wish, get creative.
Labels: Air Fryer, Lentil, Snack
~ Spicy Roasted Chickpeas | Garbanzo | Chana- in Air Fryer
~
Posted by Swetha @ 6/26/2024 02:24:00 PM ::
Swetha's Fusion ::
permalink
Baklava (Airfryer recipe) made with flaky paratha
Saturday, January 01, 2022

YEAH! THIS IS MY 150th POST. THOUGHT BAKLAVA RECIPE WOULD BE THE RIGHT FIT FOR CELEBRATING THE ACHIEVEMENT :))
Baklava is a Mediterranean sweet dessert made of layers of flaky phyllo pastry filled with crushed nuts and sweetened with honey syrup. Each country/region has their own variations. For me, any of the variation would do :P I do love Mediterranean food ... for two main reasons. One: good vegetarian options on the menu, though I am not vegetarian, I lean towards being one. I should say their chicken recipes, especially the kabobs are yummy. Two: all sorts of desserts, especially Baklava.
The traditional Turkish baklava, aka "Fistikli Baklava" is my favorite. Fistikli Bakalva is a pistachio baklava, typically made of phyllo dough, finely crushed pistachios, butter, and a simple syrup made of sugar, water, and lemon juice. Read more about different baklava here
Inspired by Bhavan's recipe, here is my version of Baklava. Flaky parathas are used instead of phyllo sheets. I used Air-fryer to prepare these baklava. So far I have prepared it three times since I purchased the air-fryer in December 2020. Every time, it has been a big hit and disappeared in no time.
Ingredients:
- 6 - Kawan Flakey Parathas
- 2 tbsp - flour
- 1/2 cup - unsalted melted butter
- For fillings:
- 3 cups - nuts ( Almonds, Pistachios, Walnuts, Pecans - may use any type of nuts or combination of nuts)
- 3 tbsp - brown sugar
- 1/4 tsp - cardamom powder
- 1/4 tsp - cinnamon powder
- 1/8 tsp - nutmeg powder
- For syrup
- 1 cup - Honey (may substitute with Maple syrup or Agave nectar or make with sugar syrup)
- 1 tsp - Rose water / or rose syrup
- 1/4 tsp - cardamom powder
- 2 (3") cinnamon sticks
- 2 Tbsp lemon juice
- 2 strips lemon peel
- 1 teaspoon finely grated orange zest, plus 1 teaspoon orange curls
- 2 cloves (optional)
- For garnish:
- 1/4 cup - chopped Pistachios or save some of the filling mixture.
Method:
- Prepare honey syrup:
- Place the honey and about 2 tablespoon of water in a saucepan and heat on the stove-top. As it warms up, add orange extract, and cinnamon stick, cloves, cardamon powder, lemon juice and peel, orange zest and curls, and rose water/syrup. Stir to mix. Bring to a boil, then lower the heat and let the syrup simmer for about 5 minutes. Turn off the stove and keep aside. NOTE: remove the cinnamon stick, cloves, and orange & lemon peels before pouring the syrup on the baked baklava (Step 13).
- Prepare nut mixture:
- In a food processor, pulse each type of nut separately till they are coarsely ground. Transfer the processed nuts in to a mixing bowl, add brown sugar, cardamom powder, cinnamon powder and nutmeg powder. Mix it all together and keep aside.
- Line your baking pan with a parchment paper. On the parchment paper, dust dry flour. Optional step, but helps to remove baklava from the pan later.
- Take out the Kawan Parathas and let them thaw on the parchment paper. Sprinkle some dry flour on top of the parathas so as to not let it become sticky. Let it thaw for only 7-10 minutes.
- Preheat the air-fryer on high for four minutes.
- Once the parathas are slightly thawed, dust bit of flour and roll one of the parathas to the size of the pan.
- Place one paratha on the bottom of the pan and brush the top with melted butter. Spread about 3-4 tbsp of nuts and sugar mix on the paratha.
- Repeat the above two steps for four more parathas.
- Roll the sixth paratha, place on the top, brush melted butter.
- Using the edge of a sharp knife, cut the paratha layers into shapes you would like.
- Place the pan in the preheated air-fryer and air-fry for about 20 minutes. Note: the time required may deffer from one air-fryer to another. Check after 8 minutes and every 3 minutes to make sure baklava does not get burnt.
- If using oven, bake in preheated oven for about 40 minutes or till golden brown.
- Remove the baked baklava and pour the prepared honey syrup while it is still hot.
- Let baklava stay at room temperature overnight or for 8 hours. Garnish with chopped pistachios before serving.


Labels: Air Fryer, Baking, Desserts, Festive Food, Holidays, Sweet, Traditional Sweet
~ Baklava (Airfryer recipe) made with flaky paratha
~
Posted by Swetha @ 1/01/2022 11:22:00 AM ::
Swetha's Fusion ::
permalink
Halasina Hannina Mulka - Jackfruit Fritters | Muffins - (Baked & Air Fried)
Wednesday, July 07, 2021
Halasina Hannina Mulka - Jackfruit Fritters is a traditional dish, originally recipe calls for deep frying. But for over six months I have not deep fried anything and I plan to keep it that way. Over the weekend I found Jackfruit and wanted to make mulka, so I experimented around and tried preparing it in my Air Fryer, came out yummy the first try. My Air fryer has the option for baking as well. So I first backed for 15 minutes, and then Air fried for 7 minutes. It was ready to eat after baking but, I wanted that roasted (bit burnt) outer layer which you get when deep fried. Yummy!
To be honest, in my opinion it turned out better than deep frying. I should confess, since I was not going to deep fry, I added some ghee to the dough and also brushed mulka with some ghee. Reminded me of the
Southadka Ganapathi temple prasada - sweet appam. Of course, no where near the authentic temple prasada, but house was smelling like one. I love that place ...so peaceful and serene open temple, how I wish to visit the temple now. I pray Lord Ganesha will bless me many more opportunity to visit again and again, ...and also visit his parents at
Sri Kshetra Dharmasthala to offer my humble prayers.
There are many variations for the recipe, some also make with rice flour and/or sujji rava (semolina). I make with wheat flour and sujji rava. Also see
Bale Hannina Mulka | Banana FrittersIngredients:
- 10 to 12 - fully ripe Jackfruit pods/arils (scroll to the end of this post for extracting the pods)
- 1 cup - whole wheat flour (some people use rice flour)
- ½ cup - Sujji rava | semolina
- ½ cup - grated coconut (may be grounded as well)
- ½ cup - jaggery -crushed to powder
- 1 tsp - cardamom powder
- 1 tsp - honey
- 1 tsp - poppy seeds
- ½ tsp - black pepper powder
- ¼ tsp - baking soda or Eno fruit salt
- ¼ tsp - baking powder
- ¼ tsp - nutmeg powder
- ¼ tsp - cinnamon powder
- 2 tbsp - Ghee (clarified butter) or oil
- pinch of salt
Method (the way I prepared it):
- In a blender or food processing mince the Jackfruit pods/aril to course pulp.
- Transfer the minced Jackfruit into a mixing bowl.
- Add coconut and jaggery. Mix it all together in hand, squeezing and breaking big pieces of jaggery. The mixture will turn watery.
- To the mixture, now add wheat flour, sujji rava, baking soda, baking powder and pinch of salt. The consistency should be of thick cake batter. If it is too runny, add more wheat flour. If it is too hard, add bit of milk or water and mix.
- Next stir-in nutmeg powder, cinnamon powder, black pepper powder, poppy seeds, cardamom powder and honey.
- Cover and keep aside for about 10 minutes ...for everything to blend in and for the baking soda and powder to do its job.
- Meanwhile, brush the muffin molds with ghee or butter or oil. Preheat the oven for 5 minutes on 375F.
- After 10 minutes, mix in 1½ of ghee to batter. Spoon the batter into the prepared muffin molds. [ I used silicon mini muffin/brownie molds - size worked out perfectly ]
- Place the muffin mold in the preheated oven and bake for 15 minutes on 375F. Turn the own off and let it stay in oven for 5 more minutes.
- At this point, the mulka is cooked and ready to eat. But I want the crisp (almost burnt) outer layer. So I air-fried the mulka. If you don't have air-fryer, just flip the mulka and broil for few minutes in the oven.
- Remove the mulka from the muffin mold, place them in air-fryer basket.
- Brush the mulka with rest of the ghee.
- Air-fry on 395 F [200 C] for 5 to 7 minutes.
- Mulkas are ready (for the second time). Share and enjoy yummy mulka with your family.

Method for extracting the Jackfruit arils and separating the seeds from the flesh:
- Apply oil on your hand, cutting board and knife. Also a good idea to spread a newspaper for easy cleanup. As when fruit is pruned, the inner part (core) secretes a sticky, milky liquid, which can hardly be removed from the skin, even with soap and water. Applying oil ahead helps the clean-up.
- Separate each firm yellowish aril (seed coat, flesh), which has an intense sweet taste.
- Slit open each aril and reach in to pull out the seed and its coat - thin, waxy, parchment-like and easily removable testa (husk) and a brownish, membranous tegmen.
Labels: Air Fryer, Baking, Banana, breakfast, Festive Food, Fritters, Mangalore dish, Sweet, Traditional Sweet, Vegetarian
~ Halasina Hannina Mulka - Jackfruit Fritters | Muffins - (Baked & Air Fried)
~
Posted by Swetha @ 7/07/2021 03:03:00 PM ::
Swetha's Fusion ::
permalink
Bread Pockets
Monday, July 05, 2021

Bread Pockets are one of the simple dish. One may use any left over curry, veggies, meet or make special fillings with whatever left in refrigerator, Get Creative! ( ideas are mentioned below, I will update the post as and when I will make them with different fillings).
These are good for breakfast, evening snack and lunch box. Kids love it, even the picky eater. It is always good idea to sneak in few healthy veggies.
Bread pockets may be cooked over pan, oven or airfryer. Also by dipping them in seasoned chickpeas flour dough, it can be deep fried to make 'Bread Pakoda'.
Serve hot with tomato ketchup and/or mint chutney and enjoy!
Ingredients:
- 10 - bread Slices - side crusts removed
- 3 cup - stuffing (see below for ideas)
- 1 cup - water
- 2 tbsp - oil or butter
Method:
- Place a slice of bread ( side crusts removed ) on a flat surface.
- Spray or brush water over the bread.
- Flatten the bread by pressing with your palm or with help of a rolling pin.
- Place a teaspoon of stuffing on one-half side of the bread.
- Fold over the bread and press the edges to seal
- Brush oil or butter over the bread pockets
- Cook the bread pockets in preheated oven or airfryer and toast for about 5-7 minutes, then turn them over and toast for another 3-5 minutes. [ May be toasted on a flat pan on medium-low heat as well ]
- Server hot with mint chutney and tomato ketchup.
- - - ~ o 0 o ~ - - -
STUFFING ( IDEAS ) FOR BREAD POCKETS
Potato & Onion stuffing:- 2½ cups - potatoes -boiled and mashed ( I used red potatoes with skin as well )
- 1 - onion (small) - finely chopped
- 2 - green chilies - finely chopped
- 5 - curry leaves
- ½ cup - coriander leaves - finely chopped
- 1 tsp - Red chili powder
- ½ tsp - chaat masala powder
- 1 tbsp - oil
- 1 tbsp - cream cheese or mayonnaise
- 1 tbsp - tomato ketchup
- salt - as per taste
Mix all the above ingredients
- - - ~ o 0 o ~ - - -
Onion Tomato & Grated carrot stuffing:
- ½ cup - onion -finely chopped
- ½ cup - tomato -finely chopped
- ½ cup - carrot -grated
- 1 tsp - green chili -finely chopped
- ¼ cup - bell pepper | capsicum -finely chopped
- ½ tsp - turmeric powder
- ½ tsp - chili powder
- ¼ tsp - garam masala
- 1 tsp - cumin powder
- ¼ cup - chopped coriander leaves
- 1 tsp - lime juice (optional)
- 2 tbsp oil
- salt to taste
- Heat oil in a pan, fry onion, green chili and capsicum for a minute.
- Add grated carrots and fry for a minute.
- Now add chopped tomato, turmeric powder, salt, chili powder, garam masala, cumin powder and mix well. fry till tomatoes are cooked well and mushy.
- Turn of the flame. Add chopped coriander leaves and lime juice
- Mix and use it as bread pocket filling.
Jalapeño & Cream cheese stuffing:
- 6 - jalapeño peppers -minced
- ¼ cup - onion –minced (may substitute with green onions instead)
- ¼ cup - fresh coriander | cilantro - chopped
- ¾ cup - cream cheese
- 2 tbsp - jack cheese
- 1 tsp – oragano powder
- Salt as per taste
Mix all together. Keep it aside in the refrigerator for 10 to 20 minutes for the flavor to blend. Use it for Bread Pocket filling and enjoy!
- - - ~ o 0 o ~ - - -.
Sweet corn and Cheese stuffing (version 1):
- ½ cup - boiled sweet corn
- ¼ cup - mozzarella cheese -grated
- 2 tbsp - onion -finely chopped
- 2 tbsp - tomato -finely chopped
- 1 tbsp – bell pepper -finely chopped
- 1 tbsp - chili flakes or chopped jalapeño
- Salt to taste
Mix all together and use it for Bread Pocket filling!
- - - ~ o 0 o ~ - - -
Sweet corn and Cheese stuffing (version 2):
- 15 oz - canned corn, drained
- 3 tbsp - mayonnaise
- ¼ tsp - sugar
- Salt as per taste
- ¼ tsp - black pepper
- ¼ cup - onion, finely chopped
- ¼ tsp - red chili flakes
- 1/2 cup - shredded mozzarella cheese
In a mixing bowl, combine all the ingredients to use as a stuffing for bread pockets. Red chili flakes may be skipped if making for young children.
Labels: Air Fryer, Appetizers, breakfast, Lunch-box, Snack
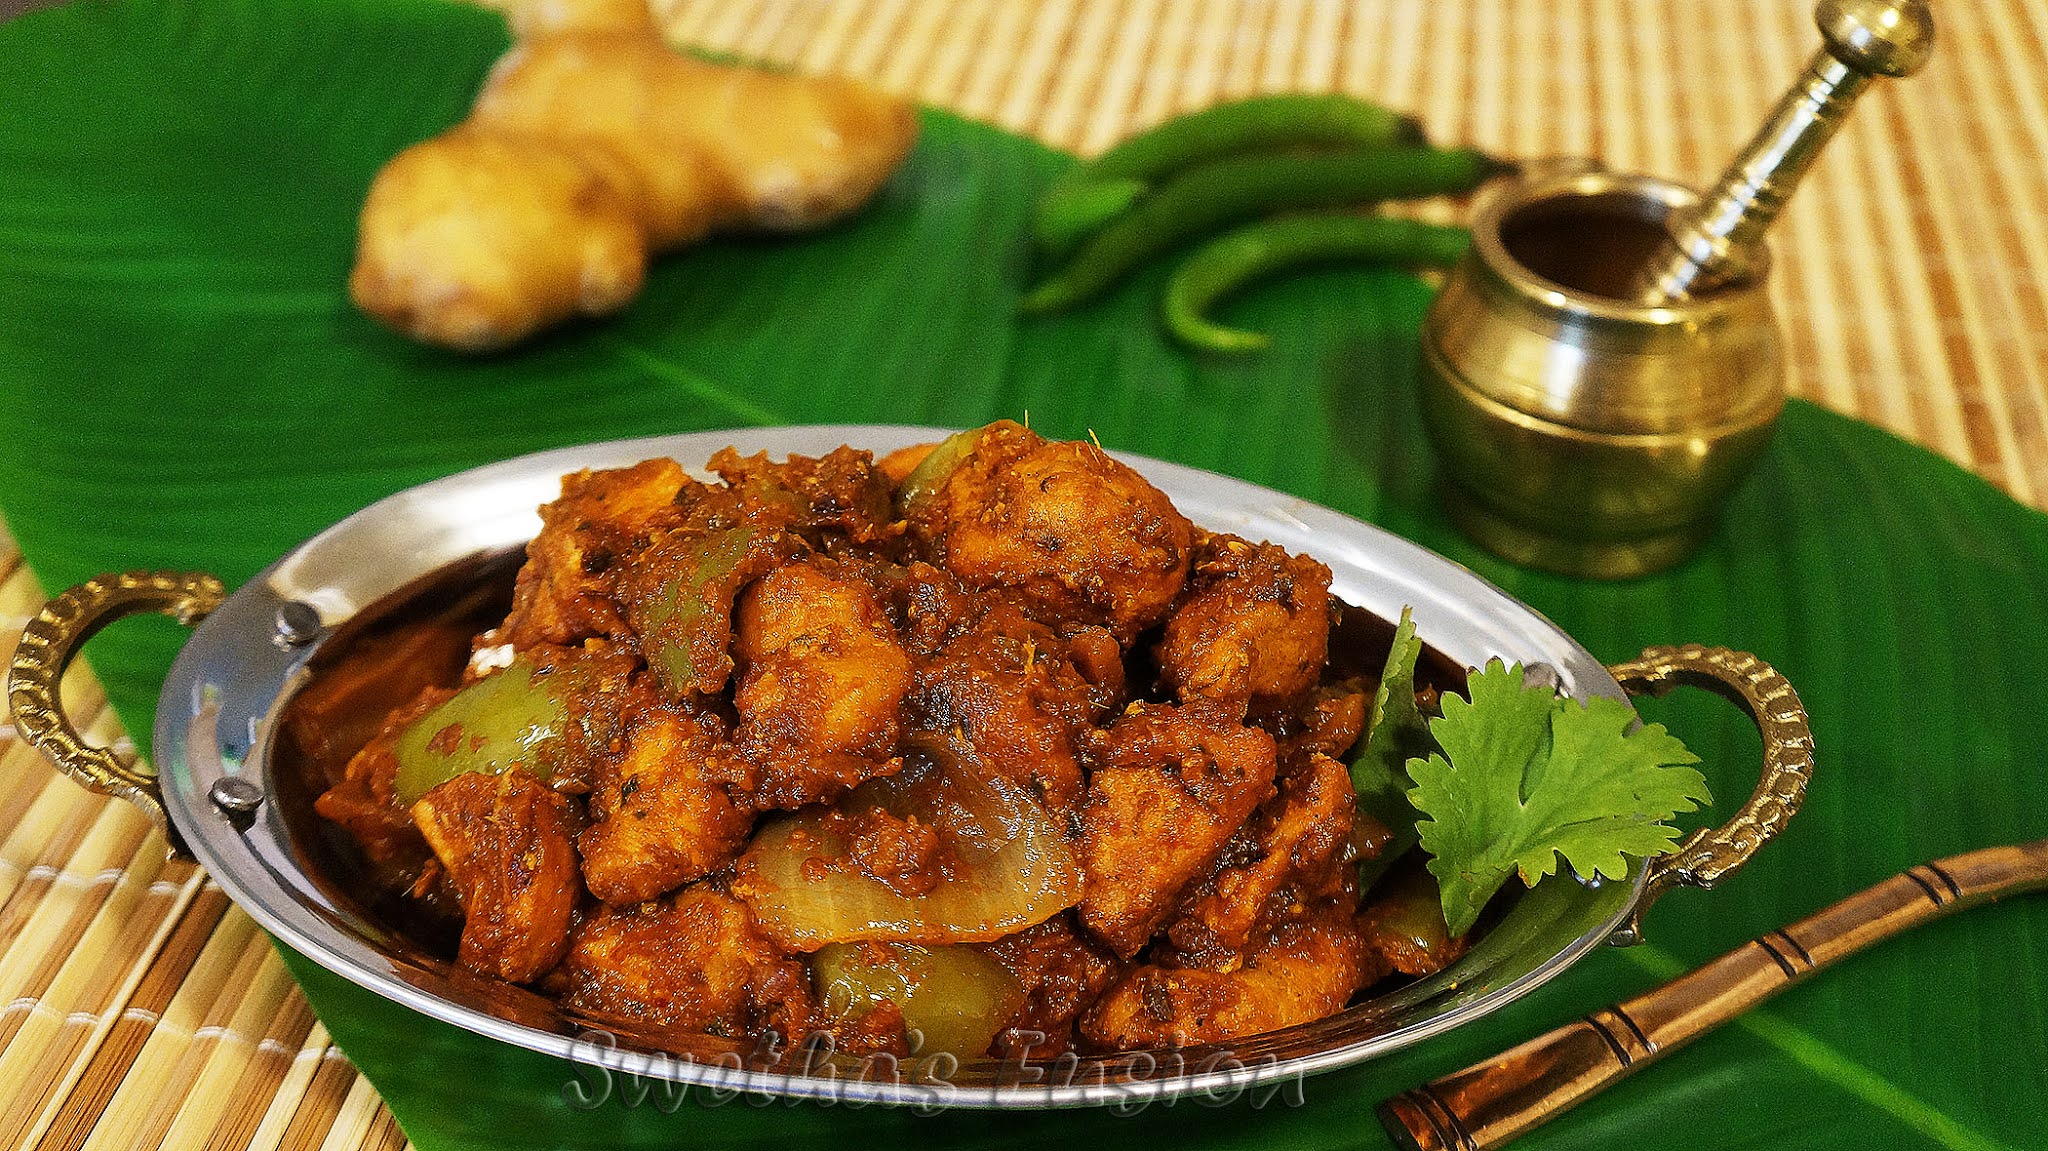
Kadai Chicken (both Airfryer and Pan cooking recipe methods)
Thursday, July 01, 2021
Kadai Chicken or Karhai Chicken is a North Indian dish served along with Indian bread or Rice. It is prepared with few ingredients but the taste is so good and unique. The main thing about the dish is using slightly cooked Bell Pepper (capsicum), usually green bell pepper is used, red and yellow ones may also used. I sometimes like to combine both Green and Red bell pepper to add the bright color to the dish.
Kadai | Karhai means Wok in Hindi, it used to be cooked in a thick deep wok. It takes a long time to prepare in this method, so I prepare it in Pressure pan to speed up the process. Now that I have a Airfryer, in parallel I cook the Chicken in the Airfryer then add it to the gravy. This not only reduce the cook time, less oil is used. Both methods are mentioned here in this post.
First, I have mentioned the stove-top method, and then Airfryer method is at the bottom. Please scroll down and check it out.
Ingredients:
- 1 lb - Chicken
- 2 big - Onions
- 3 big - Bell pepper (capsicum)
- 1 tbsp - coriander powder
- 1/2 tsp - garam masala powder
- 1 tsp - sugar
- Butter and oil - as needed
- Salt – as required.
- 10 - cashew nuts (optional)
Masala:
- 7 - Garlic flakes
- 1/2 " - Ginger piece
- 4 - Green chilies
- 5 - Red chilies
- 5 medium - Tomatoes
Preparation:
- Cut onions and bell pepper into big pieces and keep aside.
- In a blender, grind garlic, ginger, green chilies, red chilies and one tomato in to paste. Keep one tablespoon of the ground paste aside for using as marinade for chicken. Now, add rest of the tomatoes and grind in to smooth paste. Keep the masala aside for gravy.
- Clean and cut chicken. Mix-in turmeric powder, salt, red chili powder, lemon juice and marinade paste to chicken.
- Mix and keep aside for about 30 minutes.
- ~ o 0 o ~ -
Method (Pan cooked):
- In a ‘Kadai’ | fry-pan (or Pressure cooker ) heat 1 tsp oil, increase the flame to high and add bell pepper pieces. Cook for about 3 minutes and keep aside. The bell pepper will be added later to keep its flavor and also not let it become mushy.
- In the same kadai, heat 1 tsp oil, add sliced onions and fry till it becomes transparent. Keep aside. [ I like my onions crunchy in my curries, I will add it in to the curry later as well along with bell pepper. You may choose to leave it in the kadai, continue with rest of the steps. ]
- In the same kadai, add a tablespoon of ghee, butter or oil and heat on medium flame. Add sugar and let it caramelize. (This helps to bring that bright red color).
- Add the ground paste, cover and cook for about 3 to 5 minutes until the raw smell is gone and you start seeing oil collecting at the edge of the gravy in the pan.
- Now add marinated chicken and mix.
- Add coriander powder and garam masala powder. Mix
- Add salt and water. Stir, cover and simmer until the chicken is cooked. Stir in between to make sure the curry does not stick to the pan and burn. [ If using pressure cooker, cover, put the weight on the cooker, cook for two or three whistles and then turn off the flame. Wait until the pressure releases, remove the cover and cook for few minutes to let the liquid be observed. NOTE: number of whistles depends on type of cooker and how tender is the chicken. ]
- Once chicken is cooked, add fried onions, bell pepper and mix gently. Allow to cook for couple of minutes more. Turn off the flame.
- Optional: Stir 1/2 tsp of Kasoori methi | dry fenugreek leaves.
- Garnish with fried cashew nuts and serve hot with rice or Indian bread (roti/chapati,naan, pulkas)

Method (with Air Fryer ):
- Cook marinated chicken and bell pepper in Airfryer (either using skewers or just placing in the airfryer basket or tray. )
- In a ‘Kadai’ | fry-pan heat some butter, add sliced onions and fry till it becomes transparent. Keep aside.
- In the same kadai, add a tablespoon of ghee, butter or oil and heat on medium flame. Add sugar and let it caramelize. (This helps to bring that bright red color).
- Add the ground paste, cover and cook for about 3 to 5 minutes until the raw smell is gone and you start seeing oil collecting at the edge of the gravy in the pan.
- Now add airfryer cooked chicken and bell pepper to the kadai.
- Add coriander powder and garam masala powder. Mix
- Add salt as needed. Stir, cover and cook for about 5 to 8 minutes.
- Add fried onions, and mix gently. Allow to cook for couple of minutes more. Turn off the flame.
- Optional: Stir 1/2 tsp of Kasoori methi | dry fenugreek leaves
- Garnish with fried cashew nuts and serve hot with rice or Indian bread (roti/chapati,naan, pulkas)

Labels: Air Fryer, Chicken, North Indian dish, Side-Dish
~ Kadai Chicken (both Airfryer and Pan cooking recipe methods)
~
Posted by Swetha @ 7/01/2021 05:00:00 PM ::
Swetha's Fusion ::
permalink