Cauliflower Tawa Fry - South Canara Style
Sunday, July 14, 2024
Cauliflower Tawa Fry and similar tawa fry dishes are made as a side dish to go with Ganji. In india, as any typical Mangalorean house, we ate 'kuchalakki ganji' for supper. Which is basically red boiled-rice porridge, -very nutritious and well suited for the tropical weather conditions.
Ingredients:
- 2 cup - Cauliflower florets [I used half of a medium sized cauliflower]
-
½ cup - Cooking oil for frying
-
½ cup - Suji rava | semolina
Masala for Marination:
- 2 tsp - Rasam powder
- 1 tsp - Red chilli powder (from byadagi red chilli)
-
1 tsp - Turmeric powder
- 1 tsp - Cumin powder
- 2 tsp - Coriander powder
- 1 tsp - Tamarind paste
- Salt to taste
Method:
-
Cut the cauliflower florets into slices. Basically cut lengthwise in the
middle, about a centimeter thick.
-
Take a bowl of warm water or tap water, mix some salt. Put the slices in the
water till ready to use. Soaking in water helps in removing chemicals like pesticides and salt helps kill any bugs if present
as well.
-
To prepare the masala, take all the masala ingredients listed in a mixing
bowl, add little water and mix it to form thick paste.
-
Drain the sliced cauliflower from water put it into the mixing bowl with
masala. Keep it aside and marinate for about 15 mins.
-
After 15 minutes, sprinkle the suji rava over the mixture, mix it to lightly
coat the cauliflower slices.
-
Place a flat fry pan on stove, switch it on to medium flame. Lightly spread
oil over the pan.
-
Once the pan is hot, transfer the marinated cauliflower slices on the pan, spread and arrange them evenly.
-
Reduce the flame to medium-low, drizzle 1 tsp of oil over the cauliflower slices, cover the pan and cook for
about 4 to 5 minutes or until the underside of the slices are crispy.
-
Remove the cover, flip each slice, on a low flame, let the other side get crispy as well. No need to cover the pan this time. Will take about 5 to 7 minutes.
- Serve hot along with rice.
NOTE:
- You may use same masala and steps to make tawa fry with Potato, Brinjal/Eggplant, Breadfruit, Plantain/green-banana, Kantola/spiny gourd and Fish.
- Lime juice can be substituted for tamarind paste.
- I usually use Rasam powder as it gives more flavor. If you don't have rasam powder, just substitute with more red chilli powder.
- Garam masala can be substituted for Rasam powder. One may notice, we in South India do not use much of Garam masala in our dishes as it does not suit the weather condition and one may end up upsetting their stomach. Garam means 'Heat', Garam masala is good to use in cold place like in North India, It generate heat in your body while digesting. If we do use garam masala, we also add poppy seeds, black pepper, coconut etc., to cool down and counter act. My mom would make Gasgase (poppy seeds) payasa for desert after having a meal which needed garam masala (like Chicken curry or Biryani)
Labels: Fritters, Kundapura, Side-Dish, South-Indian Dish, Tawa Fry, Vegetarian
Stuffed - Chili Fritters | Mirchi Bonda | Menasinakai Bajji
Wednesday, July 10, 2024
In Bombay(Mumbai) one will find lots of Mirchi Bonda street stalls. Sometimes stuffed and
sometimes plain. It is also part of 'Special double Vada pav'. In
Karnataka, it is known as Menasinakai Bajji. It is a great evening snack
especially while enjoying the monsoon rain.
Usually, for stuffed bonda, big green chilies (not very spicy) or even small
green bell peppers are used. The whole chili is used to make the bonda, but
since my fry-pan is small, I cut the chili into small rings. For this recipe I
used Anaheim Green Pepper. You can also use other pepper which has room for stuffing and is not very spicy.
Ingredients:
- 3 - Green pepper
- oil for deep fry
For batter:
- 1 cup - besan | chickpeas flour
- 1 tbsp. - rice flour
-
¼ tsp - red chili powder
- a pinch - turmeric
- a pinch - hing | asafetida
- salt as per taste
For stuffing:
- 2 - boiled potatoes
- 1 - onion chopped finely
- ½ tsp - chat masala powder
- ½ cup - chopped fresh coriander leaves
- 1 tsp - lime juice
- salt as per taste
Prep:
- Boil potatoes, remove the skin and mash the potatoes
- Finely chop onions
-
Wash the green chilies. Cut them into rings as shown in the picture or
slit one side of the chili. Remove the seeds and inside veins.
-
Prepare the batter: In a mixing bow, place all the batter ingredients.
Gradually add water while mixing to make a smooth paste. Not too watery
nor thick paste. Keep aside.
-
Prepare Stuffing: In another bowl, take the mashed potato, cut onion,
chat masala powder and salt. Mix it all well. Now add lime juice and cut
coriander leaves. Give a quick mix.
Method:
-
Stuff the potato mixture into the peppers gently and keep it aside. I had
some extra stuffing so I made it into small balls to make batata vada
-
Put fry pan with oil on the stove on medium flame. Wait until the oil is
hot enough. To test, a small amount of batter dropped into the oil should
immediately bubble and float to the top.
-
Dip each stuffed chili in the batter and carefully slide into the hot oil
for frying. Repeat with few more them until fry pan fits enough. Do not
over crowd the pan, may have to make in multiple batches depending on the
size of your fry-pan.
-
Fry the bonda in medium flame, flipping the bonda after every few minutes
to cook evenly on all the sides.
-
Once cooked, carefully remove the bonda with a help of a large slotted
spoon - onto a paper towel to remove excess oil.
- Serve hot with chutney or tomato ketchup.
Labels: Appetizers, Bonda/Pakoda, Fritters, Snack, Vegetarian
~ Stuffed - Chili Fritters | Mirchi Bonda | Menasinakai Bajji
~
Posted by Swetha @ 7/10/2024 09:45:00 PM ::
 Swetha's Fusion
 ::
permalink
Vermicelli Pakoda, Semiya Bonda, Shevige Bajji in Air Fryer (from leftover Vermicelli Upma)
Wednesday, July 03, 2024
Yesterday I posted recipe for
Vermicelli Upma, so what to do with the leftover
upma. Here is a secret, I prepare extra upma so that I can make Vermicelli
Pakoda or
Vermicelli cutlet for snacks. It goes so well with evening tea or
filter-coffee. Now that we have air-fryer it makes my life more easy, I don't
have to stand in front of the hot oil and constantly monitor it. Of course, it
is more healthy as there is very little oil needed to prepare it in
Air-fryer.
Ingredients:
- 2 cups - Vermicelli Upma
- 2 tsp - red chili powder (or as per taste. Pakodas are usually more spicier then the upma)
- 1 tsp - green chutney (optional)
- 1 tbsp. - curds [1 tsp lime juice can be used instead]
-
½ cup - boiled and mashed potato (optional) helps in binding
-
½ cup - oil -for brushing
For dipping batter:
- 2 tbsp. - Besan | Chickpeas flour
-
1 tbsp. - corn flour [for Air fryer recipe, if you want to fry in oil, just
add 1 more cup of Besan]
- 1 tsp - chili powder
- 1 pinch - hing | asafetida
- 2 tsp - oil
- salt as per taste
Method:
- Take the leftover Vermicelli upma in a mixing bowl.
-
Add red chili powder, green chutney, curds (or lime juice) and mashed
potato if using. Mix it all together.
-
In another smaller mixing bowl, Take all the ingredients for making
dipping batter and mix.
-
Now slowly add little water at a time and mix to form thin
batter.
-
Put a liner in the Air Fryer basket. This is a optional step, but helps
from batter dripping.
-
Take about 1½ tablespoon vermicelli mixture and form into a ball. Press it in
between you palm to form vada shape. Place it on a plate. Shape the rest
of mixture into vada and keep it ready.
-
Now, dip each vada in the batter and place them on the liner in the air
fryer basket.
-
Lightly spray cooking oil on the vada and place the basket in the air
fryer.
-
Air fry on 375°C (700°F) for 12 minutes.
-
After 12 minutes, remove the vada, turn them over and place them
directly in basket with out the liner. Spray or brush cooking oil over
the vada and cook for another 8 to 10 minutes or until done.
- Serve hot Vermicelli pakoda with green chutney or ketchup.
NOTE:
- Using corn flour helps the pakoda get crispy outer coating.
- Adding bit of mashed potato helps for binding and keep the vada shape. Also, adds to the flavor.
- If you don't have leftover Vermicelli upma, just follow the direction on the packet to cook the vermicelli and use it to make the pakoda. You will need add salt and more chili powder.

Labels: Air Fryer, Appetizers, Bonda/Pakoda, Fritters, Snack, Vermicelli
~ Vermicelli Pakoda, Semiya Bonda, Shevige Bajji in Air Fryer (from leftover Vermicelli Upma)
~
Posted by Swetha @ 7/03/2024 07:50:00 PM ::
Swetha's Fusion ::
permalink
Dal Vada | Chattambade | Aambode | Lentil Fritters - AIR FRYER version
Saturday, June 29, 2024
You may have already seen my past blog posts on preparing
Dal Vada,
Masala Vada and
Sabudana Vada
traditional way of making by deep-frying them. But, now I have my NEW favorite... Since I got my
Air Fryer, I have been experimenting with recipes which usually requires deep
frying in oil to make them in Air Fryer with very little oil. To my surprise Air Fried
Dal Vada and
Sabudana Vada
tastes much better and cooks well evenly without the dripping oil.
Did I mention, I have not deep fried anything since I brought the Air Fryer in
Nov of 2020. I am so proud of myself.
I am still trying to figure out how to make my all-time-favorite Onion Pakodas
in Air Fryer. Few times I experimented, the pakodas has turned out dry, not the same.
Meanwhile, check out other
Air Fryer
recipes.
Ingredients:
- 1 cup - Bengal gram dhal (Chana dhal)
-
¼ cup - Finely chopped
onions
- 3 - Green chilies ( or as per taste)
- 1 tsp - Crushed ginger
- 2 tbsp. - Chopped coriander
- 1 tsp - Chopped curry leaves
-
1 tsp - Fresh dill leaves -finely chopped (use only the
leaves and discard the stem)
- 2 tbsp. - oil
- Pinch of asafoetida (Hing)
- Salt - to taste
Method:
- Wash and soak chana dal in water for 2 hours ( Tip: if you are short on time,
wash Chana dhal and with little water microwave for 5 to 6 minutes.
Remove add some more water and let it soak for half an hour)
-
In a blender, add green chilies and ginger. Grind it into fine paste
without adding water. Transfer it to a mixing bowl.
- With help of a strainer, completely drain water from the soaked
chana dal. Transfer it the blender. Without adding any water, grind it in to coarse paste . Basically pulse the soaked lentils for 5 to 6 times in
the blender. As you will notice in the picture some of the lentils are
intact. Transfer it to the same mixing bowl with ginger/green-chili
paste.
-
Add salt, 1 tbsp. of oil and coriander/dill/curry leaves to the mixing
bowl.
-
Mix all together, it should form into a ball easily when pressed into
one, If needed sprinkle little water if it dry or add little rice flour
if the mixture is watery.
-
Apply little oil on your palm so that the mixture won't stick to your hands.
Roll the mixture into lemon sized ball and press slightly flat in
between center of your palms to shape into vada. Keep aside on a plate.
Work with rest of the mixture to make all the vada ready.
-
Place the shaped vada in the air-fryer basket. you may line it with
parchment paper if you wish. I use a 2-tier wire rack. I brush the
rack with oil and place the vada on them. Using 2-tier rack allows me to
make about 18 vada at a time. Which helps save time and electricity.
-
Brush or spray the vada(s) with oil. place the rake (or basket) in the
air-fryer.
- Air-fry for 13 minutes on 395F (200C).
-
After about 13 minutes, brush/spray oil on the top, now flip the vada
over and brush/spray oil on the other side of the vada. Since I
use 2-tier rack, I even switch the vada between top and bottom rack for
even cooking and roasting. Airfry for 8 - 10 minutes more, or until
done.
- Serve hot with chutney or tomato sauce.
Notes, Tips and Variations:
-
*Dill =
sabsige soppu in Kannada
-
May use red chilies powder instead of green chilies. Vada will turn out
dark shade.
-
Finely chopped mint leaves (puddina) or or any other greens may be
added.
-
1/4 cup of split white peas can be added while soaking for more crisper
vade.
-
No onion: If you plan to make dal vada on a festival or a fasting
occasion, then simply skip onions. Add a generous pinch of asafetida to
mimic the onion flavors.
-
Soaking: Do not soak chana dal for more than 2 hours. Soaking it for
longer time does not result in crispy texture.
-
Consistency: The ground mixture has a thick and coarse consistency. If
the batter becomes flowing or runny, then add some rice flour to thicken
it.
-
Shaping: A thick coarse mixture helps to shape the vada easily.
Labels: Air Fryer, Appetizers, Fritters, Healthy dish, Lentil, Snack, Vegetarian
~ Dal Vada | Chattambade | Aambode | Lentil Fritters - AIR FRYER version
~
Posted by Swetha @ 6/29/2024 10:11:00 AM ::
Swetha's Fusion ::
permalink
Breadfruit Fritters | JeevGujje Bajji | JeevKadgi Podi
Thursday, June 27, 2024

Breadfruit is an interesting fruit. When it is fully ripe, it is consumed as a
fruit which is sweet just like Plantain. For the sevory dish and curry, it is better to use the
breadfruit which is just before mature (See below). Don't use raw
breadfruit.
In India, breadfruit is mostly used in South-India, as it grows in tropical
climate. My mom made this podi as a side dish to have with supper. As any
typical Mangalorean house, we ate 'kuchalakki ganji' for supper. Which is basically
red boiled-rice porridge, -very nutritious and well suited for the
tropical weather conditions. The rice water in porridge, or ganji,
replenish all nutrients and water that are lost due to sweating and is rich in
amino acids, vitamin E etc,.
Ingredients:
- half of the whole Breadfruit
- 1 cup - gram flour | besan | chickpea flour
- 1 tbsp. - rice flour
- 2 tsp - red chilli powder
- 1 tsp - cumin seeds
- a pinch - of asafoetida (hing)
- a pinch - of baking soda [Optional]
- salt to taste
- oil for deep frying
Method:
- Cut half of the breadfruit one more time to make into 1/4th.
-
Peel the breadfruit's outer skin, cut it vertically to remove the
center core. Discard the skin and the core.
- Then cut it into slices. Crescent shaped .5mm to 1cm slices.
- Put the cut slices into cold water with bit of salt. Keep aside.
-
Meanwhile prepare the batter by placing the rest of dry ingredients in a
deep bowl.
- Gradually add water while mixing to make a smooth paste. Not too watery nor thick paste.
- Put oil for deep-frying on the stove on medium-high heat.
-
Once the oil is hot, reduce the flame to medium as breadfruit takes more
time to cook.
- Drain the breadfruit slices and keep aside.
-
Dip each breadfruit slice in the batter and carefully slide into the hot
oil for frying. Repeat with few more slices until fry pan fits enough.
Need to work faster here so that all the slices are evenly cooked. Do
not over crowd the pan, may have to make in multiple batches depending
on the size of your fry-pan.
-
Fry the podi in medium flame, flipping the podi after every few minutes to
cook evenly on both sides.
-
Once cooked, carefully remove the podi with a help of a large slotted
spoon - onto a paper towel to remove excess oil.
-
Serve hot as a appetizer with green chutney, or as a side dish with
rice.

Labels: Appetizers, Bonda/Pakoda, Fritters, Mangalore dish, Side-Dish, Snack, South-Indian Dish, Vegetarian
~ Breadfruit Fritters | JeevGujje Bajji | JeevKadgi Podi
~
Posted by Swetha @ 6/27/2024 01:24:00 PM ::
Swetha's Fusion ::
permalink
Masala Vada
Tuesday, December 20, 2022

Masala Vada is similar to
Dal vada, but with more spices and flavor.
Masala vada goes well with coconut chetney
Ingredients:
- ¼ cup - chopped onions or 1 small onion
- 1 tsp - chopped green chili
- 1 tsp - chopped ginger
- 9 to 10 - curry leaves – finely chopped
- 3 tsp - chopped coriander leaves
- 1 pinch asafoetida (hing)
- salt as required
- oil for deep frying – as required
- water for soaking chana dal – as required
- Ground together
- ½ cup - chana dal (husked and split bengal gram) – 120 grams
- 1 - dry red chili – deseeded and halved (or red chili powder may be used)
- 1 tsp - fennel seeds
- ½ tsp - coriander seeds
- ¼ tsp - black pepper
Method:
- Rinse chana dal couple of times in water. Then soak in enough water for 2 hours. [if short on time, microwave(with water) for 5 minutes and let it sit for about 30 minutes]
- In a blender, add dry red chili, fennel seeds, coriander seeds and black pepper. Grind the spices coarsely
- Drain all the water from the soaked chana dal. Add the soaked lentils to the blender along with the spices and grind the lentils coarsely. Some whole chana dal should be there. No need to add water while grinding.
- Remove the ground dal-spice mix in to a mixing bowl.
- To the mixture, add chopped - onions, green chilies, ginger, curry leaves, coriander leaves, asafetida(hing), and salt as per taste.
- Mix everything together.
- Meanwhile, heat oil in a fry-pan
- Let the oil become hot on medium heat. to test if the oil is ready, drop a tiny portion of the masala vada mixture in the hot oil. If it comes up bubbling and quickly on to the surface of the oil, you can begin frying.
- Shape the mixture to a big lemon sized ball, press slightly to flatten it on your palm.
- Gently drop the vada to the hot oil, may fry multiple vada at a time depending on the size of your fry-pan.
- Let one side become light golden and then turn them over with a slotted spoon. Then fry the second side. If the oil becomes very hot, reduce the heat.
- Fry until masala vada turns crisp and golden. Flip each vada a couple of times for even frying.
- Remove the vadas with a slotted spoon and place them on kitchen paper towels to remove extra oil. Use up the entire masala vada mixture to shape and fry as shown in the steps above.
- Serve these spiced masala vada hot with coconut chutney.
TIPS:
No onion: If you plan to make dal vada on a festival or a fasting occasion, then simply skip onions. Add a generous pinch of asafetida to mimic the onion flavors.
Soaking: Do not soak chana dal for more than 2 hours. Soaking it for longer time does not result in crispy texture.
Consistency: The ground mixture has a thick and coarse consistency. If the batter becomes flowing or runny, then add some rice flour to thicken it.
Shaping: A thick coarse mixture helps to shape the vada easily. For super crispy vadai, flatten them more.
Labels: Appetizers, breakfast, Fritters, Lentil, Side-Dish, Snack, South-Indian Dish, Vegetarian
Halasina Hannina Mulka - Jackfruit Fritters | Muffins - (Baked & Air Fried)
Wednesday, July 07, 2021
Halasina Hannina Mulka - Jackfruit Fritters is a traditional dish, originally recipe calls for deep frying. But for over six months I have not deep fried anything and I plan to keep it that way. Over the weekend I found Jackfruit and wanted to make mulka, so I experimented around and tried preparing it in my Air Fryer, came out yummy the first try. My Air fryer has the option for baking as well. So I first backed for 15 minutes, and then Air fried for 7 minutes. It was ready to eat after baking but, I wanted that roasted (bit burnt) outer layer which you get when deep fried. Yummy!
To be honest, in my opinion it turned out better than deep frying. I should confess, since I was not going to deep fry, I added some ghee to the dough and also brushed mulka with some ghee. Reminded me of the
Southadka Ganapathi temple prasada - sweet appam. Of course, no where near the authentic temple prasada, but house was smelling like one. I love that place ...so peaceful and serene open temple, how I wish to visit the temple now. I pray Lord Ganesha will bless me many more opportunity to visit again and again, ...and also visit his parents at
Sri Kshetra Dharmasthala to offer my humble prayers.
There are many variations for the recipe, some also make with rice flour and/or sujji rava (semolina). I make with wheat flour and sujji rava. Also see
Bale Hannina Mulka | Banana FrittersIngredients:
- 10 to 12 - fully ripe Jackfruit pods/arils (scroll to the end of this post for extracting the pods)
- 1 cup - whole wheat flour (some people use rice flour)
- ½ cup - Sujji rava | semolina
- ½ cup - grated coconut (may be grounded as well)
- ½ cup - jaggery -crushed to powder
- 1 tsp - cardamom powder
- 1 tsp - honey
- 1 tsp - poppy seeds
- ½ tsp - black pepper powder
- ¼ tsp - baking soda or Eno fruit salt
- ¼ tsp - baking powder
- ¼ tsp - nutmeg powder
- ¼ tsp - cinnamon powder
- 2 tbsp - Ghee (clarified butter) or oil
- pinch of salt
Method (the way I prepared it):
- In a blender or food processing mince the Jackfruit pods/aril to course pulp.
- Transfer the minced Jackfruit into a mixing bowl.
- Add coconut and jaggery. Mix it all together in hand, squeezing and breaking big pieces of jaggery. The mixture will turn watery.
- To the mixture, now add wheat flour, sujji rava, baking soda, baking powder and pinch of salt. The consistency should be of thick cake batter. If it is too runny, add more wheat flour. If it is too hard, add bit of milk or water and mix.
- Next stir-in nutmeg powder, cinnamon powder, black pepper powder, poppy seeds, cardamom powder and honey.
- Cover and keep aside for about 10 minutes ...for everything to blend in and for the baking soda and powder to do its job.
- Meanwhile, brush the muffin molds with ghee or butter or oil. Preheat the oven for 5 minutes on 375F.
- After 10 minutes, mix in 1½ of ghee to batter. Spoon the batter into the prepared muffin molds. [ I used silicon mini muffin/brownie molds - size worked out perfectly ]
- Place the muffin mold in the preheated oven and bake for 15 minutes on 375F. Turn the own off and let it stay in oven for 5 more minutes.
- At this point, the mulka is cooked and ready to eat. But I want the crisp (almost burnt) outer layer. So I air-fried the mulka. If you don't have air-fryer, just flip the mulka and broil for few minutes in the oven.
- Remove the mulka from the muffin mold, place them in air-fryer basket.
- Brush the mulka with rest of the ghee.
- Air-fry on 395 F [200 C] for 5 to 7 minutes.
- Mulkas are ready (for the second time). Share and enjoy yummy mulka with your family.

Method for extracting the Jackfruit arils and separating the seeds from the flesh:
- Apply oil on your hand, cutting board and knife. Also a good idea to spread a newspaper for easy cleanup. As when fruit is pruned, the inner part (core) secretes a sticky, milky liquid, which can hardly be removed from the skin, even with soap and water. Applying oil ahead helps the clean-up.
- Separate each firm yellowish aril (seed coat, flesh), which has an intense sweet taste.
- Slit open each aril and reach in to pull out the seed and its coat - thin, waxy, parchment-like and easily removable testa (husk) and a brownish, membranous tegmen.
Labels: Air Fryer, Baking, Banana, breakfast, Festive Food, Fritters, Mangalore dish, Sweet, Traditional Sweet, Vegetarian
~ Halasina Hannina Mulka - Jackfruit Fritters | Muffins - (Baked & Air Fried)
~
Posted by Swetha @ 7/07/2021 03:03:00 PM ::
Swetha's Fusion ::
permalink
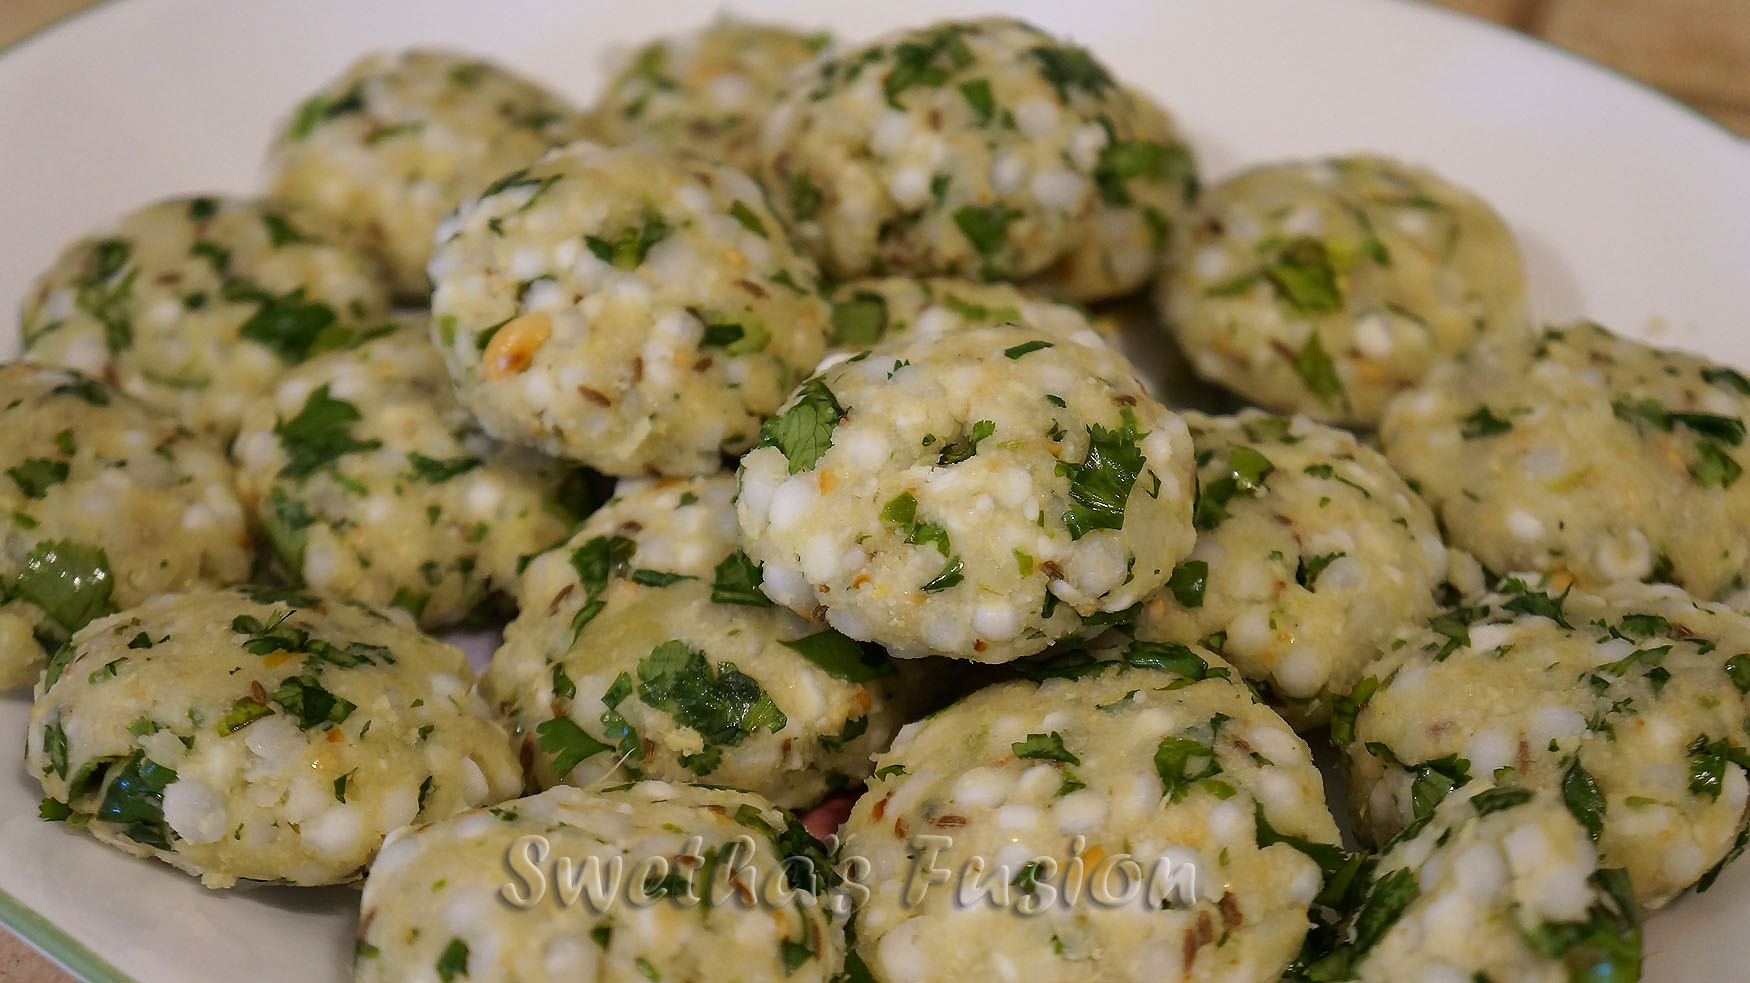
Sabudana Vada in Airfryer [Tapioca pearls fritters]
Tuesday, June 22, 2021
Here is the Air-fried version of the
Sabudana Vada, which is traditionally deep-fried fritters. I found no difference in taste between Air-fried and deep-fried. In fact, I felt air-fried vada taste better or may be because it has very little oil. All of sudden fritters became healthy snack ;)
Check out other
Sabudana/Sago/Tapioca Pearls recipes.
Ingredients:
- 1 cup - Sabakki/Sago/Tapioca Pearls
- 1 big - Boiled Potato
- 1 tsp - Jeera/Cumin seeds
- 1/3 cup - Dry roasted Peanuts powder (coarsely powdered)
- 1 tsp - Ginger paste
- 2 tsp - Green Chilli minced paste
- 1 tsp - Lemon juice
- 1/4 tsp - Sugar
- 1/2 cup - Coriander leaves - finely chopped
- 1/4 cup - dill leaves (optional) - finely chopped
- 1 tsp - oil
- Salt - as per taste
Method:
- Rinse sago well with water and soak sago overnight or for at least 5 hrs with enough water just to immerse it well. Drain the Sago in a strainer and set aside sago in the strainer on a stand or a bowl to let rest of the water drain.
- Dry roast peanuts till the skin splutters.
- Discard the skin and grind the peanuts to a coarse powder. (I make extra and save the powder in a air-tight jar for next time or for Sabbakki uppittu/Sago Khichdi)
- In a blender I combine ginger and chili to make paste, rather preparing it separately.
- In a mixing bowl - add sago,peanut powder,mashed potato, jeera, ginger/green chili paste, lime juice, sugar, coriander leaves (dill leaves,) oil and salt as per taste.
- Mix all together, it should form into a ball easily when pressed into one, If needed sprinkle little water if it dry or add little rice flour if the mixture is watery.
- Apply oil on your palm so that the mixture wont stick to your hands. Press the mixture into lemon sized ball and press slightly flat in between center of your palms to shape into vada. Keep aside on a plate. Work with rest of the mixture to make all the vada ready.
- Place the shaped vada in the air-fryer basket. you may line it with parchment paper if you wish. I use a 2-tier wire rack. I brush the rack with oil and place the vada on them. Using 2-tier rack allows me to make about 18 vada at a time. Which helps save time and electricity.
- Brush or spray the vada(s) with oil. place the rake (or basket) in the air-fryer.
- Air-fry for 13 minutes on 395F (200C).
- After about 13 minutes, brush/spray oil on the top, now flip the vada over and brush/spray oil on the other side of the vada. Since I use 2-tier rack, I even switch the vada between top and bottom rack for even cooking and roasting. Airfry for 8 - 10 minutes more, or until done.
- Serve hot with green chutney or tomato sauce.
Enjoy these healthy, guilt-free Sabudana vada with your family and friends.

Labels: Air Fryer, Appetizers, Fritters, Healthy dish, Sago, Side-Dish, Snack, Vegetarian
~ Sabudana Vada in Airfryer [Tapioca pearls fritters]
~
Posted by Swetha @ 6/22/2021 06:40:00 PM ::
Swetha's Fusion ::
permalink
Aloo | Potato Finger Chips in Airfryer
Monday, June 07, 2021
During Christmas we purchased a Airfryer. Had been keeping eye out and doing my research on which Airfryer to purchase. Finally, decided on Ninja Foodi 8qt, which is also 9 in 1 unit.Ordered online on Amazon during the sale. The first thing we tried out when it arrived is Potato Finger chips. basically French fries. It was ready in 30 minutes from Prep -> cooking -> cleanup (& eating ). This is a very simple dish, I would quickly prepare as a side-dish {click here) or snack. I used partially cook the cut potatoes in MWO, then pan roast rest of the way. This is the steps I follow to make potato finger chips in Airfryer.
Ingredients:
- 2 - big potatoes
- 1 tsp - turmeric powder
- ½ tsp - red chili powder |or| as per taste
- 1 tbs - bagel seasoning or any other flavoring mix (optional)
- 1 tbs - oil
- salt - as per taste
Method:
- Wash potatoes. Peel the skin and place the potatoes in a bowl with regular cold water.
- Cut potatoes into long strips or french fries shaped pieces. Drop the cut pieces into the same bowl of water.
- Once all the potatoes are cut, rinse the cut potatoes.
- Drain all the water out.
- Add salt, turmeric powder, chili powder, flavoring mix over the cut potatoes, mix or toss around to coat the pieces.
- Layer the Airfryer basket with parchment paper. This step is optional.
- Pour the potato mixture into the Airfryer basket.
- Set Airfryer to 390F, and Airfry for 20 minutes. - which is default on my Airfryer
- Say about after 10 minutes of cooking open and stir the potatoes around so it may cook and roast evenly.
- Once done, transfer the finger chips on a serving plate and serve along with ketchup or hot sauce
Labels: Air Fryer, Appetizers, Fritters, Potato, Side-Dish, Snack, Vegetarian