Masala Bread Toast - Bakery Style
Wednesday, June 26, 2024
Growing up in Bangalore, Masala bread-toast was one of the favorite evening tea-time snacks. We had a Iyengar Bakery near our home, they used to start selling Masala-Toast and Veg-puff at 4pm everyday. It was perfect timing for us to run afterschool to grab warm, right out of the oven snacks.
Now that it is not possible, I try to make them at home over weekends. Well, since I end up making so many of them, it ends up as our dinner.
Ingredients:- 2 tbsp - oil or butter
- 1/2 tsp - cumin seeds
- 1.5 cups - onion -finely chopped
- 1 long - green chilli -finely chopped
- 1/4 cup - capsicum/bell pepper -finely chopped
- 1 - carrot -grated
- 1 cup - tomato -finely chopped
- salt to taste
- 1/8 tsp - turmeric powder
- 1/4 tsp - chilli powder
- 1/4 tsp - garam masala
- 1 tsp - cumin powder
- 1 tbsp. - tomato ketchup
- 1/4 cup - chopped coriander leaves
- 8 to 10 - sandwich bread slices
Instructions:- Heat oil or butter in a pan, add cumin seeds. then add and fry onion, green chilli and capsicum for few minute in the same oil.
- Add grated carrots and fry for a minute.
- Further add chopped tomato, turmeric powder, salt, chilli powder, garam masala, cumin powder and mix well. fry till tomatoes are mushy.
- Mix-in a table-spoon of tomato ketchup.
- Turn off the stove. add chopped coriander leaves and mix well.
- Pre-heat the oven for 350 degrees F.
- Spread melted butter on the bread slices.
- Next, spread veg-mixture over the bread slices.
- Place the bread slices on a backing sheet and bake for about 10 minutes. Turn off and let it sit for 5 more minutes in the oven before serving
- Serve warm with ketchup, or green chutney. Tea or coffee will go with this toast.
NOTE:
- If one prefers, couple of masala toast can be made in small oven or over a flat pan.
- Extra Veg masala can be refrigerated for future use. or can be used for making bread pockets.
- Chat masala also may be added along with garam masala.
Labels: Appetizers, Baking, Bread, Lunch-box, Snack, Vegetarian
Ricotta Cheese Italian Cookies
Sunday, December 25, 2022
HAPPY HOLIDAYS & MERRY CHRISTMAS!!
Recently, at small Christmas gathering at my work place. I tasted some yummy cookies I never had before. Found out what it was , googled for recipe (Italian Ricotta Cheese cookies -tq) and here it is.
Check out more cooking ideas for Holidays!
Ingredients:- 1 container whole milk ricotta cheese (15-ounce)
- 2½ cups - all-purpose flour
- 1 tsp - baking powder
- 1 tsp - salt
- 8 tbsp. - (1 stick) unsalted butter, softened
- 2 cups - sugar
- 2 - eggs, at room temperature
- 3 tbsp - lemon juice
- ¼ tsp - lemon zest
- For the glaze: 1½ cups powdered sugar; 3 tbsp. lemon juice & ¼ lemon zested
Method:- Sieve the dry ingrediets (flour, baking powder, and salt) together and keep aside.
- Beat the butter and sugar on medium speed until light and fluffy, about 5 minutes. Add the eggs, one at a time, mixing between additions until well incorporated.
- Add the ricotta cheese, lemon juice, and lemon zest. Beat to combine.
- Fold in the dry ingredients, small amounts at a time.
- Tightly cover the dough with plastic wrap and refrigerate overnight.
- Preheat the oven to 375 degrees F. Line 2 baking sheets with parchment paper.
- Scoop the dough (about 1 tablespoon for each cookie) onto the baking sheets.
- Bake 10 minutes, until cooked through but still pale. (Note – they go from done to burnt really quick, test with a toothpick at 10 min)
- Remove from the oven and let the cookies rest on the cooling rack. Continue with the remaining dough. Glaze and decorate once the cookies are cooled.
- For the glaze, combine the powdered sugar, lemon juice, and lemon zest in a small bowl and stir until smooth. Spoon the glaze onto each cooled cookie and use the back of the spoon to gently spread, add sprinkles to decorate. Let the glaze harden for about 2 hours.
Makes about 40 to 45 cookies.
Labels: Baking, Cookie, Festive Food, Holidays, Sweet
Flan Recipe [ in pressure cooker ]
Sunday, August 21, 2022

Pressure Cooker Flan: If you love flan and dread cooking in oven for over hour and half, you are not alone. But if you are comfortable using a pressure cooker (traditional or electric or instant pot), this is a quick and easy recipe. To be honest, I don't know what I would do with out a pressure cooker. Most of my recipes are prepared using pressure cooker. I grew up watching my mom and everyone in the family using them. My mom used to make flan, custard pudding, caramel bread pudding etc., in pressure cooker, so I knew how to make them in pressure cooker. Actually, I never tried baking them in oven. The time required to prepare in oven discourages me to even try :P
Ingredients:
- 1/2 cup - granulated white sugar
- 2 tbsp. - water
- 2 cups - half-and-half or milk or coconut milk
- 1 14oz can - sweetened condensed milk
- 3 - eggs
- 1 tbsp - vanilla extract
- 1 tsp - dark rum (optional)
- Required equipment: a flan pan or round baking dish.
Method:
- In a small saucepan, heat white sugar over medium heat until all of the sugar has melted and turned amber. Remove from heat and carefully add the 2 tbsp of water (watch out for the steam). Stir until all of the water has mixed in, then pour into your flan mold or round baking dish. Set aside to cool while you make the flan mixture.
- Combine the eggs, half-and-half, condensed milk, and vanilla in a blender. (also add rum if desired) Blend until combined and no streaks remain. Gently pour into your prepared flan mold, then cover.
- Pour 1 cup of water in to your pressure cooker, and let the water come to a boil. Place a trivet or a wire stand in the center.
- Close the flan-mold and seal. If using a baking pan, cover the pan with aluminum foil to seal.
- Carefully place the flan mold/pan on a trivet.
- Close cooker lid. Bring to full pressure on high heat. Reduce heat and cook 12 minutes. [do not put the pressure-weight]
- After time is up, turn off the pressure cooker and allow the pressure to release naturally for another 12 minutes. Remove flan from pressure cooker and uncover (flan should be slightly jiggly in the center, but not watery). Allow to cool completely, then refrigerate for at least 4 hours (preferably overnight) before serving.
- Serve: Run a paring knife around the edge of the cup to loosen the custard. Set a plate on top of the flan-mold/pan, grab both the pan and the plate, and flip them together. Gently tap on the top, and lift the pan off of the flan - tap gently on the plate to unmold if it sticks. Pour rest of the melted caramel from the pan over the flan. Cut the flan, serve, and enjoy!
Makes about 8 servings.
Variations:
- To make an Irish Cream Flan, replace 1/2 cup of half-and-half with 1/2 cup of your favorite brand of Irish Cream and reduce the vanilla extract to 1 teaspoon. Do NOT use milk, or your flan might curdle.
- To make a dulce de leche flan, replace the can of condensed milk with a can of dulce de leche.
Labels: Baking, condensed milk, Desserts, Holidays, Pie, Sweet
Baklava (Airfryer recipe) made with flaky paratha
Saturday, January 01, 2022

YEAH! THIS IS MY 150th POST. THOUGHT BAKLAVA RECIPE WOULD BE THE RIGHT FIT FOR CELEBRATING THE ACHIEVEMENT :))
Baklava is a Mediterranean sweet dessert made of layers of flaky phyllo pastry filled with crushed nuts and sweetened with honey syrup. Each country/region has their own variations. For me, any of the variation would do :P I do love Mediterranean food ... for two main reasons. One: good vegetarian options on the menu, though I am not vegetarian, I lean towards being one. I should say their chicken recipes, especially the kabobs are yummy. Two: all sorts of desserts, especially Baklava.
The traditional Turkish baklava, aka "Fistikli Baklava" is my favorite. Fistikli Bakalva is a pistachio baklava, typically made of phyllo dough, finely crushed pistachios, butter, and a simple syrup made of sugar, water, and lemon juice. Read more about different baklava here
Inspired by Bhavan's recipe, here is my version of Baklava. Flaky parathas are used instead of phyllo sheets. I used Air-fryer to prepare these baklava. So far I have prepared it three times since I purchased the air-fryer in December 2020. Every time, it has been a big hit and disappeared in no time.
Ingredients:
- 6 - Kawan Flakey Parathas
- 2 tbsp - flour
- 1/2 cup - unsalted melted butter
- For fillings:
- 3 cups - nuts ( Almonds, Pistachios, Walnuts, Pecans - may use any type of nuts or combination of nuts)
- 3 tbsp - brown sugar
- 1/4 tsp - cardamom powder
- 1/4 tsp - cinnamon powder
- 1/8 tsp - nutmeg powder
- For syrup
- 1 cup - Honey (may substitute with Maple syrup or Agave nectar or make with sugar syrup)
- 1 tsp - Rose water / or rose syrup
- 1/4 tsp - cardamom powder
- 2 (3") cinnamon sticks
- 2 Tbsp lemon juice
- 2 strips lemon peel
- 1 teaspoon finely grated orange zest, plus 1 teaspoon orange curls
- 2 cloves (optional)
- For garnish:
- 1/4 cup - chopped Pistachios or save some of the filling mixture.
Method:
- Prepare honey syrup:
- Place the honey and about 2 tablespoon of water in a saucepan and heat on the stove-top. As it warms up, add orange extract, and cinnamon stick, cloves, cardamon powder, lemon juice and peel, orange zest and curls, and rose water/syrup. Stir to mix. Bring to a boil, then lower the heat and let the syrup simmer for about 5 minutes. Turn off the stove and keep aside. NOTE: remove the cinnamon stick, cloves, and orange & lemon peels before pouring the syrup on the baked baklava (Step 13).
- Prepare nut mixture:
- In a food processor, pulse each type of nut separately till they are coarsely ground. Transfer the processed nuts in to a mixing bowl, add brown sugar, cardamom powder, cinnamon powder and nutmeg powder. Mix it all together and keep aside.
- Line your baking pan with a parchment paper. On the parchment paper, dust dry flour. Optional step, but helps to remove baklava from the pan later.
- Take out the Kawan Parathas and let them thaw on the parchment paper. Sprinkle some dry flour on top of the parathas so as to not let it become sticky. Let it thaw for only 7-10 minutes.
- Preheat the air-fryer on high for four minutes.
- Once the parathas are slightly thawed, dust bit of flour and roll one of the parathas to the size of the pan.
- Place one paratha on the bottom of the pan and brush the top with melted butter. Spread about 3-4 tbsp of nuts and sugar mix on the paratha.
- Repeat the above two steps for four more parathas.
- Roll the sixth paratha, place on the top, brush melted butter.
- Using the edge of a sharp knife, cut the paratha layers into shapes you would like.
- Place the pan in the preheated air-fryer and air-fry for about 20 minutes. Note: the time required may deffer from one air-fryer to another. Check after 8 minutes and every 3 minutes to make sure baklava does not get burnt.
- If using oven, bake in preheated oven for about 40 minutes or till golden brown.
- Remove the baked baklava and pour the prepared honey syrup while it is still hot.
- Let baklava stay at room temperature overnight or for 8 hours. Garnish with chopped pistachios before serving.


Labels: Air Fryer, Baking, Desserts, Festive Food, Holidays, Sweet, Traditional Sweet
~ Baklava (Airfryer recipe) made with flaky paratha
~
Posted by Swetha @ 1/01/2022 11:22:00 AM ::
 Swetha's Fusion
 ::
permalink
Halasina Hannina Mulka - Jackfruit Fritters | Muffins - (Baked & Air Fried)
Wednesday, July 07, 2021
Halasina Hannina Mulka - Jackfruit Fritters is a traditional dish, originally recipe calls for deep frying. But for over six months I have not deep fried anything and I plan to keep it that way. Over the weekend I found Jackfruit and wanted to make mulka, so I experimented around and tried preparing it in my Air Fryer, came out yummy the first try. My Air fryer has the option for baking as well. So I first backed for 15 minutes, and then Air fried for 7 minutes. It was ready to eat after baking but, I wanted that roasted (bit burnt) outer layer which you get when deep fried. Yummy!
To be honest, in my opinion it turned out better than deep frying. I should confess, since I was not going to deep fry, I added some ghee to the dough and also brushed mulka with some ghee. Reminded me of the
Southadka Ganapathi temple prasada - sweet appam. Of course, no where near the authentic temple prasada, but house was smelling like one. I love that place ...so peaceful and serene open temple, how I wish to visit the temple now. I pray Lord Ganesha will bless me many more opportunity to visit again and again, ...and also visit his parents at
Sri Kshetra Dharmasthala to offer my humble prayers.
There are many variations for the recipe, some also make with rice flour and/or sujji rava (semolina). I make with wheat flour and sujji rava. Also see
Bale Hannina Mulka | Banana FrittersIngredients:
- 10 to 12 - fully ripe Jackfruit pods/arils (scroll to the end of this post for extracting the pods)
- 1 cup - whole wheat flour (some people use rice flour)
- ½ cup - Sujji rava | semolina
- ½ cup - grated coconut (may be grounded as well)
- ½ cup - jaggery -crushed to powder
- 1 tsp - cardamom powder
- 1 tsp - honey
- 1 tsp - poppy seeds
- ½ tsp - black pepper powder
- ¼ tsp - baking soda or Eno fruit salt
- ¼ tsp - baking powder
- ¼ tsp - nutmeg powder
- ¼ tsp - cinnamon powder
- 2 tbsp - Ghee (clarified butter) or oil
- pinch of salt
Method (the way I prepared it):
- In a blender or food processing mince the Jackfruit pods/aril to course pulp.
- Transfer the minced Jackfruit into a mixing bowl.
- Add coconut and jaggery. Mix it all together in hand, squeezing and breaking big pieces of jaggery. The mixture will turn watery.
- To the mixture, now add wheat flour, sujji rava, baking soda, baking powder and pinch of salt. The consistency should be of thick cake batter. If it is too runny, add more wheat flour. If it is too hard, add bit of milk or water and mix.
- Next stir-in nutmeg powder, cinnamon powder, black pepper powder, poppy seeds, cardamom powder and honey.
- Cover and keep aside for about 10 minutes ...for everything to blend in and for the baking soda and powder to do its job.
- Meanwhile, brush the muffin molds with ghee or butter or oil. Preheat the oven for 5 minutes on 375F.
- After 10 minutes, mix in 1½ of ghee to batter. Spoon the batter into the prepared muffin molds. [ I used silicon mini muffin/brownie molds - size worked out perfectly ]
- Place the muffin mold in the preheated oven and bake for 15 minutes on 375F. Turn the own off and let it stay in oven for 5 more minutes.
- At this point, the mulka is cooked and ready to eat. But I want the crisp (almost burnt) outer layer. So I air-fried the mulka. If you don't have air-fryer, just flip the mulka and broil for few minutes in the oven.
- Remove the mulka from the muffin mold, place them in air-fryer basket.
- Brush the mulka with rest of the ghee.
- Air-fry on 395 F [200 C] for 5 to 7 minutes.
- Mulkas are ready (for the second time). Share and enjoy yummy mulka with your family.

Method for extracting the Jackfruit arils and separating the seeds from the flesh:
- Apply oil on your hand, cutting board and knife. Also a good idea to spread a newspaper for easy cleanup. As when fruit is pruned, the inner part (core) secretes a sticky, milky liquid, which can hardly be removed from the skin, even with soap and water. Applying oil ahead helps the clean-up.
- Separate each firm yellowish aril (seed coat, flesh), which has an intense sweet taste.
- Slit open each aril and reach in to pull out the seed and its coat - thin, waxy, parchment-like and easily removable testa (husk) and a brownish, membranous tegmen.
Labels: Air Fryer, Baking, Banana, breakfast, Festive Food, Fritters, Mangalore dish, Sweet, Traditional Sweet, Vegetarian
~ Halasina Hannina Mulka - Jackfruit Fritters | Muffins - (Baked & Air Fried)
~
Posted by Swetha @ 7/07/2021 03:03:00 PM ::
Swetha's Fusion ::
permalink
Veg Puff in Airfryer
Tuesday, June 29, 2021
Ingredients:
- 4 - Kawan Flaky Parathas
- 2 cup - Aloo Bhaji (or any leftover dry curry for stuffing)
- 2 tbsp - melted butter
Method:
- Slightly warm the Aloo bhaji. Not too hot, maybe 30 secs in microwave oven.
- Remove Frozen Kawan parathas from freezer. Remove the parathas from the packet, separate them from the plastic sheets and spread bit of flour over them and let thaw for few minutes - just soft enough to handle them.
- Cut the parathas into half, place some stuffing as shown in the picture below
- Apply bit of water of water to the edges of the pastry, fold over and seal the pastry.
- Meanwhile preheat the Airfryer for 2 - 3 minutes.
- Apply melted butter over the stuffed pastry. You may make small indents on the top of the pastry with plastic knife.
- Place the prepared pastry in the airfryer basket or racks. Back for 7 minutes at 395 o F [200 o C].
- After 7 minutes, turn the pastry over. May apply one more coat of melted butter. Cook for 5 more minutes or until done.
- Remove and serve hot Veg puffs as is or with mint chutney. Enjoy!

Labels: Air Fryer, Appetizers, Baking, breakfast, Lunch-box, Potato, Snack, Vegetarian
Chicken 65 in Airfryer
Wednesday, June 23, 2021

Chicken 65 a popular non-vegetarian appetizer from south-India and now it has gained popularity around the world. Many of the restaurant now offer this dish on their menu. Vegetarian version of same dish can be prepared using Paneer (Indian cottage cheese) and Cauliflower - known as Paneer 65 and Gobi 65 respectively. The dish may be prepared on a grill, oven or tandoori oven, deep-fried, Pan cooked or Airfried. I used to follow my mom's recipe for stove-top/pan-cooked version until I purchased a Airfryer. I searched online and found Ranveer Brar's Chicken 65 in Philips Airfryer YouTube video, I tried the recipe and it turned out pretty good. He also has a deep fried [Chicken 65] version, which is different from my mom's recipes which does not require deep frying - Click [here] to check out my mom's recipe cooked with pressure-cooker and then roasted.
INGREDIENTS:
- 2 lb - Chicken
- 1 cup - onion - cut into big square pieces
- Oil - to spray while cooking.
Marinade:
- 1 cup - Thick curds or Greek yogurt
- 2 tsp - Red chili powder (or as per taste)
- 1 tsp - Black pepper powder
- 1 tbsp - Ginger Garlic (G Chili) Paste
- 1/2 tsp - Freshly roasted fennel seeds course powder
- 2 tsp - Coriander powder
- 1 - Egg
- 1 tbsp - Corn flour
- 1/2 tsp - Turmeric powder
- 1 tbsp - Lemon juice
- 2 Cloves + 2 Green cardamom + 1 Black cardamom powder (optional)
- 1/2 tsp - Kasturi Methi (optional)
- 1 tsp - Oil
- Salt
For Seasoning:
- 2 tsp - Ghee or oil
- 4 - Green chili - slit lengthwise
- 10 - curry leaves
- 10 - Cashew (optional)
For Garnishing:
- Fresh Coriander leaves
- Lemon wedges
- Onion - 1 small - cut into thin long pieces
METHOD:
- Clean and cut chicken into 1 to 2 inch pieces. Squeeze out the extra water.
- Sprinkle salt, turmeric powder & lemon juice over the chicken. Mix all together.
- Now add all other listed powders + ginger/garlic paste + egg + corn flour + curds + oil ( basically, rest of marinade ingredients)
- Mix it all, cover and keep it aside to marinate for at-least 10 - 30 minutes (or overnight in refrigerator)
- If you have skewers, thread the big onion pieces in between marinated chicken pieces. This will not only help infuse the flavor, it will also help prevent chicken pieces from sticking to each other. I have a air-fryer skewer-stand which is vertical. I add double layer of wide slices of onion at the end, which will end up as a bottom layer - to prevent the masala from flowing down and also to prevent chicken from sliding down and getting stuck to the stand.
- After preheating the air-fryer for about 4 minutes at 395 F [200 C], place the skewer stand in the air-fryer, cook for 15 minutes in air-fryer/crisp mode.
- After 13 minutes, rotate the skewers around (or flip over if it is horizontal skewer stand, or you have just laid the pieces on the air-fryer basket. Optional: at this point, you may coat the chicken pieces with additional left over ground masala and/or spread bit of oil or melted butter over the chicken pieces.
- Cook for additional 7 to 8 minutes or until done.
- Plate Chicken 65 as is with the skewers or remove it and spread it on a plate.
- In another seasoning pan, heat ghee, roast curry leaves, cashew-nuts and lengthwise slit green chilies. Pour the whole seasoning over prepared Chicken 65.
- Garnish with coriander leaves, cut onion and lemon wedges.
- Serve and enjoy!

Labels: Air Fryer, Appetizers, Baking, Chicken, Side-Dish, South-Indian Dish
Christmas fruit Cake / Rum Cake
Tuesday, January 01, 2019
This post is dedicated to Menaka Ajji or 'Ollamma' is what we used to call her with love. She used be our neighbor's sister. We used to wait for her visit as we had few common interests. One, love for cats; two, play board games (though she was our grandma's age), and love for baking .... well she taught us many wonderful baking recipes and we were eager to learn, to bake and of course to eat them. Menaka ajji used to conduct baking classes in Hyderabad and what more could one ask. She was a wonderful lady, time was filled with excitement during her visits, from chasing cats to shopping for ingredients to bake and enjoying our creations with Tea along with lots of talks, jokes and laughs.
Here is one of my favorite cake recipe - Christmas fruit/rum cake I learned from Menaka Ajji. Just like Nilgiris rich plum cake - rich, moist, loaded with dry fruits and nuts....and with good festive spirits. Literally!
Also, thank you Bina, for all the technical (I mean culinary) support for this cake.
Ingredients:
- **150gm =2/3 cup = 5.3 oz
- 150gms - maida / all purpose flour
- 75 gms - sugar for preparing caramel
- 75 gms - sugar pdr for the batter. Brown sugar or molasses may be used as it will result in preferred darker shade of the cake.
- 3 - eggs
- 150gms - butter (room temperature)
- 3/4 tsp - baking powder
- 1 tsp - Vanilla extract/essence
- 3 - cloves /laung
- 3 - cardamom / Elachi
- 3 - cinnamon / daalacheenee
- 1/2 tsp - ginger powder
- 1/2 tsp - caraway seeds / shah jeera
- Liquor - dark rum, brandy, sherry(wine) and/or Vodka - for soaking dry fruits and also used later to flavor the baked cake.
- Liqueur - (optional) Cointreau or Grand Marnier ...anything orange flavor for flavoring the baked cake
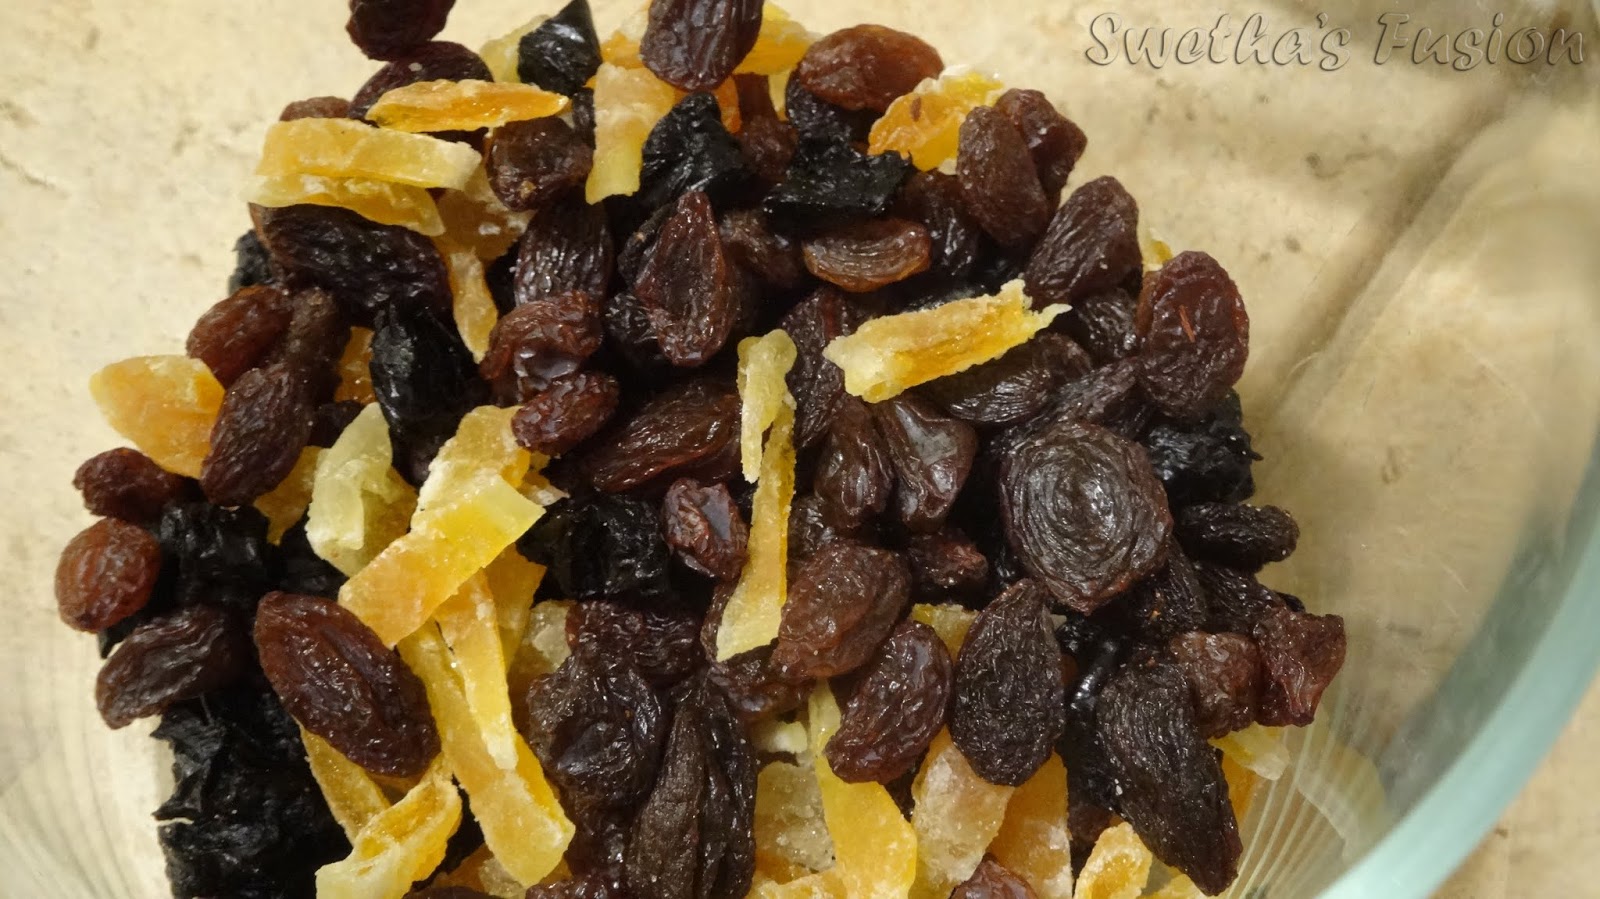
- 75 gms - dry fruits : resins, saltines, plums, figs, dates, orange and lemon zests (or candied glazed orange peels), candied cherries (not glazed cherries), Tutti-Frutti (candied colorful usually made of raw papaya) - use whichever is available for you.
- 75 gms - nuts :cashew nuts, walnuts, almonds, pecan (if not all, use which ever you find)
Method:
Preparing the Dry fruits:
- You may start this step almost a month before Christmas. ... or at least a week before. Because you want to make the cake day or two before Christmas.
- Cut candied orange peels and dates into small chunks or pulse couple of time in a food processor. Make sure dry fruits like dates are pitted.
- Put all the dry fruits in a container (which can be covered) or a wide-mouth glass jar. Pour Rum, Brandy, Sherry(or red wine) and/or Vodka, enough to cover all the dry fruits. Some people use only one kind of spirit (rum/brandy/red-wine). Cover and keep in a cool place.
- Every other day, open the jar and stir the content. If needed add more spirit to the mixture as the dry fruits soaks up the liquid.
- NOTE: Virgin Version ;) If you prefer not to use any liquor, you may prepare this cake with fruit juice. Four to five days before you make the cake, soak the dry fruits in fruit juice, grape or orange or combination of both may be used, preferably grape juice. Cover and refrigerate. Stir the content everyday and add more juice as needed. The day of baking or a day before, place the soaked dry fruits and the fresh juice of an orange in a sauce pan. Cover it, place it over a medium heat and allow it to cook until the juice is absorbed. Let it cool to room temperature before adding to the batter.
Preparing Caramel:
- In heavy bottomed metal pan (preferably not a non-stick coated pan), cook the sugar and a tbsp of water on medium high heat. You will find that the sugar will melt and start to change color.
- Swirl the pan once or twice without stirring with a spoon.
- When the sugar caramel turns darker golden brown color, turn off heat and place the vessel near the kitchen sink.
- To stop it from hardening, immediately, pour warm or hot water (a table spoon or two) little by little very carefully into the caramel and stir to mix well and keep aside. WARNING: the hot liquid may splash, be very careful and use caution.
Prepping before making the batter and baking:
- Drain the soaked dry fruits in a strainer and retain the drained spirit for later use.
- Grease the cake pans with butter and line with parchment paper if necessary. Keep aside. I keep mine in refrigerator until the batter is ready
- Lemon and Orange Zest: Use a grater/zester to grate-off the top layer of the fruit skin. Make sure not to go deep to grate the white part which is very bitter.
- Cut nuts in to small pieces and toss in flour. This helps it not to sink to the bottom while baking.
- Take the drained dry fruits and toss it around in flour separating the fruits chunks. You may add fresh lemon and orange zest to this mixture.
- In a food processor or in a mortar, make fine powder of all the spices - cloves, cinnamon, cardamom and caraway seeds.
- Sieve the flour with baking powder. Mix in the ground spice powder to the flour and keep aside.
- You may even add Coco powder and/or instant coffee powder to the flour to get that extra flavor and the desired dark cake color. This is optional, but I have added either or both if available.
- Set the oven to preheat to 180 C or 350 F. (Please refer to the oven manual as each oven works differently)
Preparing the cake batter, baking and final flavoring:
- Separate the yoke and egg-white.
- Beat egg whites until they are stiff, scrape the sides of the bowl often with a rubber spatula. Continue to beat the eggs until the peak stands straight up when the beater is lifted from the mixture. Beat the egg white till fluffy.
- In another large mixing bowl, beat the butter until paste and then gradually add sugar spoon by spoon while whisking.
- Beat the egg yoke with vanilla extract to the butter mixture.
- Add caramel to the mixture while still beating
- To the butter mixture gradually add bit of flour and bit of egg white. Mix using cut and fold method. Keep adding flour and egg white until all are mixed in.
[Cut and fold method or a.k.a fold-in or folding : The lighter mixture is placed on top of the heavier mixture, then the two are combined by passing a flat spatula (usually a rubber or flat wooden spatula) down through the mixture, across the bottom, and up over the top. This process continues until the mixtures are combined. This traps air into bubbles in the mixture, allowing the cake to rise well while baking. This is accomplished by a specific technique of using a spoon to lift the two mixtures together, turning them over using a spatula so they combine.]
- Finally now fold-in the dry fruits and nuts to the batter
- Pour the batter into the greased and lined baking tray/pan.
- Bake for 40 min - 60 min in a preheated oven or until a toothpick inserted to the cake comes out clean.
- Once done, take the cake out and let it cool.
- Invert the cake on a plate. Use a fork or toothpick to make small holes at the hard edges. This is to help the liquid to seep through and moisten the hard edges.
- Slightly warm the saved liquor or make a fresh mix by combining fruit juice with rum or just the warm rum( combined with Liqueur-optional). Use a spoon and spread over the cake as it soaks, turn the cake over and spread the spread the liquid over the cake.
- Cover with a cello /cling-warp and keep aside. May be refrigerate too. Note: do not warp or cover with Aluminium foil.
- Repeat the process couple of more times after 6 - 8 hours gap.
- You may choose to decorate it with frosting. But in our home, we just slice the cake and enjoy as the cake itself is moist, rich and very flavorful with all the dry fruits, nuts and liquor.

Wish you all wonderful Christmas with your family and Friends!
Happy Cooking! Happy Baking! Enjoy!
Don't forget to leave comments below.

Labels: Baking, Cake, Christmas, Holidays, Sweet