Vermicelli Cutlet | Semiya Tikki | Shevige Cutlet - from leftover Vermicelli Umpa
Wednesday, July 10, 2024
Here is one more recipe made from leftover
Vermicelli Upma, just like my
previous post
Vermicelli Pakoda. A wonderful and tasty twist. You can make
these patties in the morning, let it cool to room temperature then pack it for
lunch. Kids love it. You can serve as a snack with evening tea.
Ingredients:
- 2 cups - Vermicelli Upma
-
2 tsp - red chili powder (or as per taste)
- 1 tsp - lime juice
- 2 tsp - finely cut fresh coriander leaves
- ½ cup - boiled and mashed potato helps in binding
-
½ cup - bread crumbs [store brought or home made] [Suji rava may be used
instead]
- ½ cup - oil -for brushing
Method:
- Take the leftover Vermicelli upma in a mixing bowl.
-
Add red chili powder, lime juice and mashed potato. Mix it all
together.
-
Take about 2 tablespoon vermicelli mixture and form into a ball. Press it
gently to form patty shape. Place it on a plate. Shape the rest of mixture
into patties and keep it ready.
-
Put a flat pan on stove and turn the flame to medium heat. Spread little
on the pan surface.
-
Now, place each patty in the bread crumbs, coat both side and place it on
the hot pan. Repeat the same with rest of the patties.
-
Lightly spray or brush cooking oil over the patties. Let it cook for about
4 to 5 minutes or until the underside it crispy and roasted.
-
Now, flip the patties to cook on the other side. Brush bit oil.
- Once the patties is ready, remove from the pan and serve.
- Serve hot Vermicelli cutlets with green chutney or ketchup.
NOTE:
-
Vermicelli culets can me cooked in regular oven or air fryer as
well.
-
If you do not have ready bread crumbs, you can substitute with suji rava / semolina.
-
Mashed potato helps for binding and keep the patties shape. Also, adds to
the flavor.
-
If you don't have leftover Vermicelli upma, just follow the direction on
the packet to cook the vermicelli and use it to make the patties. You will
need add salt and more chili powder.
Labels: Lunch-box, Snack, Tiffin Variety, Vermicelli
~ Vermicelli Cutlet | Semiya Tikki | Shevige Cutlet - from leftover Vermicelli Umpa
~
Posted by Swetha @ 7/10/2024 09:57:00 AM ::
 Swetha's Fusion
 ::
permalink
Shavige Uppittu | Vermicelli Upma | Semiya Upma |
Tuesday, July 02, 2024
Virmicelli is know as Shavige in Kannada and Semiya in Hindi. And Uppittu in Karnataka
and Upma in North-India for savory seasoned dish usually prepared for
breakfast and also packed for lunch-box. Upma can be made with different base
ingredients. All tasty wholesome healthy breakfast. Refer to the list
below. Vermicelli upma is mostly prepared in South part of India.
Other Upma Variety: Rava upma, Sago upma, Bread upma, Avalakki upma, Shavige upma, String Hopper (Indian Rice Noodles) Upma, Millet (Siridhania) upma, Wheat/Godi kadi upma, Oats
upma, Quinoa upma, Buckwheat upma, Amarnath seeds upma the list goes on.
If you end up with some leftover Vermicelli Upma, and family makes a face looking the leftover dish, no worries, you can make
Vermicelli Pakoda or
Vermicelli cutlet. It's fun and yummy.
Ingredients:
- 2 cups - Vermicelli - broken ( I used MTR brand vermicelli here)
- 1 cup - Chopped Onion
- 1 cup - Vegetables (like peas, carrots and string beans)
- 1 - green chili (or as per taste)
- 1 tsp - Urad dal | Black gram
- 1 tsp - Chana dal | Bengal gram
- 2 tsp - Sugar
- ½ tsp - mustard seeds
- 2 tbsp. - oil or ghee
- 7 to 8 - curry leaves
- 7 to 8 - Cashew nuts [optional]
- ½ cup - grated coconut [optional]
- 6 cups - water or add as required
- salt - as required
- coriander leaves (cilantro) for garnishing
Preparation:
-
Soak Urad dal and Chana dal for about 20 minutes, drain and set aside.
-
With ½ tsp of ghee or oil, stir and roast vermicelli on a medium-low flame
until Golden in color. Transfer to another bowl and set aside.
- Finely cut onions and green chilies
- Cut beans and carrots.
- Finely chop fresh coriander/cilantro leaves
- Separate curry leaves from its stem
Method:
- Making Vermicelli Upma, heat oil or ghee in a pan.
- Add the mustard seeds and once it starts to sputter, add soaked urad dal and chana dal. If you plan on using Cashew nuts, add them now. Fry them till they are slightly browned.
- Next add curry leaves and green chill.
- Stir for 30 seconds, then add chopped onions and ½ tsp of Sugar.
- Sauté till the onions become translucent.
- Mix-in the cut veggies.
-
Now add water, salt and sugar. Mix and cover.
- Let the mixture come to a rolling boil on a medium flame.
- Once it starts to boil, add the roasted vermicelli. Mix the vermicelli well
- Lower the flame, cover the pan and cook the vermicelli till they become soft and all the water is
absorbed.
-
Once the vermicelli is cooked completely, mix-in grated coconut and 1½ tsp of sugar.
- Switch off the flame.
-
Serve hot of warm vermicelli upma garnished with a few coriander leaves along.
Notes:
- Cashew nuts are optional to use. When you have guests, adding cashew will make upma special.
- Grated coconut is also optional, its a Mangalorean thing, we add coconut for everything. Anyway, it does give sweet nutty flavor to your dish.
Labels: breakfast, Lunch-box, South Indian Soup, Tiffin Variety, Upma, Vegetarian, Vermicelli
~ Shavige Uppittu | Vermicelli Upma | Semiya Upma |
~
Posted by Swetha @ 7/02/2024 09:23:00 PM ::
Swetha's Fusion ::
permalink
Kanda Batata Poha - Seasoned Beaten Rice with Potato
Friday, June 28, 2024
Kanda Poha is a common dish from the heart of Maharashtra. I got this recipe
from one of my Maharashtrian friend. My friend told me a funny fact, that when boys
family visit potential girl's house (arranged marriage), the boys family
looks for how well the girl can make Kanda Poha. I am not sure how
true is the fact, but I am sure she was trying to emphasis how important this
dish is.
Ingredients:
- 2 cup - Poha (Flattened rice)(150 grams)
- 2 - Potatoes, peeled and diced
- 1 - Green Chilli (finely chopped) (or as per taste)
- ½ cup - Peanuts
- 2 tsp - Fresh Lemon Juice (or as per taste)
- 8 to10 - Curry Leaves
- 1½ tsp - Sugar
- ¼ tsp - Turmeric Powder
- ½ tsp - Black Mustard seeds
- ¼ tsp - Cumin seeds
- ¾ tsp - Salt (or as per taste)
- 1 - 2 tbsp. - Oil
- ¼ cup - Fresh Coriander/cilantro Leaves (finely chopped)
- Besan Sev for garnish
Prep:
-
Poha: Clean the poha of husks and other impurities; To wash it,
pour the poha it in a bowl of cold water, immerse it completely
and drain it out immediately. You may use a strainer to
drain the water out; Gently spread out the poha with a help of a
spoon. Gently mix-in ¾ teaspoon of salt and 1½ tsp of sugar.
Keep the poha aside for about 15 minutes for it to soften. If it
is too dry, sprinkle bit of water for it soak and swell.
-
Peanuts: Heat a pan. Put 1tsp of oil in it. When the oil is hot,
add peanuts and roast until the color changes and skin starts to
come off. Transfer the peanuts onto a kitchen towel. Fold over the
towel, rub the peanuts in remove the skin. Discard the skin. Keep
the roasted peanuts aside.
Removing the peanut skin is optional step.
-
Potatoes: Peal the skin and cut potatoes in to medium size cubes.
Keep the cubes in cold water for a minute and drain. Cook potato
cubes with bit of salt added by boiling it or in the microwave
(without water) for about 5 to 8 minutes. Drain and keep aside.
-
(Finely) Chop and keep them ready: Onion, green chilies and
coriander leaves.

Method:
-
For Kanda Poha, heat 1 to 2 tablespoons of oil on medium flame.
Add mustard seeds to the oil. Once the mustard seeds starts to
sputter, add cut green chilies, turmeric powder and fry them
lightly. now add curry leaves. Sauté for few more seconds.
-
Add chopped onion and sauté until the onions are tender and become
translucent.
-
Add potatoes, sprinkle bit of water, and stir to coat
the potatoes. For about a 30 seconds
-
Next add the prepared poha and peanuts. Mix it in with the spices
and cook for 2 minutes.
- Do a taste test in between. Add salt if and as needed.
-
After 2 minutes, turn off the flame and squeeze lemon juice into
the poha. Gently stir.
- Before serving mix-in cut coriander leaves.
-
Plate kanda poha, serve garnished with sev (or
Chivda) for bit of crunchiness. Enjoy!
NOTE:
- Use thicker variety of the Poha/flattened rice is better than the
very thin variety. Medium thick variety works well too.
- May use more green chilies if you and your family prefers more spicy poha.
You may be also interested in other recipes which uses Poha or similar dishes like Upma
Labels: breakfast, Lunch-box, Poha / Avalakki, Potato, Tiffin Variety, Upma, Vegetarian
~ Kanda Batata Poha - Seasoned Beaten Rice with Potato
~
Posted by Swetha @ 6/28/2024 03:25:00 PM ::
Swetha's Fusion ::
permalink
Bisi Bele Bath
Tuesday, June 07, 2022

Bisi Bele Bath - literally translates to 'hot lentil rice'. It is an authentic dish from the state of Karnataka, India. Bisi Bele Bath is a complete meal, with lentils and vegetables and rice. Onion/tomato raita, kara (spicey) boondi and potato chips are usually served on the side with Bisi Bele Bath. I have included recipe for onion & tomato raita at the end of this post. Try this traditional recipe and enjoy it with your family and friends.

Ingredients for Masala:
- 1 tsp - urad dal | black gram
- 1 tsp - chana dal | split chickpeas
- 1 tsp - dhania seeds | coriander seeds
- 1 tsp - jeera | cumin seeds
- 1 tsp - khus khus | white poppy seeds
- 1/2 tsp - methi seeds | fenugreek seeds
- 1/4 tsp - mustards seeds
- 2 to 3 - lavanga | cloves
- 1 small piece - cinnamon
- 4 to 5 - Red chilli ( I use Byadagi red chilli )
- 1 Tbsp or as per taste - tamarind paste
- 2 Tbsp - grated fresh coconut
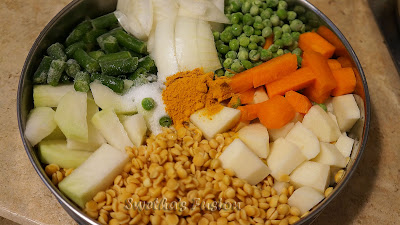
Ingredients
- 1 cup - Rice ( I use Sona Masoori Rice)
- 3/4 cup - Toor dal | pigeon peas lentil
- 1 - Kohlrabi ( 'navilu kosu'[ನವಿಲು ಕೋಸು] )
- 1 - potato
- 1 - carrot
- 1 - medium sized onion
- 1/2 cup - green peas
- 1/2 cup - peanuts
- 5 to 7 - green beans
- 7 tp 10 - curry leaves
- 1/4 tsp - mustards seeds
- 1 pinch - hing | asafoetida
- 1/2 tsp - haldi | turmeric powder
- 1 tsp - jaggery
- 1 Tbsp - oil
- Salt as per taste
- For garnish:
- 1 Tbsp - ghee
- 1/4 cup - cashew nuts
Preparations:
- Wash rice with water and let it soak for about 15 mins. Cook the rice and keep aside
- Wash toor dal ( pigeon peas ) and keep aside for soaking.
- Wash and cut potato, carrot, kohlrabi into cubes
- Wash and cut green beans
- Cut onion into big pieces
- In a pressure cooker, add soaked toor dal, half of peanuts, cut onion, cut vegetables, turmeric powder and salt. Cook it with water for two to three cooker whistle. Turn off the flame and keep aside for the pressure to release on its own.
I have big pressure cooker with 2-tier inserts. I place all the vegetables in bottom tier-pan and cook rice in the top tier at the same time in one go rather than cooking them separately.
- PREPARE MASALA: In a pan, dry roast the masala ingredients - To the hot pan, first add mustard, cumin and fenugreek seeds, once it is slightly roasted and mustard starts to sputter, add the coriander seeds, khus khus, cloves, cinnamon, urad dal, channa dal and red chillies. Roast the mixture stirring continuously. Transfer the content to a blender (mixie). Now in the same pan, add grated coconut and roast on low flame. No need to turn it brown. Turn off the flame and transfer the coconut to the blender. Add tamarind-paste to the mixture, add some water, and grind into smooth paste. Keep aside.
Method:
- In a big thick bottom sauce pan or a cooker pan. Add oil and heat it on medium flame. Once oil is hot, add mustard seeds, asafoetida, curry leaves and rest of the peanuts, roast them.
- Now carefully add the ground masala (mind the oil is hot, if needed reduce the flame). Continue stirring and let the masala cook for 3 minutes.
- Slowly add 2 cup of water, jaggery and salt. Stir, and bring the mixture to boil on medium flame.
- Next, add the cooked lentil and vegetables. Mix, cover and let it cook for about three minutes.
- Finally add the cooked rice. Stir, cover and simmer for 5 minutes. The mixture should look mushy not dry. If needed heat a cup of water and mix it in. This is also a good time to check for salt. Once cooked turn off the flame.
- In a small seasoning pan, heat ghee, add cashew nuts and roast it. Pour the ghee and roasted cashew nuts over the Bisi Bele Bath.
- Serve hot with onion and tomato raita (see below for recipe); kara or masala boondi; and potato chips.

- Cut 1 onion and 1 tomato into small cubes.
- Cut green chilies into big pieces or length-wise. ... so it is easily visible and be able to separate it while eating.
- Add ¼ cup of water to 1 cup of curds and whisk the curds until it is smooth.
- To the curds, add salt, ginger powder and whisk to mix it all well.
- Now add onion, tomato, green chilies and chopped coriander leaves.
- Mix it and refrigerate for at least 30 minutes or more before serving. This allows the flavor of the onion to be released.
- Serve chilled along with any spicy mixed rice or chapati.
- - ~ o 0 o ~ - -
Note:
- Do not use tomatoes or bell pepper (capsicum)
- May garnish with fresh coriander leaves.
Labels: Healthy dish, Lentil, Main Course, Meal, Raita, Rice, South-Indian Dish, Tiffin Variety, Vegetarian
Aloo Paratha (Stuffed version) - Potato Bread
Monday, July 12, 2021
There are two ways I make Aloo (Potato) Paratha. (1) by mixing the flour with aloo bhaji | sabzi and (2) 'stuffed aloo paratha'- by stuffing the aloo bhaji in the dough. This post is on the second method - stuffed version. Both turns out delicious. Difference would be (1) the bhaji for the stuffed version should be thick, if it is watery, it makes it harder to stuff and roll. (2) to add little maida (all purpose flour). maida will make the dough more stretchy and won't ripe while rolling - which may happen if only wheat flour is used. I make the same bhaji for both, just repeating it in this post as well for convenience.
Ingredients for Aloo Bhaji:
- 1 cup - potato - boiled & mashed
- ½ cup - onion -cut lengthwise
- 3 - green chilies -finely chopped
- 1 tsp - cumin seeds
- 1 tsp - ginger minced
- ½ tsp - turmeric powder
- ½ tsp - lime juice
- ¼ cup - fresh coriander leaves - chopped
- 2 tbsp - oil
- salt to taste
Method to make Aloo Bhaji:
- In a pan|kadai|wok, heat oil. Once oil is hot, add cumin seeds, cut green chilies and ginger. Saute for few seconds.
- Add cut onions, fry until onion become soft & translucent.
- Add turmeric powder and stir.
- Now, add boiled and mashed potatoes. salt, and ¾ cup of water.
- Stir and cover the pan, simmer for 5-6 minutes on a medium-low flame.
- Once the bhaji becomes thick, add coriander leaves and lime juice, mix.
- Turn off the flame. Aloo bhaji is ready. Keep aside and let it cool down to be used in aloo paratha dough.
Ingredients for Aloo Paratha:
- 1 cup - aloo bhaji
- 1 cup - all purpose flour | maida
- 1½ cup - wheat flour
- 3 tsp - oil
- 5 tsp - oil | melted butter | ghee - needed while cooking the paratha
- ¼ cup - wheat flour - needed while rolling the paratha
- salt to taste
Method to make Aloo Paratha:
- In a mixing bowl, take all-purpose-flour, wheat flour and salt
- Add 1 cup of water, mix it to form a firm dough. you may need more water to get right consistency.
- Once all the dough comes together, add 3 tsp of oil and knead. Will need extra kneading to make the dough stretchy.
- Cover with moist paper towel or cling-warp and keep it aside for about 15 to 20 minutes.
- Knead the dough few more times. Divide the dough and form into big-lemon sized balls.
- Roll one of the ball to about 4 inch diameter circle.
- Place about 1 tbsp of aloo bhaji on the center of the rolled dough. Now bring all the edges together and seal to form a ball. Keep aside.
- Repeat the steps with rest of the dough.
- Heat a flat pan/griddle on medium-low flame.
- On a lightly floured surface, gently roll the stuffed-dough ball, to say about 5" diameter circles. Careful not to tear the paratha. The technique is to roll evenly from center towards the edge, best idea is to flip the paratha and roll; and again flip and repeat. This why the outer layer of the dough is evenly stretched. Note, the paratha will be thick as it has stuffing.
- Once the griddle is hot, place the rolled paratha on the griddle. As bottom side gets slightly hot flip it over. Brush bit of oil/ghee/melted-butter on the paratha. With help of flat spatula, gently press the middle area of the paratha and rotate it in circular motion - this help it cook evenly. Flip the paratha again and brush oil/ghee/melted-butter now on the top side. You may need to flip couple of more times to cook evenly on both sides, no need to apply oil again. Cook until you notice brown spots on the paratha.
- Repeat the steps with rest of the stuffed dough balls.
- Serve hot aloo paratha with leftover aloo bhaji, plain curds or raita and Indian pickle.


Labels: Indian Bread, Lunch-box, Main Course, North Indian dish, Potato, Tiffin Variety, Vegetarian
~ Aloo Paratha (Stuffed version) - Potato Bread
~
Posted by Swetha @ 7/12/2021 07:19:00 PM ::
Swetha's Fusion ::
permalink
Aloo Paratha / Aloo Roti / Indian Potato Bread
There are two ways I make Aloo (Potato) Paratha. (1) by mixing the flour with aloo bhaji | sabzi and (2) 'stuffed aloo paratha'- by stuffing the aloo bhaji in the dough. Both turns out yummy and disappears from the table in no time. In this post, lets look at the steps how to make aloo paratha by mixing the flour with aloo bhaji. Aloo Paratha is good for kids lunch box, roll aloo paratha into tube and wrap it in aluminium foil, also give ketchup or jam on the side for dipping.
Ingredients for Aloo Bhaji:
- 1 cup - potato - boiled & mashed
- ½ cup - onion -cut lengthwise
- 3 - green chilies -finely chopped
- 1 tsp - cumin seeds
- 1 tsp - ginger minced
- ½ tsp - turmeric powder
- ½ tsp - lime juice
- ¼ cup - fresh coriander leaves - chopped
- 2 tbsp - oil
- salt to taste
Method to make Aloo Bhaji:
- In a pan|kadai|wok, heat oil. Once oil is hot, add cumin seeds, cut green chilies and ginger. Saute for few seconds.
- Add cut onions, fry until onion become soft & translucent.
- Add turmeric powder and stir.
- Now, add boiled and mashed potatoes. salt, and ¾ cup of water.
- Stir and cover the pan, simmer for 5-6 minutes on a medium-low flame.
- Once the bhaji becomes thick, add coriander leaves and lime juice, mix.
- Turn off the flame. Aloo bhaji is ready. Keep aside and let it cool down to be used in aloo paratha dough.
Ingredients for Aloo Paratha:
- 1 cup - aloo bhaji
- 2½ cup - wheat flour
- 2 tsp - oil
- 5 tsp - oil | melted butter | ghee - needed while cooking the paratha
- ¼ cup - wheat flour - needed while rolling the paratha
- salt to taste
Method to make Aloo Paratha:
- Once the aloo bhaji is cooled enough to handle, transfer it to a mixing bowl.
- Add wheat flour and bit of salt (remember aloo bhaji already has salt in it). Mix it to form a firm dough. Depending on the consistency, you may need extra water or more wheat flour.
- Once all the dough comes together, add 2 tsp of oil and knead.
- Cover and keep it aside for about 10 minutes.
- Divide the dough and form into medium sized balls.
- Meanwhile, heat a flat pan/griddle on medium-high flame.
- On a lightly floured surface, roll the dough - say about 5" diameter circles.
- Once the griddle is hot, place the rolled paratha on the griddle. As bottom side gets slightly hot flip it over. Brush bit of oil/ghee/melted-butter on the paratha. With help of flat spatula, gently press the middle area of the paratha and rotate it in circular motion - this help it cook evenly. Flip the paratha again and brush oil/ghee/melted-butter now on the top side. You may need to flip couple of more times to cook evenly on both sides, no need to apply oil again. Cook until you notice brown spots on the paratha.
- Repeat the steps with rest of the dough.
- Serve hot aloo paratha with leftover aloo bhaji, plain curds or raita and Indian pickle.
Also, check out other Indian bread recipes

Labels: breakfast, Indian Bread, Lunch-box, North Indian dish, Potato, Tiffin Variety, Vegetarian
~ Aloo Paratha / Aloo Roti / Indian Potato Bread
~
Posted by Swetha @ 7/12/2021 05:53:00 PM ::
Swetha's Fusion ::
permalink
Raw-Mango Chitranna | Mavinkai Chitranna
Saturday, July 11, 2020
Mavinkai means raw-mango in Kannada language. Chitranna (a.k.a Lemon-rice) is a south-Indian dish usually made with lime-juice Lemon-Rice is made year around. But when it comes to summer - Mango season, raw-mango may be used instead of lemon juice. During summer, mango-ginger is also available in the market. I add a bit of it, (not too much as it turns bitter).
Picking the right mango: don't go for the green mango. Pick a raw mango, which is just about to ripe. Basically, very hard when pressed on, slight yellow shade on the mango skin and mostly tangy with bit of sweetness in taste(and small). If I have a green mango, I place it in my onions-basket or in rice box for a day or so for it start to ripe. Anyway, if you do use raw-mango or very tangy mango, add bit of jaggery or sugar to balance the taste.
This dish is perfect for the humid and hot climate conditions, and also can be eaten at room temperature, hence perfect for lunch-box. Very simple to make, flavorful, easy on digestion, and won't go bad easily. A bit of (spicy mango or lemon) pickle and curds is sufficient on the side and goes well as a combo.
Also checkout Chitranna / Lemon-rice
Ingredients:
- 1 cup - rice (I used sona masoori)
- 1 cup - grated raw Mango
- 1 tsp - methi powder | fenugreek powder
- 1 tsp - grated ginger (I use mango ginger)
- ¼ cup - peanuts or groundnuts
- ½ tsp - mustard seeds
- 3 tp 5 - green chilies (or as per taste) - split in center lengthwise.
- 7 to 8 - curry leaves
- ¼ cup - coriander leaves - chopped
- 2 tbsp - cooking oil
- ½ tsp - turmeric powder
- ¼ tsp - asafoetida
- Salt - as per your taste
Method:
- Cook rice and keep it aside to cool down. You may carefully spread the rice on a wide tray to fasten the process.
- In a pan, heat oil on medium flame and add mustard seeds.
- As mustard sputters, add green chilies, curry leaves, asafoetida and peanuts. Stir and let peanuts roast a bit on medium-low flame
- Meanwhile, add methi powder and salt to the cooked rice, mix it all together. Keep aside.
- As the peanut is roasted, add grated mango, ginger, turmeric powder and cut coriander leaves. Stir until the raw small is gone (for about 2 minute). [Note: Rather than just garnishing coriander leaves, roasting it gives an unique flavor, aroma and will not let it go bad in lunch-box.]
- Now add the rice mix to the pan and mix it all together. Turn the heat to low, cover and let it warm for about 2 minutes. Turn off the flame.
- Serve with pickle and curds or Raita. Of course any pakoda's will go well with Mango rice.
Tips:
- If packing for lunch, let the Mango-rice cool down before covering the lunch box lid.
- 1 tsp of (soaked for about 10 minutes) urad dal and chana dal may be add to the seasoning along with peanuts.
- It is important that the cooked rice is cool down, or else the rice will break and get mushy.
Labels: Meal, Rice, South-Indian Dish, Tiffin Variety, Vegetarian
Chitranna | Lemon Rice
Chitranna a.k.a lemon-rice is a south-Indian dish. It is perfect for the humid climate and also can be eaten at room temperature, hence perfect for lunch-box. Very simple to make, flavorful, easy on digestion, and won't go bad easily. A bit of (spicy mango or lemon) pickle and curds is sufficient on the side and goes well as a combo.
Ingredients:
- 1 cup - rice (I used sona masoori)
- ¼ cup - peanuts / groundnuts
- Lemon juice from one large lime ( as per taste)
- ½ tsp - mustard seeds
- 3 to 5 - green chilies (or as per taste) - split in center lengthwise.
- 7 to 8 - curry leaves
- ¼ cup - coriander leaves - chopped
- 1 tsp - grated ginger
- 2 tbsp - cooking oil
- ½ tsp - turmeric powder
- ¼ tsp - asafoetida/hing
- Salt - as per your taste
Method:
- Cook rice and keep it aside to cool down. You may also carefully spread the rice on a wide-tray to fasten the process.
- In a big pan, heat oil on medium flame and add mustard seeds.
- As mustard sputters, add green chilies, curry leaves, asafoetida and peanuts. Stir and let peanuts roast a bit on medium-low flame
- Meanwhile, add lemon juice and salt to the cooked rice, mix it all together. Keep aside.
- Once the peanut is roasted, add turmeric powder, ginger and coriander leaves. Stir until the raw small is gone (for about a minute or so). [Note:Rather than just garnishing coriander leaves, roasting it gives an unique flavor, aroma and will not let it go bad in lunch-box.]
- Now add the rice mix to the pan and mix it all together. Turn the heat to low, cover and let it warm for about 2 minutes. Turn off the flame.
- Serve with pickle and curds. Of course, any fritters like pakoda's will go well with Lemon rice.
Tips:
- If packing for lunch, let the Lemon-rice cool down before covering the lunch box lid.
- 1 tsp of (soaked for about 10 minutes) urad dal and chana dal may be add to the seasoning along with peanuts.
- It is important that the cooked rice is cool down, or else the rice will break and get mushy while mixing it.
Labels: Meal, Rice, South-Indian Dish, Tiffin Variety, Vegetarian
Mint Veg Pulao | Minty vegetable Rice
Tuesday, July 07, 2020
Yummy Vegetable pulao! one of the favorite dish in my house and also made often as it is easy to take it for lunch. All the healthy vegetables and wonderful flavors bursting in every-bite you take. At work, every-time I warm up my lunch, I always hear the compliment "It smells so gooood in here!" I usually make a big batch which will last couple of days for lunch. It is easy to make too. I grow my own mint in pots, so no shortage of that as mint plants loves to spread and like any other herb, it needs regular harvesting for it to grow well. Here is my Mint Pulao recipe. Hope you will try it and enjoy it with your family.
Ingredients:
- 2 cups - Basmati Rice
- 2 - Onion [cut into thin slice]
- ½ cup - Mint leaves
- ¼ cup - Coriander leaves
- 10 - Garlic cloves
- 2-3 - Green chilies (or as per taste)
- 1 inch - Ginger
- 1 inch - Cinnamon
- 2 - Bay leaf
- 4 - Cloves
- 2 - Cardamom pods
- 1 - Star anise
- ½ tsp - Shah jeera | Caraway seeds
- ¼ cup - cashew nuts
- 1 tsp - Ghee
- 1 - lime
- 2 cups - mix vegetables [green peas, carrots, potato, corn, string beans etc]
- Oil as needed
- To taste salt
|

|
Method:
- Rinse the rice until water runs clear, drain and keep aside.
- Wash and cut all the mix-vegetables. Add some salt and partially cook in pressure-cooker or just by boiling them. I usually cook in Microwave oven for about 5 to 8 minutes. Keep aside
- In a wide non-stick pan, with ½ tsp oil, sauté cut onion until slightly translucent. Remove the onion into a separate dish and keep aside.
- In the same pan, now sauté garlic, cinnamon, cloves, ginger and mint leaves. Slightly cook mint leaves to remove its rawness and also bitterness which some of the mint strongly have. I grow three variety of mint in my backyard and one of them is very bitter.
- Turn off the heat and transfer the content to a food processor|blender jar
- To the food processor jar, also add cut green chilies, coriander leaves and a tablespoon of sautéed onion.
- Add about ¼ cup of water and grind it into fine paste.
- In the same pan, on a medium flame, heat 1 tsp of ghee (or oil). Add bay-leaves, cardamom, caraway seeds, cloves, star anise and cashew-nuts. Sauté for few minutes and then add the ground masala paste.
- Cook the masala for about 3 to 5 minutes or until the raw smell of masala is gone. You will notice that the masala turns to a darker shade of green.
- Now add the partially cooked mix-veggies.
- Add ¼ cup of water, mix the veggies and masala. Cover and cook for about 3 to 4 minutes.
- Meanwhile, in a small saucepan, bring 3 cup of water to boil [ you may do this in microwave or electric kettle]. Remember, the ratio is - for 1 cup of rice, 1½ cup of water.
- Now add the rice to the masala-veggie mix. Gently stir for about 20 seconds. You don't want to break the rice grains, just coat it with masala. Turn off the flame.
- I use an electric rice cooker and hence need to prepare the pan so it does not burn the bottom. Take the cooker pan, add ¼ tsp of oil or ghee. let it coat the bottom. Now, layer the bottom with rest of sautéed onion. My cooker usually burns and browns slightly in the bottom-center. So I layer with onion, which actually tastes good when browned.
- To the rice-mix, add lime juice, boiled water and salt as per taste (about 2 tsp). Mix [Optional: You may add few drops of Kewra water/essence and/or Rose water/essence for extra aroma]
- Now, gently pour the rice-mix to prepared cooker pan. Place the pan in the cooker and cook until done.
- Once done (should take less than 10 to 15 minutes). un-plug the cooker open the lid and let it cool. If needed with help of thin-flat spatula, gently spoon out the mint pulao on a wide serving tray. If you let it sit in the cooker, the rice will over-cook and grains won't be separated.
- Garnish with mint or coriander leaves and/or roasted cashew.
- Serve hot with Cucumber Raita or chana dal or Veg kurma.
- Enjoy mint pulao with your family and friends.
Note: If you plan to use a pressure-cooker, you can do the whole process in the pressure-cook pan. Rather than using a separate pan, just start the process (step 3) in the PC-pan. Skip step-14, mix-in the sautéed onion with the rice mix. Pressure cook for about 10 mins or 2 whistles. Again, don't let the rice sit in the pressure cooker, slowly release the pressure by placing a thin edge of the spatula under the weight. Open the lid and spread the rice carefully.
Labels: Main Course, Rice, Tiffin Variety, Vegetarian
Crispy Lavash Rolls - Substitute for Vegetable Puff
Friday, June 26, 2020

Hello, welcome to one more of my blog-post. This recipe I came up with by accident ..say about 15 years ago. A new small Mediterranean grocery store opened next to the craft-store I usually visit. I just dropped by to check out what they had. Besides all the dry-fruits, there were many interesting things I had never seen before. Since, there were no other customers, I asked plenty of questions for the storekeeper who was more than happy to answer me. I walked out with lots of dry-fruits, a bottle honey, box of baklava, some veggies and a pack of Lavash bread. The bread was in huge rectangle shape, I cut them into smaller pieces and warmed them on tawa to have for dinner with curry. But as I warmed it, the bread turned crispy and brittle like papad. Hmm! this is not good. Well I had to come up with something to use the bread. 15 years ago, internet was not filled with information or recipes as it is now. Did not find much online. So I came up with idea of making roles. Of course, now, when you search up on internet you will see so many recipes using Lavash bread, most commonly Lavash bread warps. So here is what I came up with.... an healthy alternative for Vegetable Puff you get in Indian bakery.
Ingredients:
- Lavash bread
- Dry curry - I usually use onion and potato curry or any other curry will do
- Butter - 2 tbsp
- Garlic - 2 cloves
- Spices and Herbs for flavoring
Method:
- Cut Lavash bread into about 6 inch by 4 inch rectangle pieces
- Warm up the curry if it is cold
- Melt butter.
- Chop and crush garlic in to course paste in a mortar. Add it to the melted butter.
- To the butter-garlic mix, add other spices and herbs of your choice. I add black pepper powder, oregano, parsley etc. Keep aside.
- Lay the Lavash bread piece. spoon some curry on one corner. Roll the bread. Apply bit of water on the other end so that the bread sticks and holds the shape (as shown in the picture)
- Prepare the rolls with rest of the Lavash bread pieces
- Heat a flat tawa (griddle). I am using an electric tawa here.
- Place the prepared rolls and grill them on medium low
- Using a brush, apply the butter mix over the rolls.
- After the bottom-side cooks and turns to golden color, turn over the rolls
- Apply the butter mix on the now top-side and cook until golden brown.
- Once done, remove from the tawa.
- Serve hot with a dip of your choice (like ketchup, hot-sauce, chutney, hummus or flavored cream-chess/yogurt)
Enjoy Crispy Lavash Rolls with your family. This is also a good option for kids meal and for their lunch box
Labels: Lunch-box, Snack, Tiffin Variety, Vegetarian
~ Crispy Lavash Rolls - Substitute for Vegetable Puff
~
Posted by Swetha @ 6/26/2020 12:07:00 PM ::
Swetha's Fusion ::
permalink
Ubbu Roti / Ukkarisida Akki Roti
Tuesday, November 20, 2018
Ubbu roti is basically rice-flour roti. popular in Malnad / Karnataka and Maharastra. Made for breakfast. Ubbu roti goes well with Eggplant curry, especially
Badanekayi Ennegayi or even Mangalore style chicken curry.
Ingredients:
- 1 cup rice flour
- 1&1/2 cup water
- Salt as per your taste
- 1/2 tsp cooking oil
Method:
- In a wide kadai / pan , boil the water along with a tbsp oil and salt to taste.
- When water starts bubbling, lower the flame, start adding the rice flour as you mix. Switch off the stove. With a wooden spatula, keep mixing to blend the dough together.
- Once the dough is warm, apply bit of oil on your palm and knead it very well
- Once you are done with the kneading, pinch and take big lemon sized dough. Again knead the dough using palms and make a soft flat ball.
- Put the tava/ flat-griddle on stove and let start heating up at medium-low flame.
- Dust the rolling flat and roll the flat balls into thin roti.
- Transfer the rolled roti over the hot tava.
- Once you start seeing the small bubbles, flip the roti and cook on the other side.
- No need to add oil .You can press edges lightly with a soft dry cloth so that roti inflates.This also ensures equal cooking. The roti will fluff up like a poori.
- Once ready, transfer the roti to a hot-box.
- Repeat the steps 4 through 10 with rest of the dough.
- Serve hot with chutney or spicy curry. The best side-dish or what we call combo is Eggplant/ brinjal curry/ Badanekayi Ennegayi

Note: You can not make the dough and keep. The dough needs to roll into roti when it is still warm. And need to cooked immediately after rolling. You can start rolling the other roti while cooking the previous one.
Labels: breakfast, Indian Bread, South-Indian Dish, Tiffin Variety


