Bisi Bele Bath
Tuesday, June 07, 2022

Bisi Bele Bath - literally translates to 'hot lentil rice'. It is an authentic dish from the state of Karnataka, India. Bisi Bele Bath is a complete meal, with lentils and vegetables and rice. Onion/tomato raita, kara (spicey) boondi and potato chips are usually served on the side with Bisi Bele Bath. I have included recipe for onion & tomato raita at the end of this post. Try this traditional recipe and enjoy it with your family and friends.

Ingredients for Masala:
- 1 tsp - urad dal | black gram
- 1 tsp - chana dal | split chickpeas
- 1 tsp - dhania seeds | coriander seeds
- 1 tsp - jeera | cumin seeds
- 1 tsp - khus khus | white poppy seeds
- 1/2 tsp - methi seeds | fenugreek seeds
- 1/4 tsp - mustards seeds
- 2 to 3 - lavanga | cloves
- 1 small piece - cinnamon
- 4 to 5 - Red chilli ( I use Byadagi red chilli )
- 1 Tbsp or as per taste - tamarind paste
- 2 Tbsp - grated fresh coconut
Ingredients
- 1 cup - Rice ( I use Sona Masoori Rice)
- 3/4 cup - Toor dal | pigeon peas lentil
- 1 - Kohlrabi ( 'navilu kosu'[ನವಿಲು ಕೋಸು] )
- 1 - potato
- 1 - carrot
- 1 - medium sized onion
- 1/2 cup - green peas
- 1/2 cup - peanuts
- 5 to 7 - green beans
- 7 tp 10 - curry leaves
- 1/4 tsp - mustards seeds
- 1 pinch - hing | asafoetida
- 1/2 tsp - haldi | turmeric powder
- 1 tsp - jaggery
- 1 Tbsp - oil
- Salt as per taste
- For garnish:
- 1 Tbsp - ghee
- 1/4 cup - cashew nuts
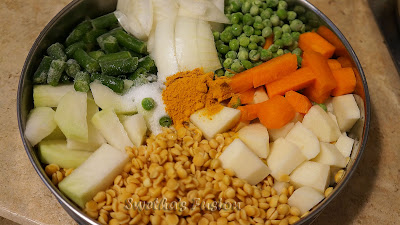
Preparations:
- Wash rice with water and let it soak for about 15 mins. Cook the rice and keep aside
- Wash toor dal ( pigeon peas ) and keep aside for soaking.
- Wash and cut potato, carrot, kohlrabi into cubes
- Wash and cut green beans
- Cut onion into big pieces
- In a pressure cooker, add soaked toor dal, half of peanuts, cut onion, cut vegetables, turmeric powder and salt. Cook it with water for two to three cooker whistle. Turn off the flame and keep aside for the pressure to release on its own.
I have big pressure cooker with 2-tier inserts. I place all the vegetables in bottom tier-pan and cook rice in the top tier at the same time in one go rather than cooking them separately.
- PREPARE MASALA: In a pan, dry roast the masala ingredients - To the hot pan, first add mustard, cumin and fenugreek seeds, once it is slightly roasted and mustard starts to sputter, add the coriander seeds, khus khus, cloves, cinnamon, urad dal, channa dal and red chillies. Roast the mixture stirring continuously. Transfer the content to a blender (mixie). Now in the same pan, add grated coconut and roast on low flame. No need to turn it brown. Turn off the flame and transfer the coconut to the blender. Add tamarind-paste to the mixture, add some water, and grind into smooth paste. Keep aside.
Method:
- In a big thick bottom sauce pan or a cooker pan. Add oil and heat it on medium flame. Once oil is hot, add mustard seeds, asafoetida, curry leaves and rest of the peanuts, roast them.
- Now carefully add the ground masala (mind the oil is hot, if needed reduce the flame). Continue stirring and let the masala cook for 3 minutes.
- Slowly add 2 cup of water, jaggery and salt. Stir, and bring the mixture to boil on medium flame.
- Next, add the cooked lentil and vegetables. Mix, cover and let it cook for about three minutes.
- Finally add the cooked rice. Stir, cover and simmer for 5 minutes. The mixture should look mushy not dry. If needed heat a cup of water and mix it in. This is also a good time to check for salt. Once cooked turn off the flame.
- In a small seasoning pan, heat ghee, add cashew nuts and roast it. Pour the ghee and roasted cashew nuts over the Bisi Bele Bath.
- Serve hot with onion and tomato raita (see below for recipe); kara or masala boondi; and potato chips.

- Cut 1 onion and 1 tomato into small cubes.
- Cut green chilies into big pieces or length-wise. ... so it is easily visible and be able to separate it while eating.
- Add ¼ cup of water to 1 cup of curds and whisk the curds until it is smooth.
- To the curds, add salt, ginger powder and whisk to mix it all well.
- Now add onion, tomato, green chilies and chopped coriander leaves.
- Mix it and refrigerate for at least 30 minutes or more before serving. This allows the flavor of the onion to be released.
- Serve chilled along with any spicy mixed rice or chapati.
- - ~ o 0 o ~ - -
Note:
- Do not use tomatoes or bell pepper (capsicum)
- May garnish with fresh coriander leaves.
Labels: Healthy dish, Lentil, Main Course, Meal, Raita, Rice, South-Indian Dish, Tiffin Variety, Vegetarian
Chana Bhatura | Chole Bhatura
Friday, July 09, 2021
Chole Bhatura or Chana Bhatura is one of the common dish in North India, especially in Punjabi house hold. One will definitely find it in North Indian restaurant menu. It is one of the famous combo, though one may have bhatura with other curry; or have chole with rice, chapati, roti or poori. The recipes are kinda my way of doing the way I like it. For Chana/Chole, I take the shortest and simplest route of making it in pressure cooker with ready chana masala powder and canned Garbanzo beans (chana) and at times canned tomatoes. Anyway, I make it when I have ran out of things in refrigerator and I have to visit my pantry for emergency supply - which happens rarely. I am going to mention both recipes here, but note that it is NOT the authentic way of preparing the dish. That said, it still turns out delicious in its own way, so give it a try.
BHATURA
Ingredients for Bhatura:
- 4 cups - whole wheat flour (gheu ka atta)
- ½ cup - semolina (sooji/rava)
- ½ tsp - Eno fruit salt
- ½ tsp - sugar
- ½ tsp - turmeric powder
- 1 tsp - cumin seeds
- 2 tbsp - fresh coriander leaves -finely chopped
- 2 tbsp - fresh methi (fenugreek) leaves -finely chopped (optional)
- 2 tbsp - curds | plain yogurt
- Salt – to taste
- Warm water – ¾ cup
- Oil – 1 tablespoons + more for deep frying
Method for preparing Bhatura:
- In a mixing bowl take -wheat flour, semolina, salt, sugar, Eno fruit salt, cumin seeds, and turmeric powder. Slightly mix them all.
- Now add plain yogurt, chopped coriander and methi leaves. Mix all together.
- Start adding little water at a time and knead the dough. Keep adding and keep kneading the dough. Dough should be firm.
- Finally, add 1 tablespoon of oil or ghee and give a quick knead. Cover with wet towel and keep it aside at least for half an hour to an hour, this brings unique flavor and texture to the bhatura.
- You may notice that the dough would have fluffed up a bit and feels soft due to the soda we added. Divide the dough equally and make medium sized balls.
- Meanwhile, take oil in a fry-pan, place it on the stove and heat it on medium-high flame.
- Lightly flour rolling surface, place the dough ball and smoothly roll it. Dust some more flour over the rolled dough, flip it over, dust some flour again on the other side and roll again. Since the dough is on the softer and fluffier side, it is hard to get a perfect circle - that's case at least for me. Also, it will be bit thicker than the roti/chapati. That is normal, if you try to roll any thinner you may end up tearing it.
- Now slowly slide the rolled bhatura into hot oil [ to check if the temperature of the oil is right, drop a small piece of dough in to the oil and it should float immediately to the top ]
- After few seconds, the bhatura will float, with the help of a slotted spatula gently press it down, this will help bhatura to swell, now turn the bhatura and fry it on both sides.
- Once bhatura is slightly golden brown, remove the bhatura out on to a plate lined with paper towel to absorb extra oil.
- Repeat the steps with rest of the dough.
- Serve hot with Chole or any other curry.
CHOLE | CHANA
Ingredients for Chole:
- 1 can - chana |chickpeas | Garbanzo (or 1 cup - Soak overnight and pressure cook for 10 - 15 minutes)
- 4 - onion (medium) - chopped
- 2 - tomato (large) - chopped ( or 1 can)
- 10 - garlic cloves
- 2" - ginger - chopped
- 1 of each - bay leaves, black cardamom, green cardamom,cinnamon
- ½ tsp - cumin seeds
- ½ tsp - turmeric powder
- 1 ½ tsp - red chili powder
- ½ tsp - cumin powder
- 1 tsp - coriander powder
- ½ tsp - garam masala powder
- 1 tsp - Chole masala(any brand)
- ½ cup - coriander leaves chopped
- 5 tbsp - oil for cooking
- Salt as per taste
Method to prepare Chole:
- With little water, grind ginger, garlic and onion,
- Heat oil or ghee in pressure cooker pan, when it is hot, add bay leaves, black cardamom, green cardamom,cinnamon and cumin seeds. Saute a bit
- Turn the flame to medium and add the ground ginger, garlic and onion paste. Stir the mixture and let it cook - for about 3 to 5 minutes until the raw smell is gone.
- Meanwhile in the same grinding jar, add cut tomatoes and grind it into smooth paste.
- Once the ginger, garlic and onion is cooked, add turmeric and red chili powder. Stir for 30 seconds
- Now add the ground tomato paste, stir, cover and cook for about 3 to 4 minutes.
- Next add (drained and washed) chana, cumin powder, coriander powder, chole masala and salt, mix it all together.
- Add 1 ½ cup water. stir and close the pressure cooker lid and cook for about 5 whistles on low-medium flame. [number of whistles may differ for different pressure cooker model]
- Turn off the flame and let the pressure release on its own.
- Add coriander leaves and mix
- Chole is ready, serve it hot with cut onion and lime wedges. Goes well with jeera rice, poori or paratha or of course bhatura.
- Enjoy the yummy Chole masala with your family and friends.
Labels: Curry, Indian Bread, Lentil, Main Course, Meal, North Indian dish, Side-Dish, Vegetarian
Raw-Mango Chitranna | Mavinkai Chitranna
Saturday, July 11, 2020
Mavinkai means raw-mango in Kannada language. Chitranna (a.k.a Lemon-rice) is a south-Indian dish usually made with lime-juice Lemon-Rice is made year around. But when it comes to summer - Mango season, raw-mango may be used instead of lemon juice. During summer, mango-ginger is also available in the market. I add a bit of it, (not too much as it turns bitter).
Picking the right mango: don't go for the green mango. Pick a raw mango, which is just about to ripe. Basically, very hard when pressed on, slight yellow shade on the mango skin and mostly tangy with bit of sweetness in taste(and small). If I have a green mango, I place it in my onions-basket or in rice box for a day or so for it start to ripe. Anyway, if you do use raw-mango or very tangy mango, add bit of jaggery or sugar to balance the taste.
This dish is perfect for the humid and hot climate conditions, and also can be eaten at room temperature, hence perfect for lunch-box. Very simple to make, flavorful, easy on digestion, and won't go bad easily. A bit of (spicy mango or lemon) pickle and curds is sufficient on the side and goes well as a combo.
Also checkout Chitranna / Lemon-rice
Ingredients:
- 1 cup - rice (I used sona masoori)
- 1 cup - grated raw Mango
- 1 tsp - methi powder | fenugreek powder
- 1 tsp - grated ginger (I use mango ginger)
- ¼ cup - peanuts or groundnuts
- ½ tsp - mustard seeds
- 3 tp 5 - green chilies (or as per taste) - split in center lengthwise.
- 7 to 8 - curry leaves
- ¼ cup - coriander leaves - chopped
- 2 tbsp - cooking oil
- ½ tsp - turmeric powder
- ¼ tsp - asafoetida
- Salt - as per your taste
Method:
- Cook rice and keep it aside to cool down. You may carefully spread the rice on a wide tray to fasten the process.
- In a pan, heat oil on medium flame and add mustard seeds.
- As mustard sputters, add green chilies, curry leaves, asafoetida and peanuts. Stir and let peanuts roast a bit on medium-low flame
- Meanwhile, add methi powder and salt to the cooked rice, mix it all together. Keep aside.
- As the peanut is roasted, add grated mango, ginger, turmeric powder and cut coriander leaves. Stir until the raw small is gone (for about 2 minute). [Note: Rather than just garnishing coriander leaves, roasting it gives an unique flavor, aroma and will not let it go bad in lunch-box.]
- Now add the rice mix to the pan and mix it all together. Turn the heat to low, cover and let it warm for about 2 minutes. Turn off the flame.
- Serve with pickle and curds or Raita. Of course any pakoda's will go well with Mango rice.
Tips:
- If packing for lunch, let the Mango-rice cool down before covering the lunch box lid.
- 1 tsp of (soaked for about 10 minutes) urad dal and chana dal may be add to the seasoning along with peanuts.
- It is important that the cooked rice is cool down, or else the rice will break and get mushy.
Labels: Meal, Rice, South-Indian Dish, Tiffin Variety, Vegetarian
Chitranna | Lemon Rice
Chitranna a.k.a lemon-rice is a south-Indian dish. It is perfect for the humid climate and also can be eaten at room temperature, hence perfect for lunch-box. Very simple to make, flavorful, easy on digestion, and won't go bad easily. A bit of (spicy mango or lemon) pickle and curds is sufficient on the side and goes well as a combo.
Ingredients:
- 1 cup - rice (I used sona masoori)
- ¼ cup - peanuts / groundnuts
- Lemon juice from one large lime ( as per taste)
- ½ tsp - mustard seeds
- 3 to 5 - green chilies (or as per taste) - split in center lengthwise.
- 7 to 8 - curry leaves
- ¼ cup - coriander leaves - chopped
- 1 tsp - grated ginger
- 2 tbsp - cooking oil
- ½ tsp - turmeric powder
- ¼ tsp - asafoetida/hing
- Salt - as per your taste
Method:
- Cook rice and keep it aside to cool down. You may also carefully spread the rice on a wide-tray to fasten the process.
- In a big pan, heat oil on medium flame and add mustard seeds.
- As mustard sputters, add green chilies, curry leaves, asafoetida and peanuts. Stir and let peanuts roast a bit on medium-low flame
- Meanwhile, add lemon juice and salt to the cooked rice, mix it all together. Keep aside.
- Once the peanut is roasted, add turmeric powder, ginger and coriander leaves. Stir until the raw small is gone (for about a minute or so). [Note:Rather than just garnishing coriander leaves, roasting it gives an unique flavor, aroma and will not let it go bad in lunch-box.]
- Now add the rice mix to the pan and mix it all together. Turn the heat to low, cover and let it warm for about 2 minutes. Turn off the flame.
- Serve with pickle and curds. Of course, any fritters like pakoda's will go well with Lemon rice.
Tips:
- If packing for lunch, let the Lemon-rice cool down before covering the lunch box lid.
- 1 tsp of (soaked for about 10 minutes) urad dal and chana dal may be add to the seasoning along with peanuts.
- It is important that the cooked rice is cool down, or else the rice will break and get mushy while mixing it.
Labels: Meal, Rice, South-Indian Dish, Tiffin Variety, Vegetarian
Mangalore Style Chicken Curry with Coconut Milk
Thursday, November 28, 2019
This Mangalore Style Chicken curry with Coconut milk was common Sunday lunch when I was young, especially when I visited my native place Kundapura. It is extra delicious when had with its' perfect combo ...Kori Roti, Neer Dosa, Ottu Shavige or Kotte Kadabu. It has been long since I have made chicken curry with this recipe as it is hard to have all the right combo. Can be had with rice or chapati, but it is not the same. Recently, I found Kori Roti in the local store, since then I have made this curry already thrice. My family is amazed by the taste the combination brings and it is so unique.
Kori Roti is made with Rice, just like Neer Dosa but, dry and crispy, and has a long shelf-life. Once you pour curry over the Kori Roti, its starts to soak up all the goodness of curry and become soft, Yummy!!
Ingredients:
- 4 lb – Chicken (cleaned and cut) 2kg
- 3 big – Onions – thinly sliced
- 1 –Lemon
- 1 tsp – Turmeric/Haldi
- 2 tbsp – Ghee or oil
- 4 cup – Coconut Milk (2 cans)
- Salt – as per taste
For Masala
- 1 cup – grated fresh coconut
- 6 – garlic cloves
- 6 – cloves
- 1½ inch – ginger
- 1 tbsp. – Coriander seeds / Dhania
- 1 tsp – Cumin seeds / Jeera
- 6-7 – Red chilies (as per taste)
Method:
- Prepare Masala: Dry roast all the masala ingredients. With little water, grind them all into fine paste in a blender.
- In a think bottom pan, heat ghee on medium flame. I use a wide pressure-cooker(pan).
- Add cut onion and cook until translucent.
- Add chicken and turmeric to the onion. Cover and cook for 5 mins or half done.
- Add salt and fresh lemon juice cover and let it cook until slightly tender (or one whistle)
- Mix in the ground masala and on medium flame, let it come to a boil,
- Now add the coconut milk. Reduce the flame to medium low.
- Cover and let it cook for 10 mins or until the chicken is fully cooked. Every few minutes, stir the curry to make sure that it does not get stick to the base of the pan and burn.
- Once done garnish with fresh cut coriander leaves.
- Serve hot with Kori Roti, Neer Dosa, Ottu Shavige, Kotte KadabuRice, idli, chapati or rice.
Labels: Chicken, Curry, Kundapura, Mangalore dish, Meal, South-Indian Dish
~ Mangalore Style Chicken Curry with Coconut Milk
~
Posted by Swetha @ 11/28/2019 10:30:00 AM ::
 Swetha's Fusion
 ::
permalink
Ash Gourd (Winter Melon) and Butter Milk curry / Boodhkumabalakayi Majjige Huli
Wednesday, November 27, 2019
This curry is good on a hot summer day. Also prepared when there is left over curds or butter milk.
Ingredients:
- Boodh-kumabalakayi/Ash Gourd / white pumpkin - 1/2 kg/ 1 Lb
- Buttermilk - 2 to 3 cups
- Salt - to taste
- For masala
- Grated Coconut - 2 tbsp
- Cumin/Jeera - 1/2 tsp
- Green chilies - 3 to 4 (or to taste)
- Coriander leaves - a handful (washed and chopped)
- For seasoning:
- Oil - 1 tbsp
- Mustard/Sasive - 1/4 tsp
- Cumin/Jirige - 1/2 tsp
- Curry leaves - 5 to 6 leaves.
- Asafoetida / Hing - pinch
Method:
- Remove the seeds and the skin of the Ash Gourd, cut it into inch and a half cubes
- Transfer the washed Ash Gourd cubes into pressure cooker or steamer.
- Add a cup of water and salt. Let it cook for one whistle and turn it off.
- Meanwhile grind masala with bit of water (or buttermilk) into paste.
- Once the pressure is released, add the ground masala to the cooked Ash Gourd and bring it to boil.
- Let it boil for 4 to 5 minutes than turn off the heat.
- Whisk thick curds and water together or buttermilk. Add it to cooked Ash gourd and mix.
- For seasoning: Heat oil, add mustard, cumin, red chilies and curry leaves; Once mustard start to splatter, pour the mixture over the curry.
- Garnish with fresh cut coriander/cilantro leaves,
- Server warm with rice.
Variation:
- Small piece of ginger may be added while grinding the masala
- 1/2 tbsp soaked Bengal Gram - may be added while grinding the masala.
Labels: Curds/Yogurt, Curry, Meal, South Indian Soup, Vegetarian
~ Ash Gourd (Winter Melon) and Butter Milk curry / Boodhkumabalakayi Majjige Huli
~
Posted by Swetha @ 11/27/2019 07:23:00 PM ::
Swetha's Fusion ::
permalink
Raw Mango Sweet Pickle
Wednesday, June 24, 2015
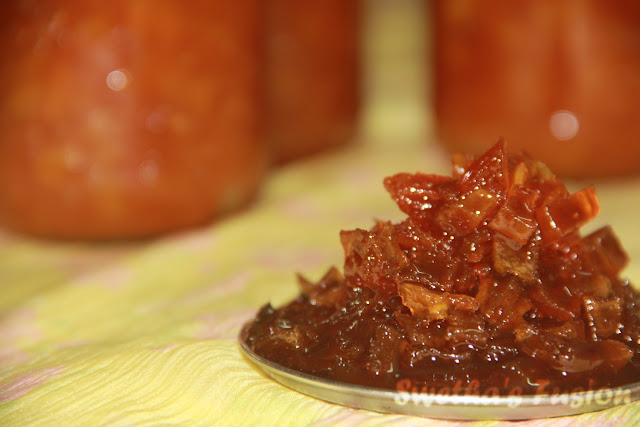 |
| Mango Sweet Pickle |
Ingredients:
1kg Raw
pickle Mango
¾kg sugar
50gms
Fenugreek seeds (Methi)
2 ½ tbsp.
Chilli powder
1/4 tsp - Sodium
Benzoate (Preservative) (optional)
 |
| Cut Raw Mangoes |
Method:
1. Wash and
peel Mango and discard the skin
2. Cut mango in
to small pieces. Discard the rind/seed
3. In a thick
bottom vessel, mix-in mango pieces and sugar.
4. Places it on
the stove and cook it on medium-high heat.
5. Keep
stirring until the sugar is melted. (Approximately
– 5 min)
6. Once the mixture comes to boil, stir it occasionally not to burn the bottom.
7. Meanwhile,
grind fenugreek/Methi seeds in to fine powder.
8. Once the
mixture becomes thicker and is light caramel in color, stir it continuously.
9. As the
mixture turn dark honey color and mango is cooked, mix-in fenugreek and Chilli
powder.
10. Turn off the
heat.
11. Optional: If you are making a big batch and would like to
preserve the pickle for a year or two, stir-in Sodium benzoate to the mixture.
12. Let it cool
completely before storing it in air tight containers.
Serve with
Roti or Chapathi. Can be even used as bread spread.
Labels: Dip Recipes, Meal, Side-Dish