Dal Vada | Chattambade | Aambode | Lentil Fritters - AIR FRYER version
Saturday, June 29, 2024
You may have already seen my past blog posts on preparing
Dal Vada,
Masala Vada and
Sabudana Vada
traditional way of making by deep-frying them. But, now I have my NEW favorite... Since I got my
Air Fryer, I have been experimenting with recipes which usually requires deep
frying in oil to make them in Air Fryer with very little oil. To my surprise Air Fried
Dal Vada and
Sabudana Vada
tastes much better and cooks well evenly without the dripping oil.
Did I mention, I have not deep fried anything since I brought the Air Fryer in
Nov of 2020. I am so proud of myself.
I am still trying to figure out how to make my all-time-favorite Onion Pakodas
in Air Fryer. Few times I experimented, the pakodas has turned out dry, not the same.
Meanwhile, check out other
Air Fryer
recipes.
Ingredients:
- 1 cup - Bengal gram dhal (Chana dhal)
-
¼ cup - Finely chopped
onions
- 3 - Green chilies ( or as per taste)
- 1 tsp - Crushed ginger
- 2 tbsp. - Chopped coriander
- 1 tsp - Chopped curry leaves
-
1 tsp - Fresh dill leaves -finely chopped (use only the
leaves and discard the stem)
- 2 tbsp. - oil
- Pinch of asafoetida (Hing)
- Salt - to taste
Method:
- Wash and soak chana dal in water for 2 hours ( Tip: if you are short on time,
wash Chana dhal and with little water microwave for 5 to 6 minutes.
Remove add some more water and let it soak for half an hour)
-
In a blender, add green chilies and ginger. Grind it into fine paste
without adding water. Transfer it to a mixing bowl.
- With help of a strainer, completely drain water from the soaked
chana dal. Transfer it the blender. Without adding any water, grind it in to coarse paste . Basically pulse the soaked lentils for 5 to 6 times in
the blender. As you will notice in the picture some of the lentils are
intact. Transfer it to the same mixing bowl with ginger/green-chili
paste.
-
Add salt, 1 tbsp. of oil and coriander/dill/curry leaves to the mixing
bowl.
-
Mix all together, it should form into a ball easily when pressed into
one, If needed sprinkle little water if it dry or add little rice flour
if the mixture is watery.
-
Apply little oil on your palm so that the mixture won't stick to your hands.
Roll the mixture into lemon sized ball and press slightly flat in
between center of your palms to shape into vada. Keep aside on a plate.
Work with rest of the mixture to make all the vada ready.
-
Place the shaped vada in the air-fryer basket. you may line it with
parchment paper if you wish. I use a 2-tier wire rack. I brush the
rack with oil and place the vada on them. Using 2-tier rack allows me to
make about 18 vada at a time. Which helps save time and electricity.
-
Brush or spray the vada(s) with oil. place the rake (or basket) in the
air-fryer.
- Air-fry for 13 minutes on 395F (200C).
-
After about 13 minutes, brush/spray oil on the top, now flip the vada
over and brush/spray oil on the other side of the vada. Since I
use 2-tier rack, I even switch the vada between top and bottom rack for
even cooking and roasting. Airfry for 8 - 10 minutes more, or until
done.
- Serve hot with chutney or tomato sauce.
Notes, Tips and Variations:
-
*Dill =
sabsige soppu in Kannada
-
May use red chilies powder instead of green chilies. Vada will turn out
dark shade.
-
Finely chopped mint leaves (puddina) or or any other greens may be
added.
-
1/4 cup of split white peas can be added while soaking for more crisper
vade.
-
No onion: If you plan to make dal vada on a festival or a fasting
occasion, then simply skip onions. Add a generous pinch of asafetida to
mimic the onion flavors.
-
Soaking: Do not soak chana dal for more than 2 hours. Soaking it for
longer time does not result in crispy texture.
-
Consistency: The ground mixture has a thick and coarse consistency. If
the batter becomes flowing or runny, then add some rice flour to thicken
it.
-
Shaping: A thick coarse mixture helps to shape the vada easily.
Labels: Air Fryer, Appetizers, Fritters, Healthy dish, Lentil, Snack, Vegetarian
~ Dal Vada | Chattambade | Aambode | Lentil Fritters - AIR FRYER version
~
Posted by Swetha @ 6/29/2024 10:11:00 AM ::
 Swetha's Fusion
 ::
permalink
Spicy Roasted Chickpeas | Garbanzo | Chana- in Air Fryer
Wednesday, June 26, 2024

Roasted Chickpeas | Garbanzo | Channa - a healthy snack or use it as toping on your salad.
Adding spices makes a wonderful snack to have with evening drinks as well.
Coming to spices, one may choice to add any combination, let your imagination and tastebuds rule. Or just add salt. In this recipe, I just used salt, chilli powder and Zatar.
Ingredients:
- 19 oz can - of chickpeas | Garbanzo (drained and rinsed)
- 1 tsp. - olive oil
- ⅛ tsp - salt
- ¼ tsp - zatar
- ¼ tsp - red chili powder or ground cayenne pepper
Method:
- Preheat air fryer to 390°F / 200°C.
- Mix dry ingredients (spices) and keep aside.
- Drain chickpeas in a colander and transfer over to a kitchen towel. Let it dry completely.
- In a mixing bowl, add oil and toss to coat the garbanzo.
- Transfer it to Air fryer basket and spread it evenly.
- Cook for 12-15 minutes, shaking the basket every 5 minutes until crunchy on the inside, not moist and golden brown [Time required my be different depending on the model of the the Air fryer - just keep an eye not to burn]
- Transfer the roasted chickpeas to a mixing bowl while still hot, sprinkle the spices over the hot garbanzo and immediately toss with the spices.
- Let it sit to cool down completely before transferring to a container.
- Enjoy this yummy healthy snack.
NOTE:
- Instead of canned Chickpeas, you may use dry chickpeas. Soak it overnight, dry it on a kitchen towel and follow the above recipe.
- You may use any spices you wish, get creative.
Labels: Air Fryer, Lentil, Snack
~ Spicy Roasted Chickpeas | Garbanzo | Chana- in Air Fryer
~
Posted by Swetha @ 6/26/2024 02:24:00 PM ::
Swetha's Fusion ::
permalink
Mixed Dal | Lentils - with Peanuts curry
Wednesday, December 27, 2023

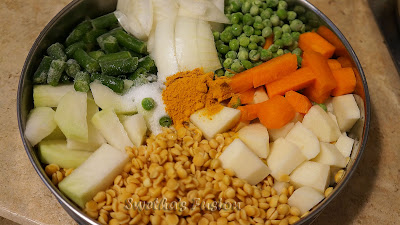
I make this mixed lentils curry often to go with phulkas (puffed up roti without oil. also check this video from Hebbar's Kitchen). I make it thick as it will be easy for me to take in my lunch box without any spills or leaks. Just by adding more water it will have more gravy consistency to mix with Rice as well. You can make this curry with the lentils of your choice or purchase mixed lentils from local Indian store [or from Amazon - Indian Bean & Lentil Superfood or Pancharatna Dal]. Additionally, I add Green Lentils as well, which gives extra volume as it does not soften as much as the other lentils do and gives the curry bit of a darker color. Since many Indians are vegetarian, Dal (lentil) is the main source of protein. Here is a recipe for you full of protein. ... and yummy too.
Pancharatna Dal mix contains: (Pancharatna means five gems)
English Hindi KannadaSplit Mung Beans - Moong dal - Hesiru bele
Split Red Lentils - Masoor dal - Mysoor bele
Split Chickpeas - Chana dal - Kadle bele (Bengal gram)
Split Matpe Beans - Urad dal - Uddina bele (Black gram)
Split Pigeon Peas - Toor dal - Togari bele
Ingredients:
- 1 cup - Pancharatna dal mix
- ½ cup - green lentils
- ¼ cup - peanuts
- 1 inch - ginger - chopped and crushed
- 3 - green chilies - finely chopped
- 1 - tomato - finely chopped
- 1 tsp - cumin seeds
- ½ tsp - kaloji (nigella seeds) - fennel seeds or caraway seeds maybe substituted
- ¼ tsp - asafoetida
- ½ tsp - turmeric powder
- ¼ tsp - red chilli powder
- 1 tsp - curry powder (optional)
- 3 tsp - ghee or oil
- ½ cup - chopped fresh cilantro or coriander leaves
- 7 to 10 - curry leaves (optional)
- fresh lime juice from 1/2 lime or as per taste (optional)
- salt as per taste
Method:
- Wash the lentils with water multiple times until water runs clear. I usually collect the water from multiple wash and use it for watering my plants.
- Add 4 cups of water to the lentil and cook it until tender. I use pressure cooker and cook it for two whistles. Instant pot may be used. Or just boil the lentil in a sauce pan over medium flame until it is cooked - for this you may need more water and it will take more time. Set aside the cooked lentils.
- Heat ghee in a pan, add cumin seeds & nigella seeds to the hot oil.
- Once the seeds starts to sputter, add asafoetida, chopped green chilies, crushed ginger and curry leaves. Stir for a minute
- Add peanuts and stir it until peanuts are slightly roasted.
- Next add chopped tomatoes, bit of salt and sugar and cook until the tomatoes turn mushy.
- Add turmeric powder, red chilli powder and curry powder. Mix and cook of a minute
- Now add the cooked lentils to the mix. If needed add some more water.
- Add salt and bring it to rolling boil.
- Turn off the stove and mix-in lime juice.
- Garnish with chopped fresh coriander and serve.
Labels: Curry, Healthy dish, Lentil, Side-Dish, Vegetarian
Masala Vada
Tuesday, December 20, 2022

Masala Vada is similar to
Dal vada, but with more spices and flavor.
Masala vada goes well with coconut chetney
Ingredients:
- ¼ cup - chopped onions or 1 small onion
- 1 tsp - chopped green chili
- 1 tsp - chopped ginger
- 9 to 10 - curry leaves – finely chopped
- 3 tsp - chopped coriander leaves
- 1 pinch asafoetida (hing)
- salt as required
- oil for deep frying – as required
- water for soaking chana dal – as required
- Ground together
- ½ cup - chana dal (husked and split bengal gram) – 120 grams
- 1 - dry red chili – deseeded and halved (or red chili powder may be used)
- 1 tsp - fennel seeds
- ½ tsp - coriander seeds
- ¼ tsp - black pepper
Method:
- Rinse chana dal couple of times in water. Then soak in enough water for 2 hours. [if short on time, microwave(with water) for 5 minutes and let it sit for about 30 minutes]
- In a blender, add dry red chili, fennel seeds, coriander seeds and black pepper. Grind the spices coarsely
- Drain all the water from the soaked chana dal. Add the soaked lentils to the blender along with the spices and grind the lentils coarsely. Some whole chana dal should be there. No need to add water while grinding.
- Remove the ground dal-spice mix in to a mixing bowl.
- To the mixture, add chopped - onions, green chilies, ginger, curry leaves, coriander leaves, asafetida(hing), and salt as per taste.
- Mix everything together.
- Meanwhile, heat oil in a fry-pan
- Let the oil become hot on medium heat. to test if the oil is ready, drop a tiny portion of the masala vada mixture in the hot oil. If it comes up bubbling and quickly on to the surface of the oil, you can begin frying.
- Shape the mixture to a big lemon sized ball, press slightly to flatten it on your palm.
- Gently drop the vada to the hot oil, may fry multiple vada at a time depending on the size of your fry-pan.
- Let one side become light golden and then turn them over with a slotted spoon. Then fry the second side. If the oil becomes very hot, reduce the heat.
- Fry until masala vada turns crisp and golden. Flip each vada a couple of times for even frying.
- Remove the vadas with a slotted spoon and place them on kitchen paper towels to remove extra oil. Use up the entire masala vada mixture to shape and fry as shown in the steps above.
- Serve these spiced masala vada hot with coconut chutney.
TIPS:
No onion: If you plan to make dal vada on a festival or a fasting occasion, then simply skip onions. Add a generous pinch of asafetida to mimic the onion flavors.
Soaking: Do not soak chana dal for more than 2 hours. Soaking it for longer time does not result in crispy texture.
Consistency: The ground mixture has a thick and coarse consistency. If the batter becomes flowing or runny, then add some rice flour to thicken it.
Shaping: A thick coarse mixture helps to shape the vada easily. For super crispy vadai, flatten them more.
Labels: Appetizers, breakfast, Fritters, Lentil, Side-Dish, Snack, South-Indian Dish, Vegetarian
Bisi Bele Bath
Tuesday, June 07, 2022

Bisi Bele Bath - literally translates to 'hot lentil rice'. It is an authentic dish from the state of Karnataka, India. Bisi Bele Bath is a complete meal, with lentils and vegetables and rice. Onion/tomato raita, kara (spicey) boondi and potato chips are usually served on the side with Bisi Bele Bath. I have included recipe for onion & tomato raita at the end of this post. Try this traditional recipe and enjoy it with your family and friends.

Ingredients for Masala:
- 1 tsp - urad dal | black gram
- 1 tsp - chana dal | split chickpeas
- 1 tsp - dhania seeds | coriander seeds
- 1 tsp - jeera | cumin seeds
- 1 tsp - khus khus | white poppy seeds
- 1/2 tsp - methi seeds | fenugreek seeds
- 1/4 tsp - mustards seeds
- 2 to 3 - lavanga | cloves
- 1 small piece - cinnamon
- 4 to 5 - Red chilli ( I use Byadagi red chilli )
- 1 Tbsp or as per taste - tamarind paste
- 2 Tbsp - grated fresh coconut
Ingredients
- 1 cup - Rice ( I use Sona Masoori Rice)
- 3/4 cup - Toor dal | pigeon peas lentil
- 1 - Kohlrabi ( 'navilu kosu'[ನವಿಲು ಕೋಸು] )
- 1 - potato
- 1 - carrot
- 1 - medium sized onion
- 1/2 cup - green peas
- 1/2 cup - peanuts
- 5 to 7 - green beans
- 7 tp 10 - curry leaves
- 1/4 tsp - mustards seeds
- 1 pinch - hing | asafoetida
- 1/2 tsp - haldi | turmeric powder
- 1 tsp - jaggery
- 1 Tbsp - oil
- Salt as per taste
- For garnish:
- 1 Tbsp - ghee
- 1/4 cup - cashew nuts
Preparations:
- Wash rice with water and let it soak for about 15 mins. Cook the rice and keep aside
- Wash toor dal ( pigeon peas ) and keep aside for soaking.
- Wash and cut potato, carrot, kohlrabi into cubes
- Wash and cut green beans
- Cut onion into big pieces
- In a pressure cooker, add soaked toor dal, half of peanuts, cut onion, cut vegetables, turmeric powder and salt. Cook it with water for two to three cooker whistle. Turn off the flame and keep aside for the pressure to release on its own.
I have big pressure cooker with 2-tier inserts. I place all the vegetables in bottom tier-pan and cook rice in the top tier at the same time in one go rather than cooking them separately.
- PREPARE MASALA: In a pan, dry roast the masala ingredients - To the hot pan, first add mustard, cumin and fenugreek seeds, once it is slightly roasted and mustard starts to sputter, add the coriander seeds, khus khus, cloves, cinnamon, urad dal, channa dal and red chillies. Roast the mixture stirring continuously. Transfer the content to a blender (mixie). Now in the same pan, add grated coconut and roast on low flame. No need to turn it brown. Turn off the flame and transfer the coconut to the blender. Add tamarind-paste to the mixture, add some water, and grind into smooth paste. Keep aside.
Method:
- In a big thick bottom sauce pan or a cooker pan. Add oil and heat it on medium flame. Once oil is hot, add mustard seeds, asafoetida, curry leaves and rest of the peanuts, roast them.
- Now carefully add the ground masala (mind the oil is hot, if needed reduce the flame). Continue stirring and let the masala cook for 3 minutes.
- Slowly add 2 cup of water, jaggery and salt. Stir, and bring the mixture to boil on medium flame.
- Next, add the cooked lentil and vegetables. Mix, cover and let it cook for about three minutes.
- Finally add the cooked rice. Stir, cover and simmer for 5 minutes. The mixture should look mushy not dry. If needed heat a cup of water and mix it in. This is also a good time to check for salt. Once cooked turn off the flame.
- In a small seasoning pan, heat ghee, add cashew nuts and roast it. Pour the ghee and roasted cashew nuts over the Bisi Bele Bath.
- Serve hot with onion and tomato raita (see below for recipe); kara or masala boondi; and potato chips.

- Cut 1 onion and 1 tomato into small cubes.
- Cut green chilies into big pieces or length-wise. ... so it is easily visible and be able to separate it while eating.
- Add ¼ cup of water to 1 cup of curds and whisk the curds until it is smooth.
- To the curds, add salt, ginger powder and whisk to mix it all well.
- Now add onion, tomato, green chilies and chopped coriander leaves.
- Mix it and refrigerate for at least 30 minutes or more before serving. This allows the flavor of the onion to be released.
- Serve chilled along with any spicy mixed rice or chapati.
- - ~ o 0 o ~ - -
Note:
- Do not use tomatoes or bell pepper (capsicum)
- May garnish with fresh coriander leaves.
Labels: Healthy dish, Lentil, Main Course, Meal, Raita, Rice, South-Indian Dish, Tiffin Variety, Vegetarian
Mung beans curry | Hesaru Kalu Thove recipe - with interesting & unique seasoning/tadka technique with white-stone
Saturday, July 10, 2021
My mom made this Hesaru Kalu Thove (sprouted Mung beans curry) for breakfast to go with Kotte Kadubu (almost) on all festival days. We would wake-up in the morning smelling this yummy curry which would help us speed up with morning chores. Kotte Kadubu is idli made with filling idli-dough inside cups made out of Jackfruit leaves and steam cooked.
Now, coming to that 'interesting seasoning' part in the post tittle. In coastal Karnataka (Kundapura) area, this curry and few other curry (like fish curry) is seasoned with placing a hot piece of rock (basically a stone) in seasoning-pan. My grandma used to burn the stone on hot embers in her wood burning stove, the stone would almost turn red-hot. [NOTE: This is NOT same as adding smokey flavor to your curry which is achieved by placing hot charcoal on a bowl kept in the center of the curry and pouring oil over the charcoal and covering the lid so as to induce the smokey flavor/smell to the curry - which many Punjabi curry recipe calls for.] But using this stone in seasoning gives an unique flavor, it instantly fills the whole house with aroma. Now, I know how we woke-up smelling the curry on festival days.
This is very unique technique only few families follow it, btw it is an optional step. I follow my mom's recipe placing stone on gas-stove fire to make it hot. My father helped me pick-up couple of these stones during our trip to Hampi. Near the river banks and one of them we found after hiking Anjanadri betta/hills (575 steps) ...probably part of some construction. Pappa informed me that it is called "Belgallu or Bella Kalu" - white stone. I don't know what it is called in English, but I am definitely sure it is not Marble. The stone is slightly translucent and when heated, it gets a oily shine on the surface. After doing some online Google (re)search I narrowed it down to two types of rocks Gypsum or Quartz. Not sure which one it is (may be neither) as I am not a Geologist :P Here is a picture of the stone I used.

This curry is usually made with only sprouted whole mung beans. But this time, I sprouted ½ cup mung beans and ½ cup black eyed peas as well. The curry requires bit of planning ...about two days ahead, unless you plan to use store brought ready sprouted beans. NOTE: using good coconut oil gets you that authentic taste and aroma of the curry. That said, other oil may be used.
Ingredients:
- 1 cup - whole mung beans
- 1" - ginger - sliced
- 1 - large onion - cut into chunks
- ¼ tsp - turmeric powder
- 3 tbsp - coconut oil
- 3 - garlic cloves
- 1 tbsp - onion -finely cut -for seasoning
- ¼ tsp - asafoetida (optional)
- salt as per taste
- The stone - Optional for seasoning
Ingredients for Masala:
- ½ tsp - mustard seeds
- ½ tsp - fenugreek seeds
- 1 tsp - cumin seeds
- 2 tsp - coriander seeds
- 10 - red chilies - I use byadagi red chilies
- 1 cup - grated fresh coconut
- 1 - small onion - chopped
- 6 - garlic cloves - chopped
- 4 - cloves
- 3 tbsp - tamarind pulp
- ½ tsp - oil - I use coconut oil
Preparation:
- Mung beans sprouts - 2 days ahead: wash and soak mung beans for over 10 hours. Drain the mung beans in a strainer, cover it with wet cotton cloth (like kitchen towel) and keep aside for over night. Do NOT put it in the refrigerator. Next day morning, again wet the towel and cover. If the beans look too dry, sprinkle some water. Have to do the same in the evening as well. Next day morning, you will see the bean sprouts.
- Masala: Heat ½ tsp of coconut oil in a wide pan on medium low flame, roast mustard seeds, cumin seeds, fenugreek seeds and coriander seeds. Reduce the flame to low. Add red chili, cloves and garlic cloves to the pan. Stir and roast for about 2 to 3 minutes. Turn off the flame and let it cool down. Transfer the roasted mixture to a blender/mixie jar. Add grated coconut, chopped onion, and tamarind pulp to the jar. Add ¼ cup of water and grind it to smooth paste and keep aside.
Method:
- Transfer the sprouted beans in to a pressure cooker, add ¼ tsp turmeric powder, ginger slices, 1 tsp salt and 3 cups of water. (I usually cook this curry in pressure cooker pan)
- Pressure cook for 3 whistles. Turn off the stove and let the pressure release on its own.
- Remove the pressure cooker lid and place pressure cooker pan with cooked beans back on the stove on medium flame or transfer the cooked beans to a sauce pan.
- Add cut onion. Stir and cook for couple of minutes.
- Now add the ground masala and salt. Add a cup of water and mix.
- Once the curry comes to boil, cover and simmer for about 8 minutes or until it is cooked . Stir in between.
- Meanwhile, if using the stone for seasoning, place it on the stove to let get it hot. Flip the stone multiple times with help of metal kitchen tongs
- Once the curry is cooked, turn off the stove.
- Seasoning: heat a seasoning pan. now carefully place the hot stone in the seasoning pan. Pour coconut oil over the hot stone. Note and be careful, the oil will immediately starts to boil. These is when you get that sizzle and fill the house with that nice aroma. Add crushed garlic cloves and cut onion. With a long spoon stir them around the stone. Once you notice that the garlic are roasted add asafoetida powder to the oil and turn off the flame.
- Carefully pour the seasoning over the prepared curry (along with the stone) and cover the lid immediately so that the aroma is infused into the curry.
- Mung beans curry | Hesaru Kalu Thove is ready to serve. Serve hot with kotte kadubu, idli, dosa, roti, chapati or rice.
- Enjoy this unique recipe with your family. Hope you like it.

Labels: Curry, Kundapura, Lentil, Mangalore dish, Side-Dish, South-Indian Dish, Vegetarian
~ Mung beans curry | Hesaru Kalu Thove recipe - with interesting & unique seasoning/tadka technique with white-stone
~
Posted by Swetha @ 7/10/2021 02:09:00 PM ::
Swetha's Fusion ::
permalink
Chana Bhatura | Chole Bhatura
Friday, July 09, 2021
Chole Bhatura or Chana Bhatura is one of the common dish in North India, especially in Punjabi house hold. One will definitely find it in North Indian restaurant menu. It is one of the famous combo, though one may have bhatura with other curry; or have chole with rice, chapati, roti or poori. The recipes are kinda my way of doing the way I like it. For Chana/Chole, I take the shortest and simplest route of making it in pressure cooker with ready chana masala powder and canned Garbanzo beans (chana) and at times canned tomatoes. Anyway, I make it when I have ran out of things in refrigerator and I have to visit my pantry for emergency supply - which happens rarely. I am going to mention both recipes here, but note that it is NOT the authentic way of preparing the dish. That said, it still turns out delicious in its own way, so give it a try.
BHATURA
Ingredients for Bhatura:
- 4 cups - whole wheat flour (gheu ka atta)
- ½ cup - semolina (sooji/rava)
- ½ tsp - Eno fruit salt
- ½ tsp - sugar
- ½ tsp - turmeric powder
- 1 tsp - cumin seeds
- 2 tbsp - fresh coriander leaves -finely chopped
- 2 tbsp - fresh methi (fenugreek) leaves -finely chopped (optional)
- 2 tbsp - curds | plain yogurt
- Salt – to taste
- Warm water – ¾ cup
- Oil – 1 tablespoons + more for deep frying
Method for preparing Bhatura:
- In a mixing bowl take -wheat flour, semolina, salt, sugar, Eno fruit salt, cumin seeds, and turmeric powder. Slightly mix them all.
- Now add plain yogurt, chopped coriander and methi leaves. Mix all together.
- Start adding little water at a time and knead the dough. Keep adding and keep kneading the dough. Dough should be firm.
- Finally, add 1 tablespoon of oil or ghee and give a quick knead. Cover with wet towel and keep it aside at least for half an hour to an hour, this brings unique flavor and texture to the bhatura.
- You may notice that the dough would have fluffed up a bit and feels soft due to the soda we added. Divide the dough equally and make medium sized balls.
- Meanwhile, take oil in a fry-pan, place it on the stove and heat it on medium-high flame.
- Lightly flour rolling surface, place the dough ball and smoothly roll it. Dust some more flour over the rolled dough, flip it over, dust some flour again on the other side and roll again. Since the dough is on the softer and fluffier side, it is hard to get a perfect circle - that's case at least for me. Also, it will be bit thicker than the roti/chapati. That is normal, if you try to roll any thinner you may end up tearing it.
- Now slowly slide the rolled bhatura into hot oil [ to check if the temperature of the oil is right, drop a small piece of dough in to the oil and it should float immediately to the top ]
- After few seconds, the bhatura will float, with the help of a slotted spatula gently press it down, this will help bhatura to swell, now turn the bhatura and fry it on both sides.
- Once bhatura is slightly golden brown, remove the bhatura out on to a plate lined with paper towel to absorb extra oil.
- Repeat the steps with rest of the dough.
- Serve hot with Chole or any other curry.
CHOLE | CHANA
Ingredients for Chole:
- 1 can - chana |chickpeas | Garbanzo (or 1 cup - Soak overnight and pressure cook for 10 - 15 minutes)
- 4 - onion (medium) - chopped
- 2 - tomato (large) - chopped ( or 1 can)
- 10 - garlic cloves
- 2" - ginger - chopped
- 1 of each - bay leaves, black cardamom, green cardamom,cinnamon
- ½ tsp - cumin seeds
- ½ tsp - turmeric powder
- 1 ½ tsp - red chili powder
- ½ tsp - cumin powder
- 1 tsp - coriander powder
- ½ tsp - garam masala powder
- 1 tsp - Chole masala(any brand)
- ½ cup - coriander leaves chopped
- 5 tbsp - oil for cooking
- Salt as per taste
Method to prepare Chole:
- With little water, grind ginger, garlic and onion,
- Heat oil or ghee in pressure cooker pan, when it is hot, add bay leaves, black cardamom, green cardamom,cinnamon and cumin seeds. Saute a bit
- Turn the flame to medium and add the ground ginger, garlic and onion paste. Stir the mixture and let it cook - for about 3 to 5 minutes until the raw smell is gone.
- Meanwhile in the same grinding jar, add cut tomatoes and grind it into smooth paste.
- Once the ginger, garlic and onion is cooked, add turmeric and red chili powder. Stir for 30 seconds
- Now add the ground tomato paste, stir, cover and cook for about 3 to 4 minutes.
- Next add (drained and washed) chana, cumin powder, coriander powder, chole masala and salt, mix it all together.
- Add 1 ½ cup water. stir and close the pressure cooker lid and cook for about 5 whistles on low-medium flame. [number of whistles may differ for different pressure cooker model]
- Turn off the flame and let the pressure release on its own.
- Add coriander leaves and mix
- Chole is ready, serve it hot with cut onion and lime wedges. Goes well with jeera rice, poori or paratha or of course bhatura.
- Enjoy the yummy Chole masala with your family and friends.
Labels: Curry, Indian Bread, Lentil, Main Course, Meal, North Indian dish, Side-Dish, Vegetarian
Heerekai Thove | Ridge Gourd and Moong Dal curry
Sunday, July 26, 2020
Heerekai Thove - Ridge Gourd and Mung gram (lentil) curry is one of the favorite curry in my house. It is like comfort food. Besides mixing with rice, my husband will just drink the flavorful lentil liquid. Very quick and simple to make.
Ingredients:
- 1 cup - Moong dal
- 1 whole - tender Ridge Gourd (about 2 cups cut pieces)
- 2 - green chillies
- 1 tsp - cumin seeds
- 1 tsp - turmeric powder
- ½ tsp - mustard seeds
- 2 tsp - freshly grated ginger
- 1 tbsp - oil or ghee for seasoning
- 2 tbsp - lime juice
- 2 tbsp - chopped coriander leaves
- 5 to 8 - curry leaves
- 4 to 5 - dry coconut slices (optional)
- 1 pinch - hing | asafetida
- salt - as per taste
Method:
- Rinse moong dal couple times until water runs clear.
- Optional step: soak dal for half hour
- Cook dal with 3 cups of water in pressure cooker for about two whistle or 12 to 15 minutes in microwave oven on high
- Meanwhile, wash ridge gourd. Using a peeler, peel the hard ridges off. Cut and discard the ends of the gourd. Cut the gourd into 2 cm thick circles. if it is wide, cut them into halves. Keep aside.
- Other preparation: Slit green chilies length wise; extract lime juice; grate ginger and chop coriander leaves and keep all aside.
- Heat seasoning oil/ghee in a sauce pan on medium flame. Add mustard to the oil.
- Once mustard starts to sputtering, add curry leaves, asafetida and cumin seeds (optional coconut slices).
- Reduce the flame, and carefully, pour the cooked dal into the sauce pan. Note, the oil is hot and when pour the dal it will start flying all over the place - cover the pan to avoid it or stir the dal to stop it.
- Using a masher or buttermilk churner, mash and churn the dal.
- Set the flame medium-high, add more water if needed and bring it to boil.
- Now, add the cut ridge-gourd, green-chilies, turmeric powder and salt to sauce pan with dal.
- Cover the pan and simmer it until ridge gourd is cooked. Stir in-between to prevent dal burning at the bottom.
- Once the ridge gourd is cooked and tender, turn of the flame.
- Mix-in lime juice to taste.
- Garnish with chopped coriander leaves and serve hot with rice and pokoda on the side.
Labels: Curry, Lentil, Side-Dish, South-Indian Dish, Vegetarian
~ Heerekai Thove | Ridge Gourd and Moong Dal curry
~
Posted by Swetha @ 7/26/2020 01:57:00 PM ::
Swetha's Fusion ::
permalink
Dal Makhani with Mung beans [Hesaru Kalu | Moong | Green Gram]
The Dal Makhani is usually prepared with Urad dal [Black gram] and Rajma [Red kidney beans]. It is a Punjabi dish. Goes well with naan especially garlic-naan and/or Ghee rice. To be honest, though I enjoy eating Dal makhani in restaurants, I am not a big fan of using Rajma beans in my cooking. I make my dal makhani with sprouted moong dal [mung beans or green gram]. Taste's equally good.
Here is my version of Dal makhani. For this recipe, you need to start two to three days ahead, unless you can find ready sprouted mung beans in store.
Ingredients:
- 1 cup whole green lentil (Mung beans or Moong)
- 3 tbsp - unsalted butter
- 1 tbsp - Ghee
- 2 - onion finely chopped
- 3 - bay leaf
- 2"- cinnamon piece
- 3 - green cardamoms
- 1 - black cardamom (optional)
- 3 - tomatoes
- 1 tbsp - ginger garlic paste
- 2 tsp - red chill powder /or as per taste
- 1 tsp - garam masala powder
- ½ tsp - sugar
- 1 tsp - amchur
- ½ tsp - kasuri methi
- 1 cup - cream or 1 can - coconut milk ( I usually use coconut milk)
- ¼ cup - cream (more for garnish)
- salt - as per taste
Sprouting and preparing Mung beans:
- Add water to mung beans and rinse well a few times. Drain the water and soak it in 3 to 4 cups of water for 7 to 8 hours or over night.
- Next, drain the water and rinse it well. Pour socked mung beans over a wet kitchen towel, tie the wet towel with beans in it and place it aside for the beans to sprout.
- Next day, morning you should be able to see good amount of sprouts.
- Pour 4 cups water and sprouted beans in a pressure cooker. And 1 tsp of salt and a ½ inch piece of ginger. Pressure cook for 2 to 3 whistles or until done on a medium heat. (each pressure cooker is different)
NOTE: Like beans, lentils also contain FODMAPs. These sugars may contribute to excessive gas production and bloating. However, soaking or spouting the lentils before you eat them can make them much easier on the digestive system[healthline.com]. ... and cooking with ginger helps even more with reducing the gas.
Method:
- Heat a heavy bottom pan with 2 tbsp butter and ghee. Add the bay leaves, cinnamon and both cardamom to the butter, saute for half a minute. Then add onions and fry until they are translucent.
- Stir in ginger-garlic paste and saute for one minute or until the raw smell goes away.
- To the mixture, add the cut tomatoes and let it cook until soft.
- Add salt, red chill powder, turmeric powder, garam masala, sugar and amchur. Saute well until it smells good and turns thick.
- Now add the cooked moong beans to the mixture and add a cup of water.
- Cover and cook on a low flame until the dal thickens stirring often in between to prevent burning the bottom.
- Add cream or coconut milk and ½ cup water. Mix, cover and continue cooking on medium flame. Stir in-between.
- Once you see the oil starts to float on the top, crush kasuri methi between your palm and sprinkle over dal.
- Taste to check for salt and add more salt if needed. Add rest of the butter and mix well.
- Garnish dal makhani with butter or cream or coriander leaves and serve with naan, roti/chapati or rice

Labels: Curry, Lentil, North Indian dish, Side-Dish, Vegetarian
~ Dal Makhani with Mung beans [Hesaru Kalu | Moong | Green Gram]
~
Posted by Swetha @ 7/26/2020 01:07:00 AM ::
Swetha's Fusion ::
permalink
Moong Dal | Split Green Gram (Mung Beans) curry
Monday, June 08, 2020
Moong dal is one of the common curry/dal made. In our house, it is part of what we call comfort food. Dal basically means lentil (also referred to lentil curry). There are many variances in the recipes. What I am sharing is the most simplest one I learned from my mother-in-law, a Bengali style dal. Among all the lentils, Moong dal and Masoor dal cooks fast and easiest to digest as well. Moong dal has a cooling effect too, which is additional benefit besides all its nutritional properties. In India, as many are vegetarian, lentil is the main source for protein intake and hence one will find wide variety of recipes which calls for one or more legume to be used in a recipe.
Ingredients:
- 1 cup - Moong dal (split green gram or Mung beans)
- 1 inch - Fresh ginger (or ½ tsp ginger powder)
- ½ tsp - Turmeric powder
- 1 tbsp - Ghee
- 1 tsp - Panch Phoron (combination of five seasoning seeds - Fenugreek/Methi seeds, Nigella/Kalonji seeds, Cumin/Jeera seeds, Black mustard/Sarso seeds and Fennel/Saunf (or sonp) seeds)
- ¼ tsp - Asafoetida (hing)
- 3 - Red chilies (or as per taste)
- 1 - Lime
- Salt - as per taste
- Chopped Coriander leaves for garnish
Preparing dal with Pressure cooker:
- Wash Moong dal several times until water runs clear. Soak for about 15 minutes and drain.
- Transfer the dal into a pressure cooker. Add about 3 cups of water.
- On medium heat, cook dal for 1 to 2 whistle. This depends on the cooker design
- Turn of the flame and let the pressure be released.
- If it is convenient, you may continue to cook in the pressure cooker with the lid remove or transfer cooked dal to a saucepan
- With back of a ladle mash the cook dal to the sides of the pan.
- Put the saucepan on medium flame.
- To the cooked dal, add salt and turmeric powder.
- With flat side of a knife or a mortar and pestle, crush ginger and add it to simmering dal.
- Meanwhile prepare for the seasoning.
- Heat ghee in a small seasoning pan, when ghee becomes hot, add Panch Phoran. Break red chilies and add to the hot ghee. Once seeds starts splattering, add asafoetida/hing. (Optional: few curry leaves may also be added)
- Pour the hot seasoning to the dal.
- Lower the heat and let dal simmer for 5 more minutes.
- Turn of the heat and add chopped coriander leaves (May add lemon juice too)
- Serve Moong dal hot with lemon wedges on the side.
- Goes well with rice and/or roti/chapati.
Preparing with Microwave:
...and another variation of tempering dal in the same saucepan rather than at the end
- Wash Moong dal several times until water runs clear. Soak for 15 minutes and drain.
- Transfer the dal into a microwave safe bowl. Take a bigger bowl as it may spillover as the dal comes to a boil.
- Add about 2 cups of water. Microwave on high-heat for about 10 mins. (this depends on the microwave oven)
- Heat ghee in a saucepan on medium flame. when ghee becomes hot, add Panch Phoran. Break red chilies and add to the hot ghee. Once seeds starts splattering, add asafoetida/hing. (Optional: few curry leaves may also be added)
- Now, carefully add cooked dal to the tempering in the saucepan. Please note that the ghee is hot.
- Stir and reduce the flame.
- With back of a ladle mash the cook dal to the sides of the pan.
- To the cooked dal, add salt and turmeric powder. Stir
- With flat side of a knife or a mortar and pestle, crush ginger and add it to simmering dal.
- Let it simmer for 5 more minutes.
- Turn off and stir-in chopped coriander leaves
- Serve Moong dal hot with lemon wedges on the side.
- Goes well with rice or roti/chapati.

Labels: Curry, Lentil, Vegetarian
~ Moong Dal | Split Green Gram (Mung Beans) curry
~
Posted by Swetha @ 6/08/2020 09:28:00 PM ::
Swetha's Fusion ::
permalink


%20Dal%20with%20peanuts%20curry.jpg)